Render Storyblok Stories Dynamically in Next.js 14
Storyblok is the first headless CMS that works for developers & marketers alike.
In this short tutorial, we will see how to start making a real website with Next.js and Storyblok. We will add a layout that includes a navigation bar and a footer to our website to make it look better. We will also see how we can add new pages and render them dynamically according to the added components inside them.
If you’re in a hurry, you can explore or fork the code from the Next Ultimate Tutorial GitHub Repository.
Requirements
This is a part of the Ultimate Tutorial Guide for Next.js (opens in a new window). You can find the previous part of the series here (opens in a new window), which shows you how to integrate Storyblok and Next.js in 5 minutes. We recommend you take a look at that tutorial before starting this one.
We will be using the code from the 5 minutes tutorial as a starting point. You can find it here.
Adding a Layout
Let’s add a layout to our website by creating a static navigation bar and a footer. We will look at how to create dynamic navigation bars in an upcoming tutorial of this series.
Make two files in your components folder, Navigation.js and Footer.js
Add the following code to Navigation.js file -
"use client"
import { useState } from "react";
import Link from "next/link";
const Navigation = () => {
  const [openMenu, setOpenMenu] = useState(false);

  return (
    <div className="relative bg-white border-b-2 border-gray-100">
      <div className="max-w-7xl mx-auto px-4 sm:px-6">
        <div className="flex justify-between items-center  py-6 md:justify-start md:space-x-10">
          <div className="flex justify-start lg:w-0 lg:flex-1">
            <Link href="/">

                <span className="sr-only">Storyblok</span>
                <img
                  className="h-20 w-auto sm:h-10 hidden sm:block"
                  src='https://a.storyblok.com/f/88751/251x53/0d3909fe96/storyblok-primary.png'
                  alt="Storyblok"
                />
                <img
                  className="h-20 w-auto sm:h-10 sm:hidden"
                  src='https://a.storyblok.com/f/88751/92x106/835caf912a/storyblok-logo.png'
                  alt="Storyblok"
                />

            </Link>
          </div>
          <div className="-mr-2 -my-2 md:hidden">
            <button
              type="button"
              onClick={() => setOpenMenu(true)}
              className="bg-white rounded-md p-2 inline-flex items-center justify-center text-gray-400 hover:text-gray-500 hover:bg-gray-100 focus:outline-none focus:ring-2 focus:ring-inset focus:ring-indigo-500"
              aria-expanded="false"
            >
              <span className="sr-only">Open menu</span>
              {/* <!-- Heroicon name: outline/menu --> */}
              <svg
                className="h-6 w-6"
                xmlns="http://www.w3.org/2000/svg"
                fill="none"
                viewBox="0 0 24 24"
                stroke="currentColor"
                aria-hidden="true"
              >
                <path
                  strokeLinecap="round"
                  strokeLinejoin="round"
                  strokeWidth="2"
                  d="M4 6h16M4 12h16M4 18h16"
                />
              </svg>
            </button>
          </div>
          <div className="hidden md:flex items-center justify-end md:flex-1 lg:w-0 space-x-10">
            <Link href="/about" className="text-base font-medium text-gray-500 hover:text-gray-900">

                About
            </Link>
            <Link href="/blog-articles" className="text-base font-medium text-gray-500 hover:text-gray-900">

                Blog
            </Link>
            <Link href="/services" className="text-base font-medium text-gray-500 hover:text-gray-900">

                Services
            </Link>
          </div>
        </div>
      </div>

      {/* <!--
        Mobile menu, show/hide based on mobile menu state.
      --> */}
      {openMenu && (
        <div className="absolute top-0 inset-x-0 p-2 transition transform origin-top-right md:hidden">
          <div className="rounded-lg shadow-lg ring-1 ring-black ring-opacity-5 bg-white divide-y-2 divide-gray-50">
            <div className="pt-5 pb-6 px-5">
              <div className="flex items-center justify-between">
                <div>
                  <img
                    className="h-8 w-auto"
                    src="https://a.storyblok.com/f/88751/92x106/835caf912a/storyblok-logo.png"
                    alt="Storyblok"
                  />
                </div>
                <div className="-mr-2">
                  <button
                    type="button"
                    onClick={() => setOpenMenu(false)}
                    className="bg-white rounded-md p-2 inline-flex items-center justify-center text-gray-400 hover:text-gray-500 hover:bg-gray-100 focus:outline-none focus:ring-2 focus:ring-inset focus:ring-indigo-500"
                  >
                    <span className="sr-only">Close menu</span>
                    {/* <!-- Heroicon name: outline/x --> */}
                    <svg
                      className="h-6 w-6"
                      xmlns="http://www.w3.org/2000/svg"
                      fill="none"
                      viewBox="0 0 24 24"
                      stroke="currentColor"
                      aria-hidden="true"
                    >
                      <path
                        strokeLinecap="round"
                        strokeLinejoin="round"
                        strokeWidth="2"
                        d="M6 18L18 6M6 6l12 12"
                      />
                    </svg>
                  </button>
                </div>
              </div>
              <div className="mt-6">
                <nav className="grid gap-y-8">
                  <Link href="/about" className="-m-3 p-3 flex items-center rounded-md hover:bg-gray-50">
                      {/* <!-- Heroicon name: outline/chart-bar --> */}
                      <span className="ml-3 text-base font-medium text-gray-900">

                        About
                      </span>
                  </Link>
                  <Link href="/blog-articles" className="-m-3 p-3 flex items-center rounded-md hover:bg-gray-50">
                      {/* <!-- Heroicon name: outline/cursor-click --> */}
                      <span className="ml-3 text-base font-medium text-gray-900">

                        Blog
                      </span>
                  </Link>
                  <Link href="/services" className="-m-3 p-3 flex items-center rounded-md hover:bg-gray-50">
                      <span className="ml-3 text-base font-medium text-gray-900">

                        Services
                      </span>
                  </Link>
                </nav>
              </div>
            </div>
          </div>
        </div>
      )}
    </div>
  );
};

export default Navigation;
Similarly, add the following code to your Footer.js file -
const Footer = () => (
    <footer className="bg-white block w-full" aria-labelledby="footer-heading">
      <h2 id="footer-heading" className="sr-only">Footer</h2>
      <div className=" py-12 mx-auto max-w-7xl lg:py-16 px-12 lg:px-20">
        <div className="grid md:grid-cols-4 md:gap-8 grid-cols-2">
          <div className="mt-12 md:mt-0">
            <h3 className="text-xs font-semibold tracking-wider text-blue-600 uppercase">Support</h3>
            <ul role="list" className="mt-4 space-y-4">
              <li>
                <a href="#" className="text-sm font-normal text-gray-500 hover:text-gray-900"> Pricing </a>
              </li>
              <li>
                <a href="#" className="text-sm font-normal text-gray-500 hover:text-gray-900"> Documentation </a>
              </li>
              <li>
                <a href="#" className="text-sm font-normal text-gray-500 hover:text-gray-900"> Guides </a>
              </li>
              <li>
                <a href="#" className="text-sm font-normal text-gray-500 hover:text-gray-900"> API Status </a>
              </li>
            </ul>
          </div>
        </div>
      </div>
      <div className="px-5 py-12 mx-auto bg-gray-50  sm:px-6 md:flex md:items-center md:justify-between lg:px-20">
        <div className="flex justify-center mb-8 space-x-6 md:order-last md:mb-0">
          <a href="#" className="text-gray-400 hover:text-gray-500">
            <span className="sr-only">Facebook</span>
            <svg className="w-6 h-6" fill="currentColor" viewBox="0 0 24 24" aria-hidden="true">
              <path fillRule="evenodd" d="M22 12c0-5.523-4.477-10-10-10S2 6.477 2 12c0 4.991 3.657 9.128 8.438 9.878v-6.987h-2.54V12h2.54V9.797c0-2.506 1.492-3.89 3.777-3.89 1.094 0 2.238.195 2.238.195v2.46h-1.26c-1.243 0-1.63.771-1.63 1.562V12h2.773l-.443 2.89h-2.33v6.988C18.343 21.128 22 16.991 22 12z" clipRule="evenodd"></path>
            </svg>
          </a>
          <a href="#" className="text-gray-400 hover:text-gray-500">
            <span className="sr-only">Instagram</span>
            <svg className="w-6 h-6" fill="currentColor" viewBox="0 0 24 24" aria-hidden="true">
              <path fillRule="evenodd" d="M12.315 2c2.43 0 2.784.013 3.808.06 1.064.049 1.791.218 2.427.465a4.902 4.902 0 011.772 1.153 4.902 4.902 0 011.153 1.772c.247.636.416 1.363.465 2.427.048 1.067.06 1.407.06 4.123v.08c0 2.643-.012 2.987-.06 4.043-.049 1.064-.218 1.791-.465 2.427a4.902 4.902 0 01-1.153 1.772 4.902 4.902 0 01-1.772 1.153c-.636.247-1.363.416-2.427.465-1.067.048-1.407.06-4.123.06h-.08c-2.643 0-2.987-.012-4.043-.06-1.064-.049-1.791-.218-2.427-.465a4.902 4.902 0 01-1.772-1.153 4.902 4.902 0 01-1.153-1.772c-.247-.636-.416-1.363-.465-2.427-.047-1.024-.06-1.379-.06-3.808v-.63c0-2.43.013-2.784.06-3.808.049-1.064.218-1.791.465-2.427a4.902 4.902 0 011.153-1.772A4.902 4.902 0 015.45 2.525c.636-.247 1.363-.416 2.427-.465C8.901 2.013 9.256 2 11.685 2h.63zm-.081 1.802h-.468c-2.456 0-2.784.011-3.807.058-.975.045-1.504.207-1.857.344-.467.182-.8.398-1.15.748-.35.35-.566.683-.748 1.15-.137.353-.3.882-.344 1.857-.047 1.023-.058 1.351-.058 3.807v.468c0 2.456.011 2.784.058 3.807.045.975.207 1.504.344 1.857.182.466.399.8.748 1.15.35.35.683.566 1.15.748.353.137.882.3 1.857.344 1.054.048 1.37.058 4.041.058h.08c2.597 0 2.917-.01 3.96-.058.976-.045 1.505-.207 1.858-.344.466-.182.8-.398 1.15-.748.35-.35.566-.683.748-1.15.137-.353.3-.882.344-1.857.048-1.055.058-1.37.058-4.041v-.08c0-2.597-.01-2.917-.058-3.96-.045-.976-.207-1.505-.344-1.858a3.097 3.097 0 00-.748-1.15 3.098 3.098 0 00-1.15-.748c-.353-.137-.882-.3-1.857-.344-1.023-.047-1.351-.058-3.807-.058zM12 6.865a5.135 5.135 0 110 10.27 5.135 5.135 0 010-10.27zm0 1.802a3.333 3.333 0 100 6.666 3.333 3.333 0 000-6.666zm5.338-3.205a1.2 1.2 0 110 2.4 1.2 1.2 0 010-2.4z" clipRule="evenodd"></path>
            </svg>
          </a>
          <a href="#" className="text-gray-400 hover:text-gray-500">
            <span className="sr-only">Twitter</span>
            <svg className="w-6 h-6" fill="currentColor" viewBox="0 0 24 24" aria-hidden="true">
              <path d="M8.29 20.251c7.547 0 11.675-6.253 11.675-11.675 0-.178 0-.355-.012-.53A8.348 8.348 0 0022 5.92a8.19 8.19 0 01-2.357.646 4.118 4.118 0 001.804-2.27 8.224 8.224 0 01-2.605.996 4.107 4.107 0 00-6.993 3.743 11.65 11.65 0 01-8.457-4.287 4.106 4.106 0 001.27 5.477A4.072 4.072 0 012.8 9.713v.052a4.105 4.105 0 003.292 4.022 4.095 4.095 0 01-1.853.07 4.108 4.108 0 003.834 2.85A8.233 8.233 0 012 18.407a11.616 11.616 0 006.29 1.84"></path>
            </svg>
          </a>
          <a href="#" className="text-gray-400 hover:text-gray-500">
            <span className="sr-only">GitHub</span>
            <svg className="w-6 h-6" fill="currentColor" viewBox="0 0 24 24" aria-hidden="true">
              <path fillRule="evenodd" d="M12 2C6.477 2 2 6.484 2 12.017c0 4.425 2.865 8.18 6.839 9.504.5.092.682-.217.682-.483 0-.237-.008-.868-.013-1.703-2.782.605-3.369-1.343-3.369-1.343-.454-1.158-1.11-1.466-1.11-1.466-.908-.62.069-.608.069-.608 1.003.07 1.531 1.032 1.531 1.032.892 1.53 2.341 1.088 2.91.832.092-.647.35-1.088.636-1.338-2.22-.253-4.555-1.113-4.555-4.951 0-1.093.39-1.988 1.029-2.688-.103-.253-.446-1.272.098-2.65 0 0 .84-.27 2.75 1.026A9.564 9.564 0 0112 6.844c.85.004 1.705.115 2.504.337 1.909-1.296 2.747-1.027 2.747-1.027.546 1.379.202 2.398.1 2.651.64.7 1.028 1.595 1.028 2.688 0 3.848-2.339 4.695-4.566 4.943.359.309.678.92.678 1.855 0 1.338-.012 2.419-.012 2.747 0 .268.18.58.688.482A10.019 10.019 0 0022 12.017C22 6.484 17.522 2 12 2z" clipRule="evenodd"></path>
            </svg>
          </a>
          <a href="#" className="text-gray-400 hover:text-gray-500">
            <span className="sr-only">Dribbble</span>
            <svg className="w-6 h-6" fill="currentColor" viewBox="0 0 24 24" aria-hidden="true">
              <path fillRule="evenodd" d="M12 2C6.48 2 2 6.48 2 12s4.48 10 10 10c5.51 0 10-4.48 10-10S17.51 2 12 2zm6.605 4.61a8.502 8.502 0 011.93 5.314c-.281-.054-3.101-.629-5.943-.271-.065-.141-.12-.293-.184-.445a25.416 25.416 0 00-.564-1.236c3.145-1.28 4.577-3.124 4.761-3.362zM12 3.475c2.17 0 4.154.813 5.662 2.148-.152.216-1.443 1.941-4.48 3.08-1.399-2.57-2.95-4.675-3.189-5A8.687 8.687 0 0112 3.475zm-3.633.803a53.896 53.896 0 013.167 4.935c-3.992 1.063-7.517 1.04-7.896 1.04a8.581 8.581 0 014.729-5.975zM3.453 12.01v-.26c.37.01 4.512.065 8.775-1.215.25.477.477.965.694 1.453-.109.033-.228.065-.336.098-4.404 1.42-6.747 5.303-6.942 5.629a8.522 8.522 0 01-2.19-5.705zM12 20.547a8.482 8.482 0 01-5.239-1.8c.152-.315 1.888-3.656 6.703-5.337.022-.01.033-.01.054-.022a35.318 35.318 0 011.823 6.475 8.4 8.4 0 01-3.341.684zm4.761-1.465c-.086-.52-.542-3.015-1.659-6.084 2.679-.423 5.022.271 5.314.369a8.468 8.468 0 01-3.655 5.715z" clipRule="evenodd"></path>
            </svg>
          </a>
        </div>
        <div className="mt-8 md:mt-0 md:order-1">
          <span className="mt-2 text-sm font-light text-gray-500">
            Copyright © 2017-2022
            <a href="#" className="mx-2 text-wickedblue hover:text-gray-500" rel="noopener noreferrer">Storyblok GmbH</a>
          </span>
        </div>
      </div>
    </footer>

    )

    export default Footer
Now we need to add these two components to our layout.js file in the app directory. Replace the code of the file with the the following code -
import { storyblokInit, apiPlugin} from "@storyblok/react/rsc"
import StoryblokProvider from "@/components/StoryblokProvider"
import Navigation from "@/components/Navigation"
import Footer from "@/components/Footer"

import './globals.css';

export const metadata = {
  title: 'Storyblok and Next.js 14',
  description: 'A Next.js and Storyblok app using app router ',
}

storyblokInit({
  accessToken: 'your-access-token',
  use: [apiPlugin]
})

export default function RootLayout({ children }) {
  return (
    <StoryblokProvider>
      <html lang="en">
        <body>
        <Navigation/>
          {children}
        <Footer/>
        </body>
      </html>
    </StoryblokProvider>
  )
}
Now, our home story should look something like this -
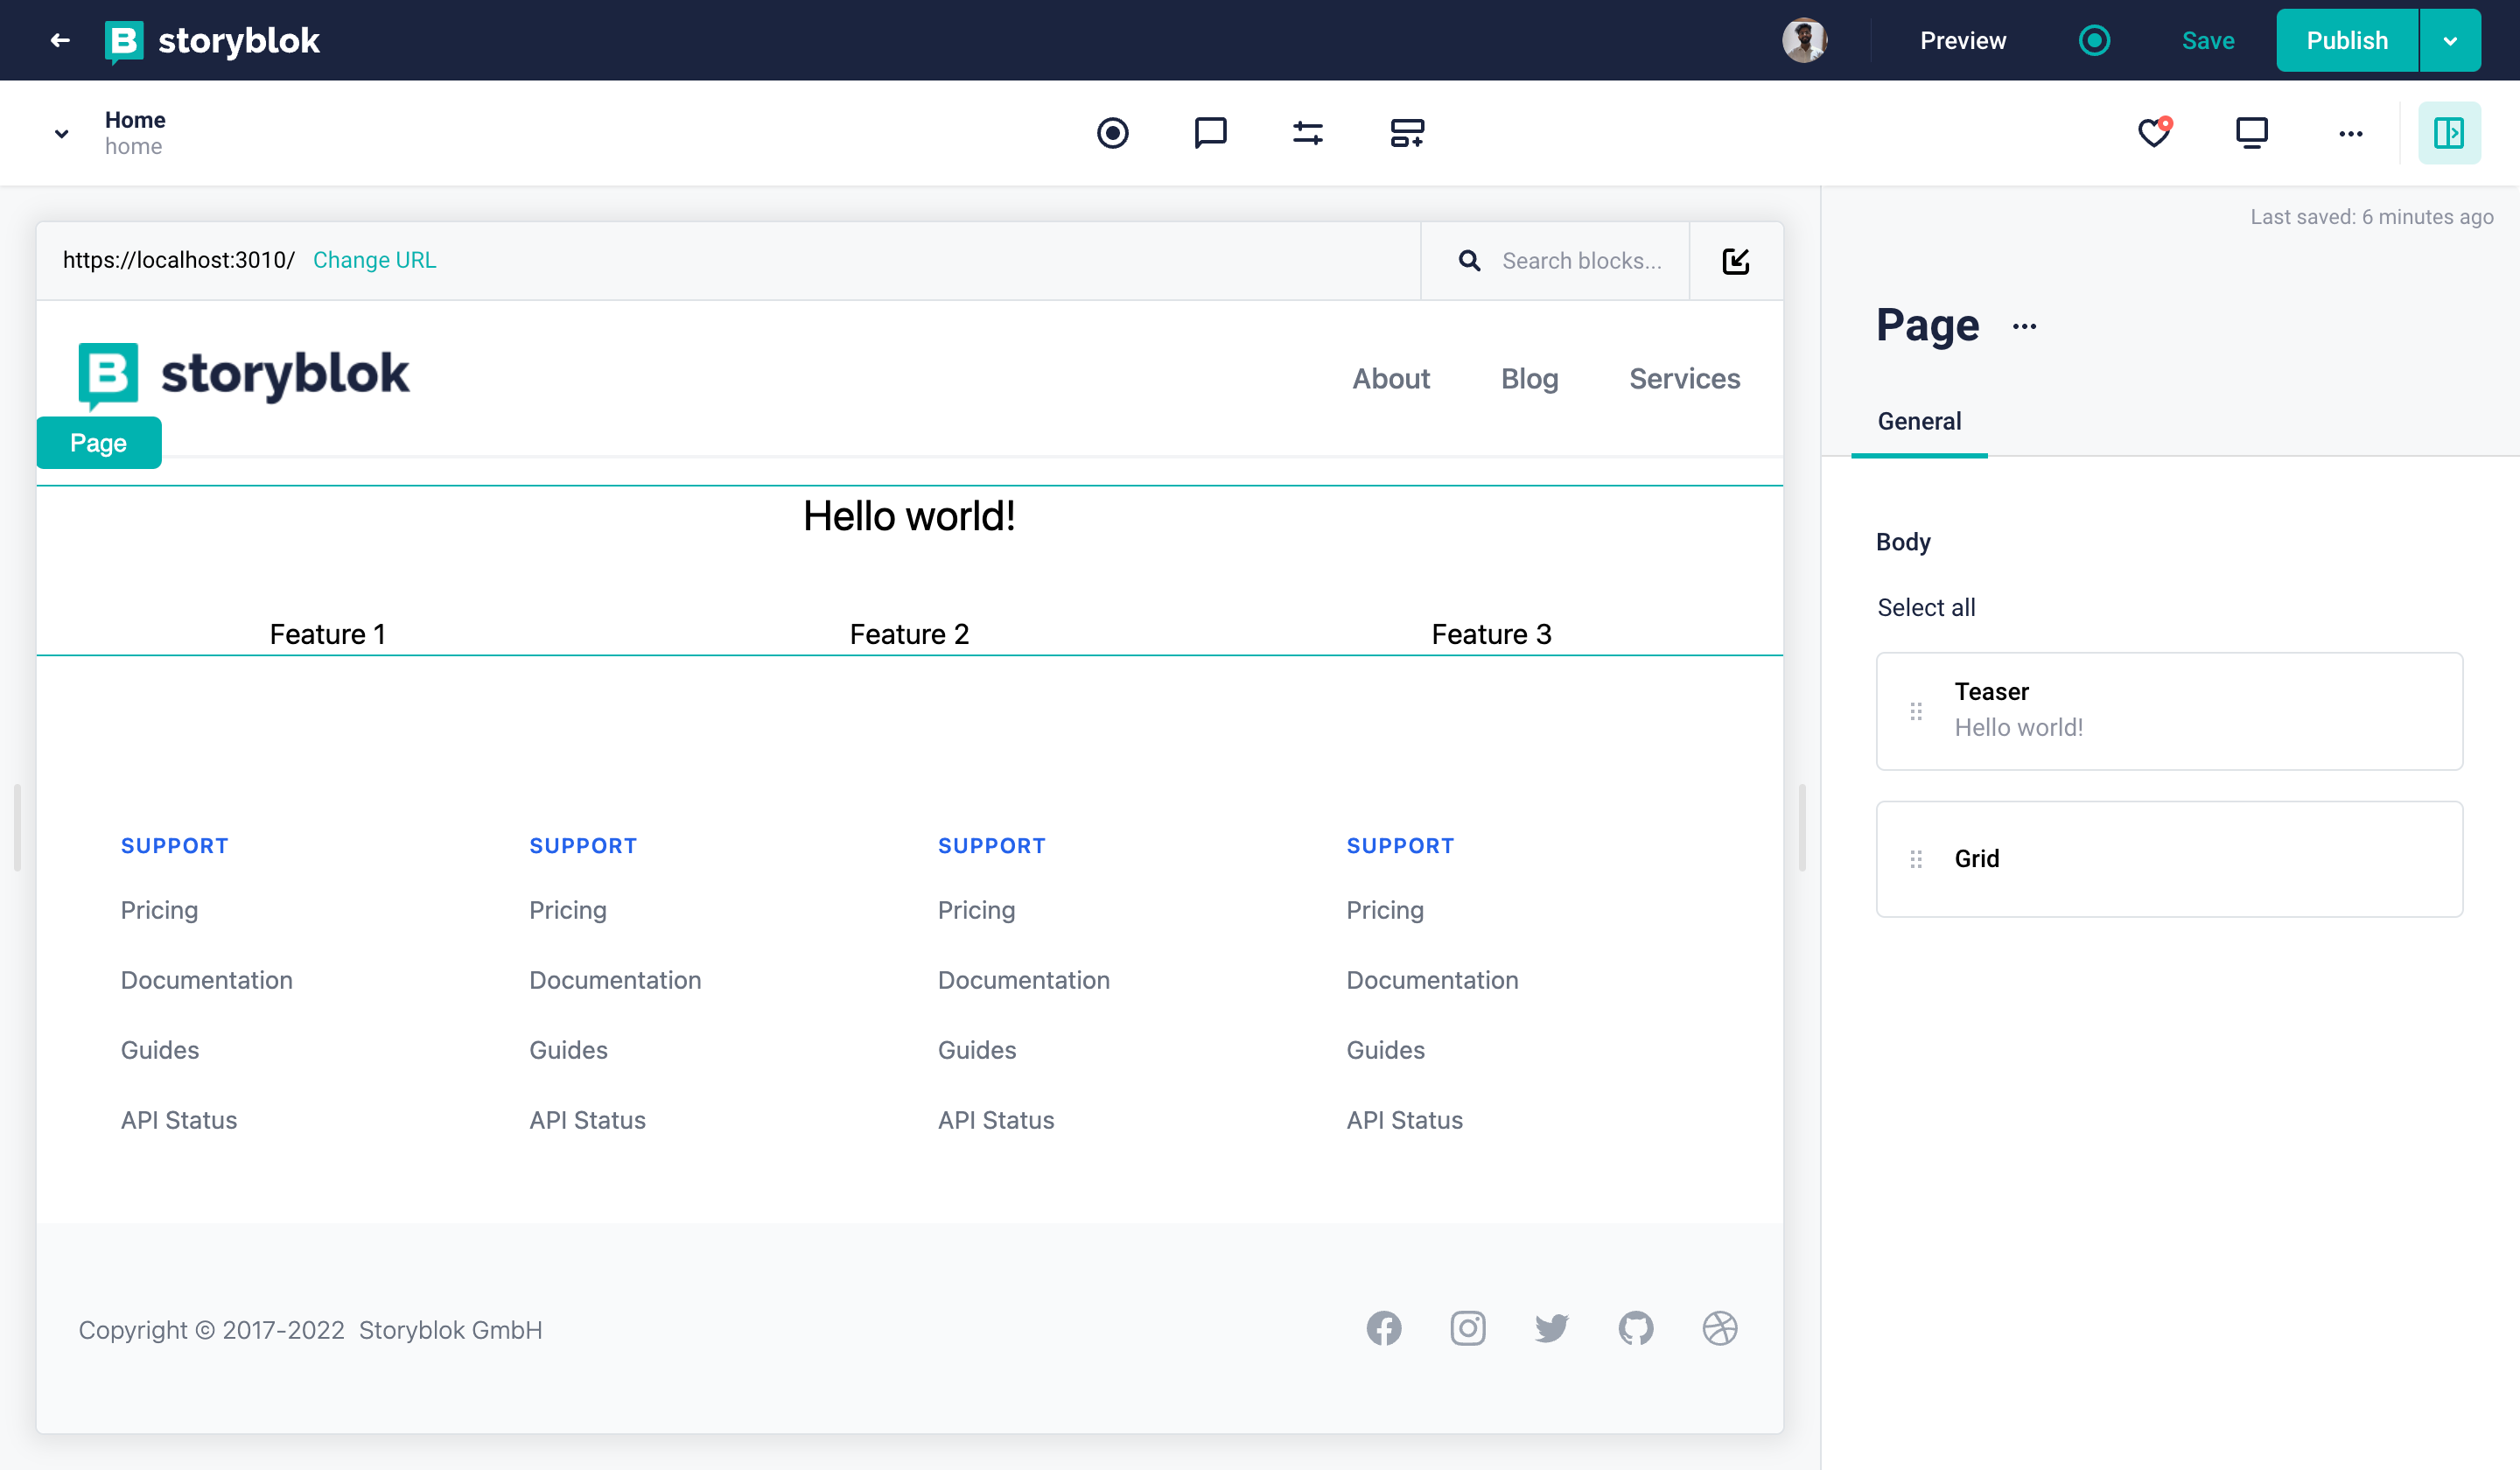
Home Story with a Layout
Right now, we can see that we have three entries in the navigation menu - About, Blog, and Services. But we don’t have any stories created for them. So, if we try to go on any of those links from our browser, we will get 404 - This page could not be found. Let’s add these stories to our space, but before that let's also see how to set up the dynamic route generation and catch all routes in Next.js so that we don't have to create files inside our Next.js app for every page we create inside Storyblok.
Catch all routes in Next.js: [[...slug]] folder
To create all routes programmatically, we need to create a folder [[...slug]] and a page.js file inside it to dynamically generate routes for all stories inside Storyblok. Here the [[...slug]] folder is used to catch all the routes. The page.js file will contain the logic to render those pages. Since we are catching all the routes here, we can delete the page.js file in the app directory for our index page (home slug). We will use the new file inside the new folder to handle everything.
You can read more about dynamic routes in Next.js here
Dynamic route generation with generateStaticParams
Next.js offers the generateStaticParams functionality to statically generate routes at build time instead of on-demand at request time. If you export an async function called generateStaticParams from a page that uses dynamic routes, Next.js will statically pre-render the paths depending on the logic inside the function. Add the following code to the page.js file.
import {
  getStoryblokApi,
} from "@storyblok/react/rsc";
import StoryblokStory from "@storyblok/react/story";

export const dynamicParams = true;

export default async function Page({params}) {
  let slug = params.slug ? params.slug.join("/") : "home";

  const storyblokApi = getStoryblokApi();
  let { data } = await storyblokApi.get(`cdn/stories/${slug}`, {version: 'draft', cv: Math.random()});

  return (
    <div>
      <StoryblokStory story={data.story} />
    </div>
  );
}


export async function generateStaticParams() {

  const storyblokApi = getStoryblokApi();
  let { data } = await storyblokApi.get("cdn/links/" ,{
      version: 'draft'
  });
  let paths = [];
  Object.keys(data.links).forEach((linkKey) => {
      if (data.links[linkKey].is_folder) {
      return;
      }
      const slug = data.links[linkKey].slug;

      if(slug == 'home'){
          return
      }

      let splittedSlug = slug.split("/");

      paths.push({ slug: splittedSlug });
  });
  return paths

}
On this dynamic page generation file, the function generateStaticParams reads all links from Storyblok(Line 25), this also includes draft links as we added the version to be draft. You can check what is returned from the links endpoint by appending your preview token to the following link: https://api.storyblok.com/v1/cdn/links?&version=draft&token=preview-token (Right now, we will just receive and see the home story in the response. But as we add more stories in Storyblok, we will see those as well.)
Then, we check each link that is returned from Storyblok, and it creates a page for every link except for any folder or the home slug itself. Then we return the paths array. This format depends on the type of dynamic segments. You can read more about the returns here.
Finally, for every route that we return, we fetch the data from Storyblok(Line 12) inside the Page function. We also manage the home slug inside the Page function.
In order not to have to change the real path & slugs constantly, it makes sense to already create the correct folder structure in Storyblok and use the catch all routes.
Adding pages to Storyblok
To create a new story, we need to go to the Content section {1} in our space. Once we are there, we will see a button Create New {2} on the top right corner. Click on the button. We will see two options - one to create a new story and another one to create a new folder. Let’s click on Story {3}
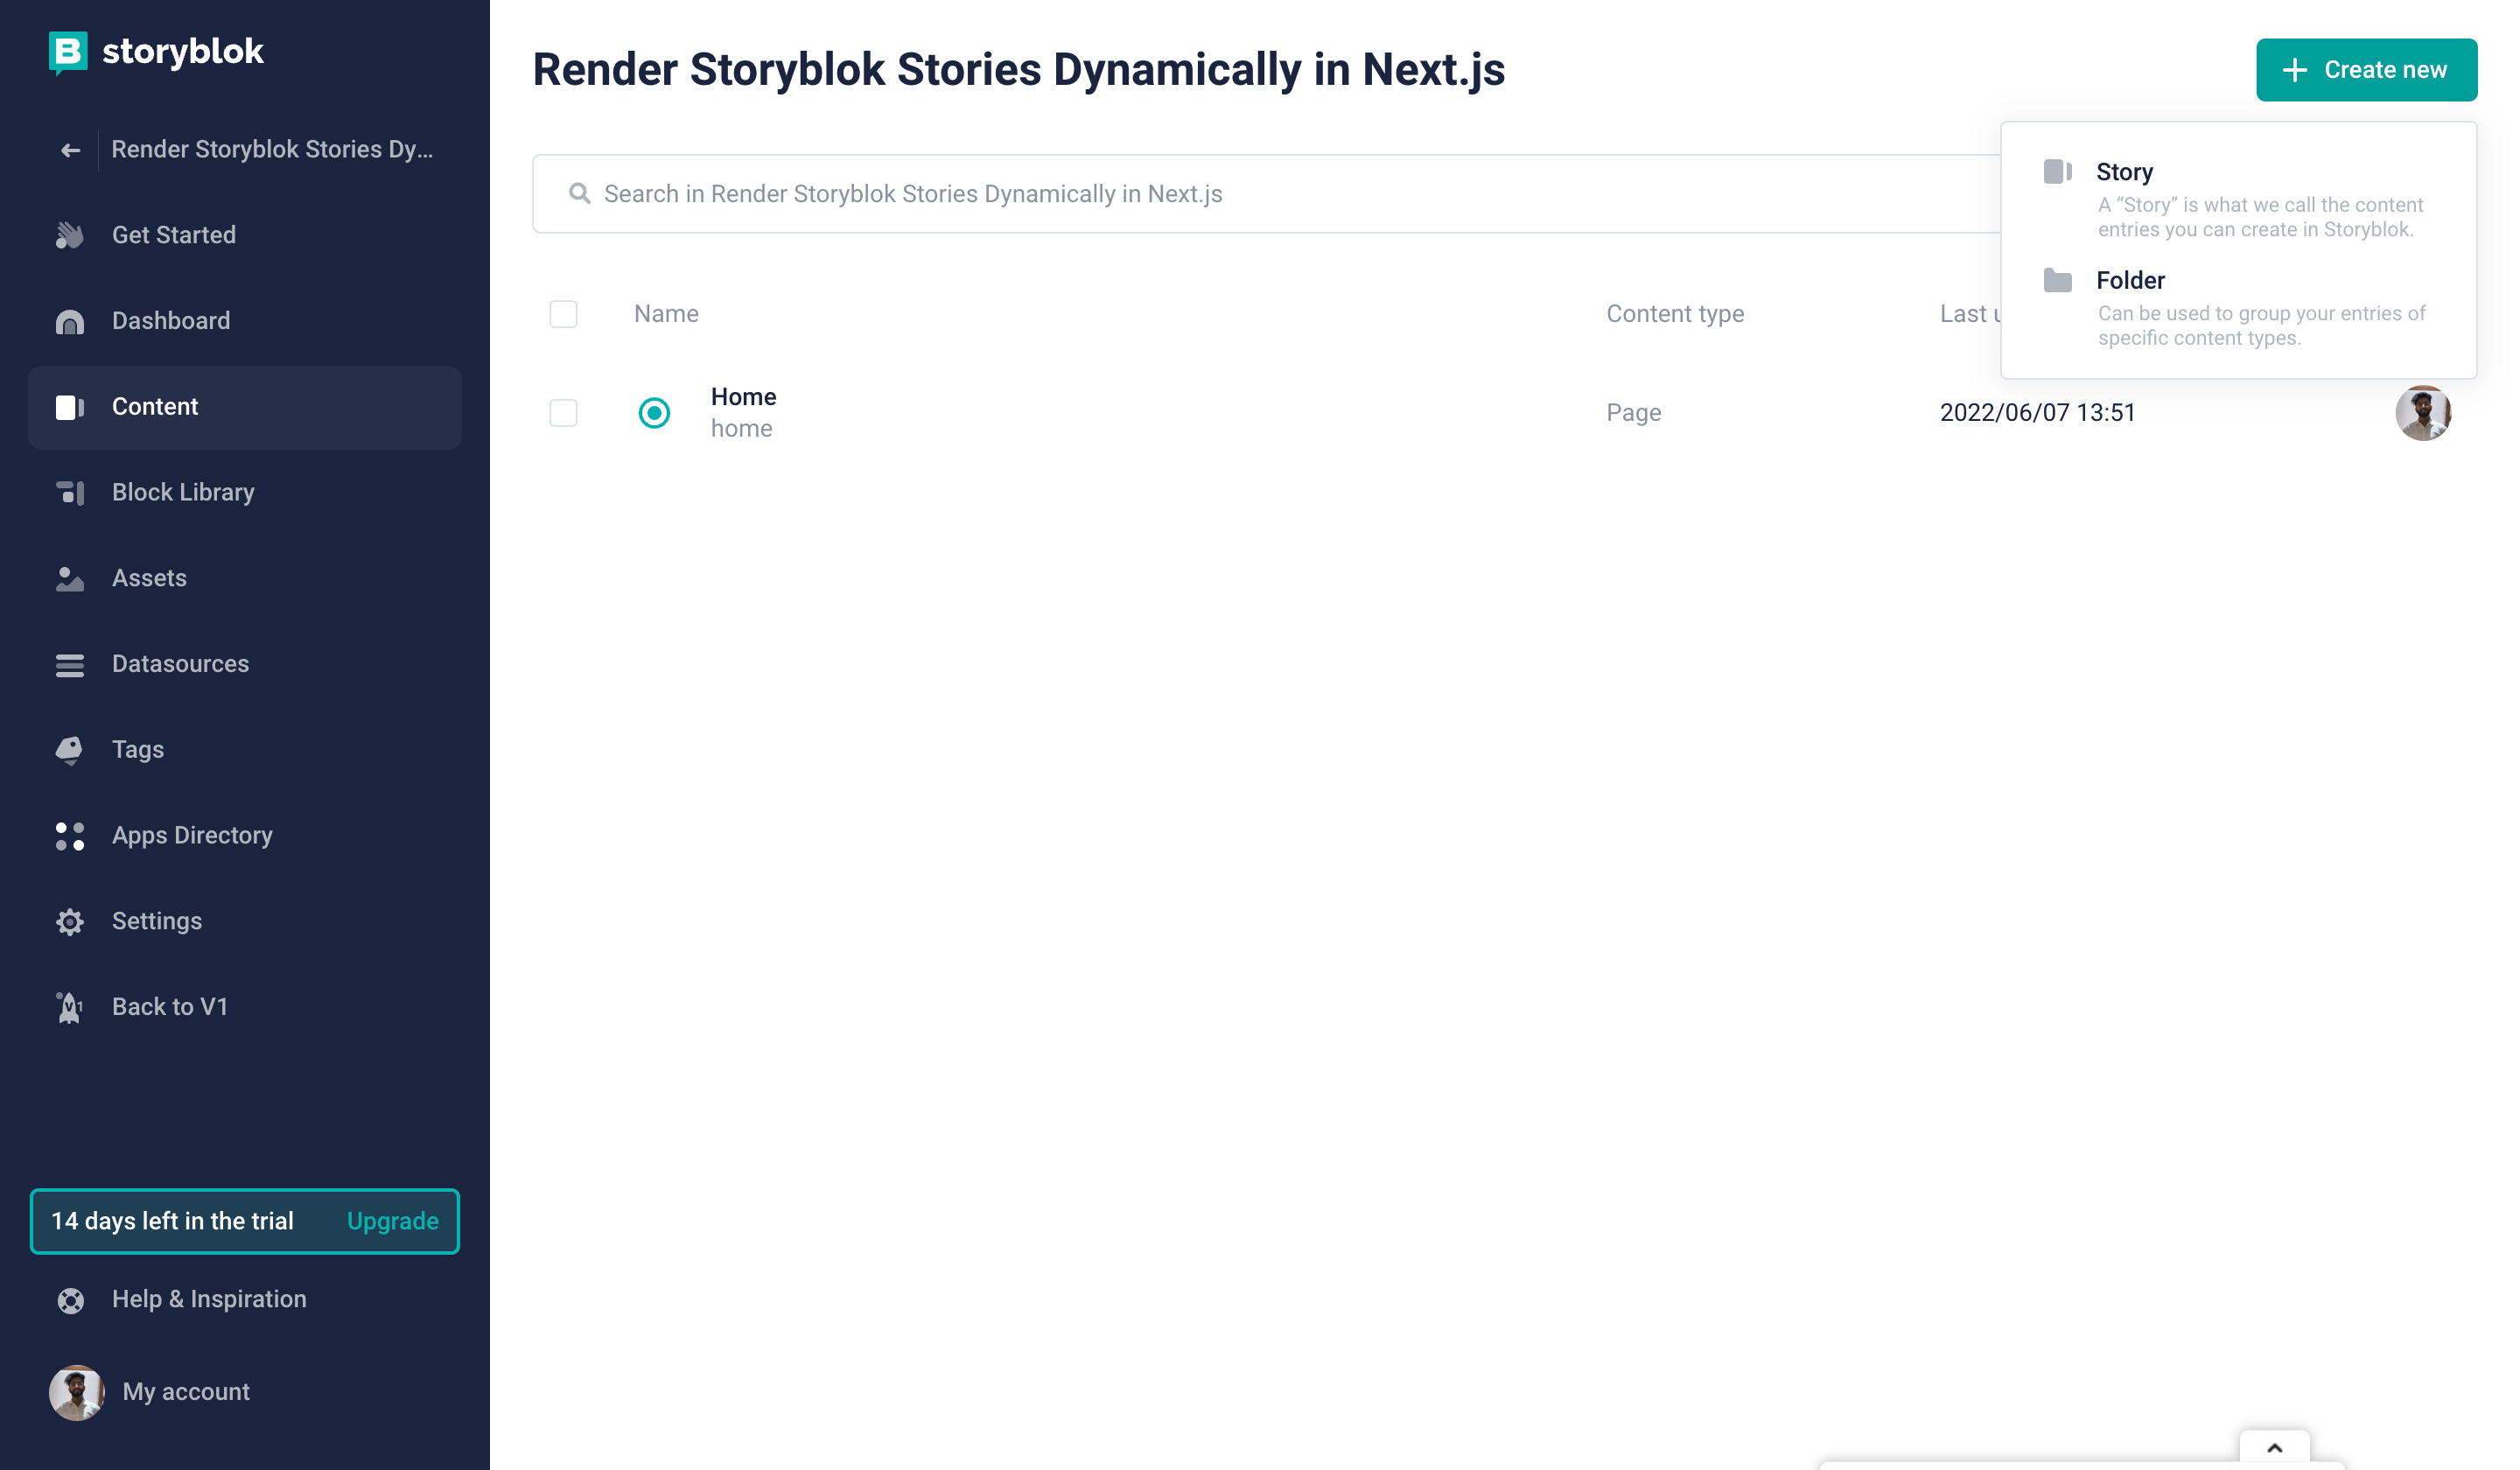
Create Button
Once we click on it, we will get a popup with a couple of fields to create a new story. Let’s create an About page. Fill the Name {1} and Slug {2} fields as in the image below -
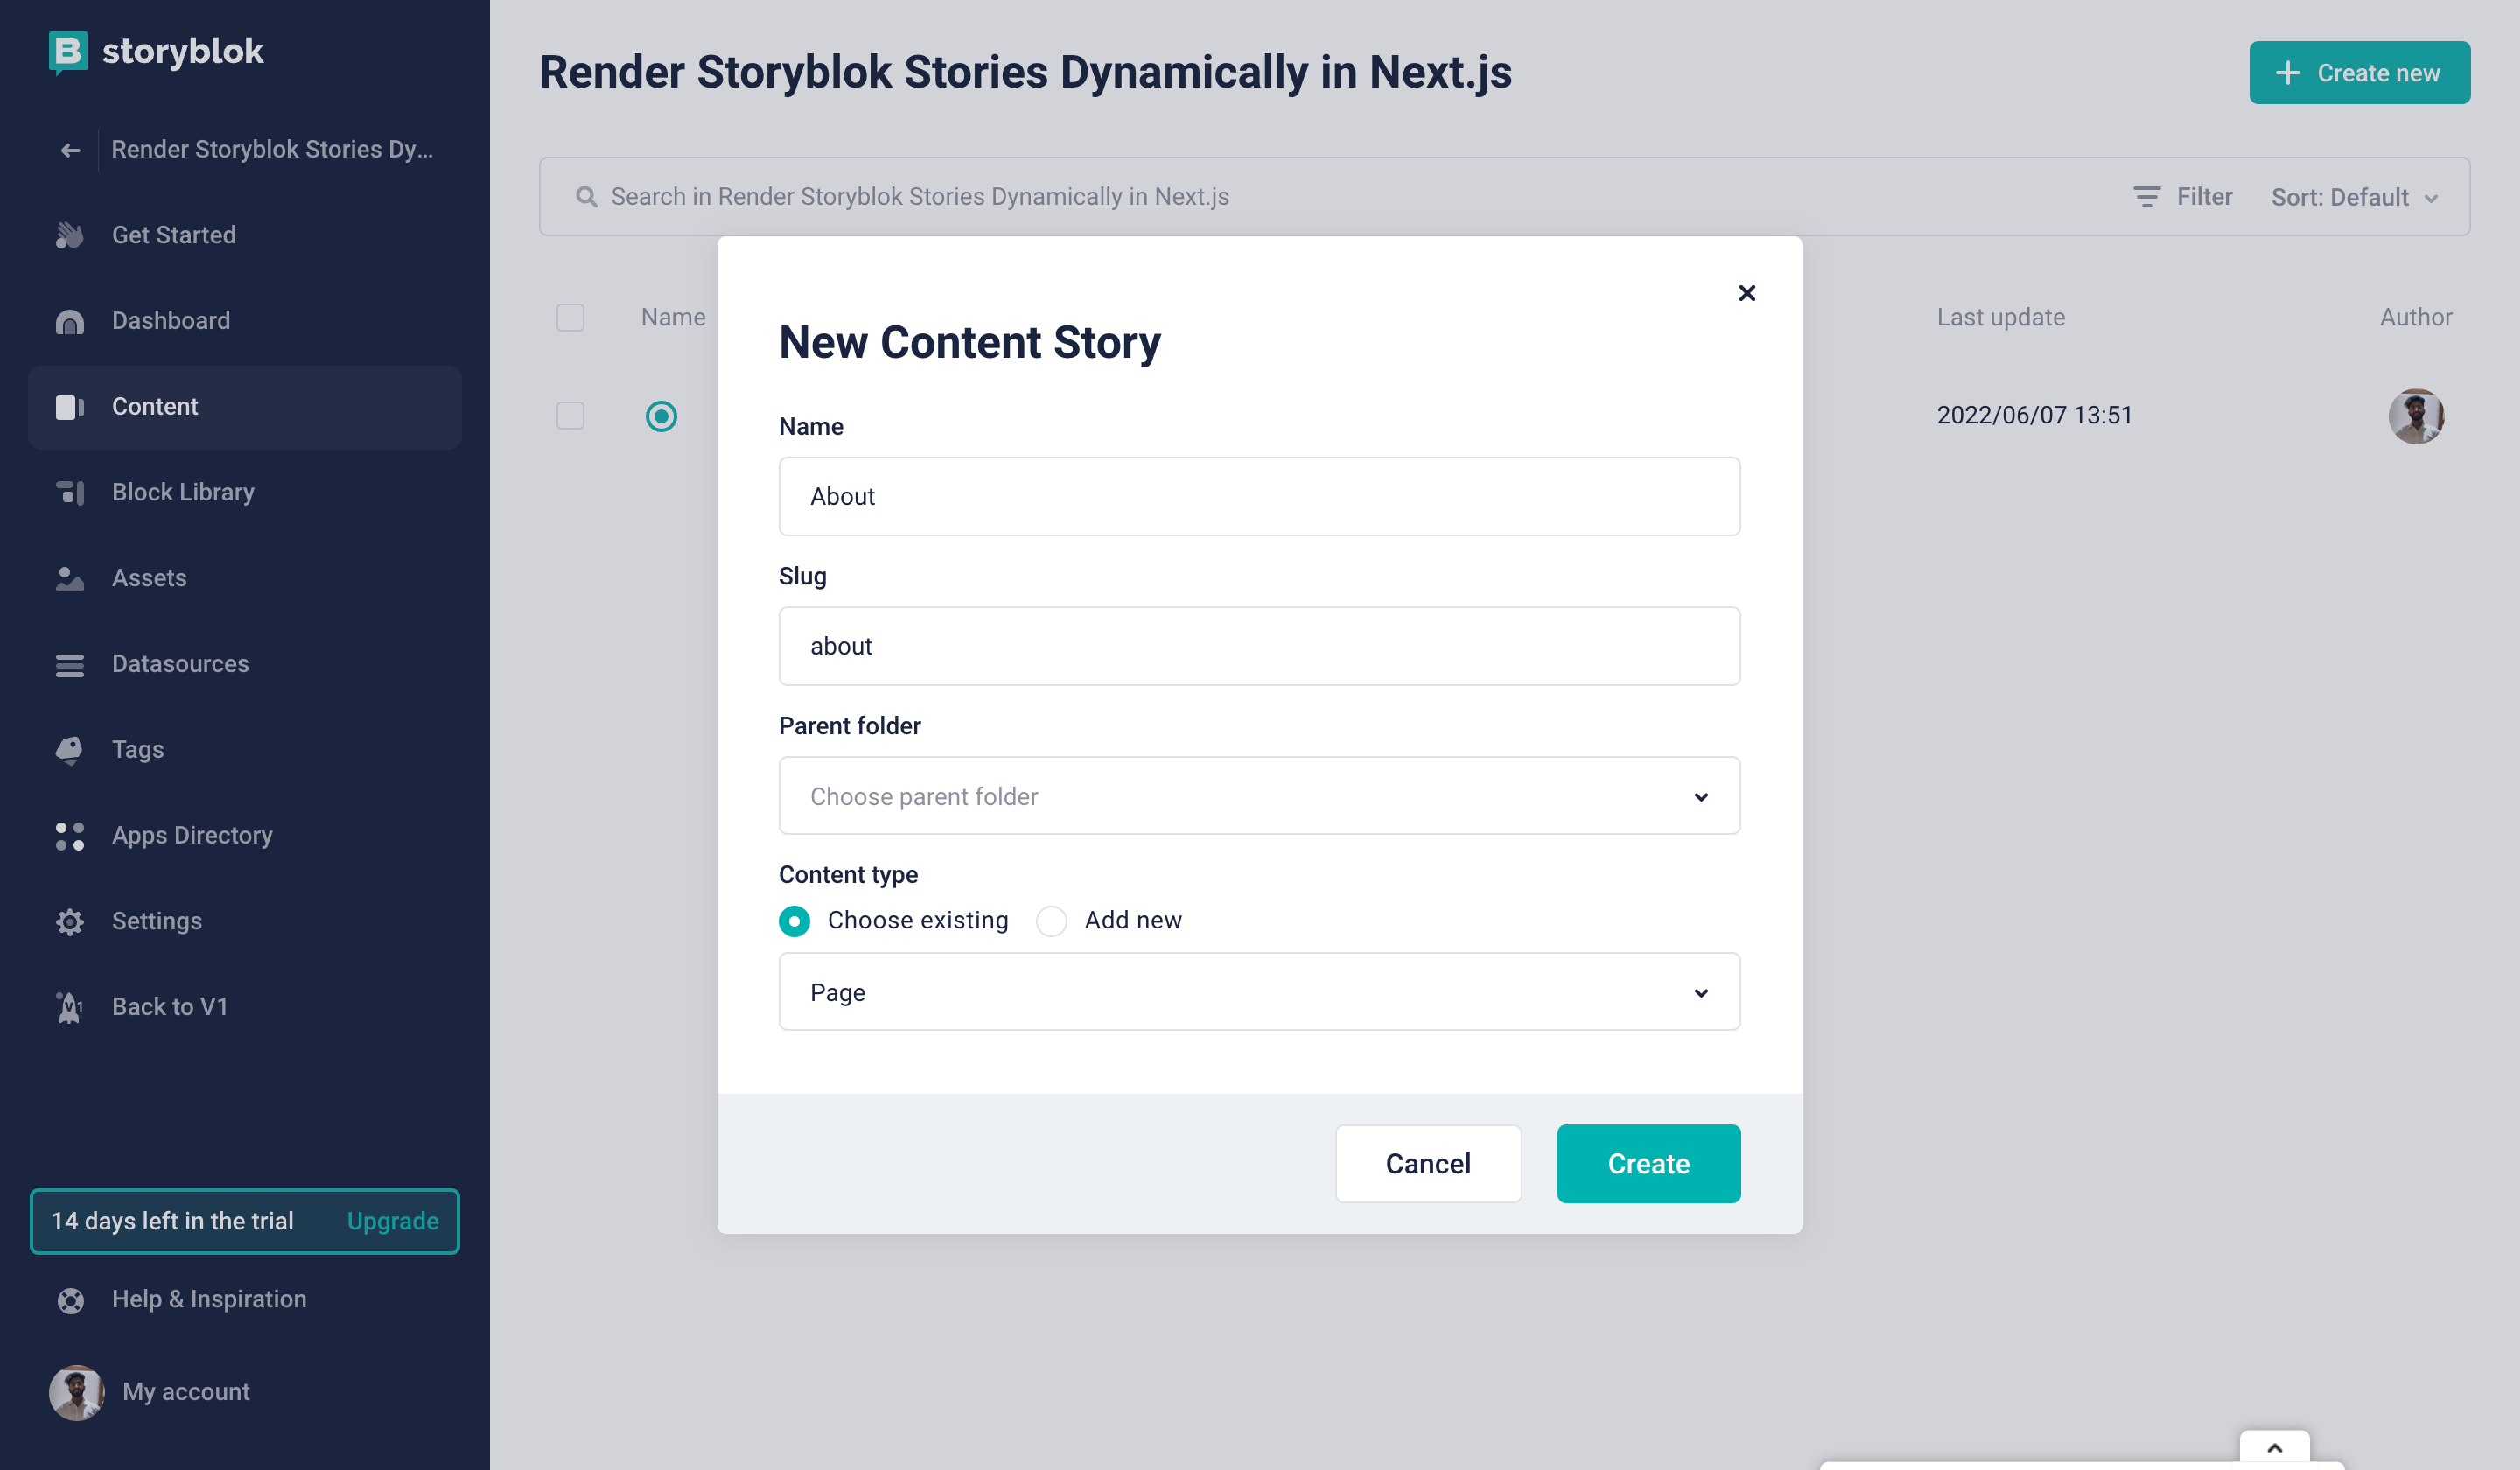
Create Story
Once we hit Create we will get a new story added, and we will have a page with just our layout. Since we don't see a 404 here, this means the page is being rendered with the help of our new structure.
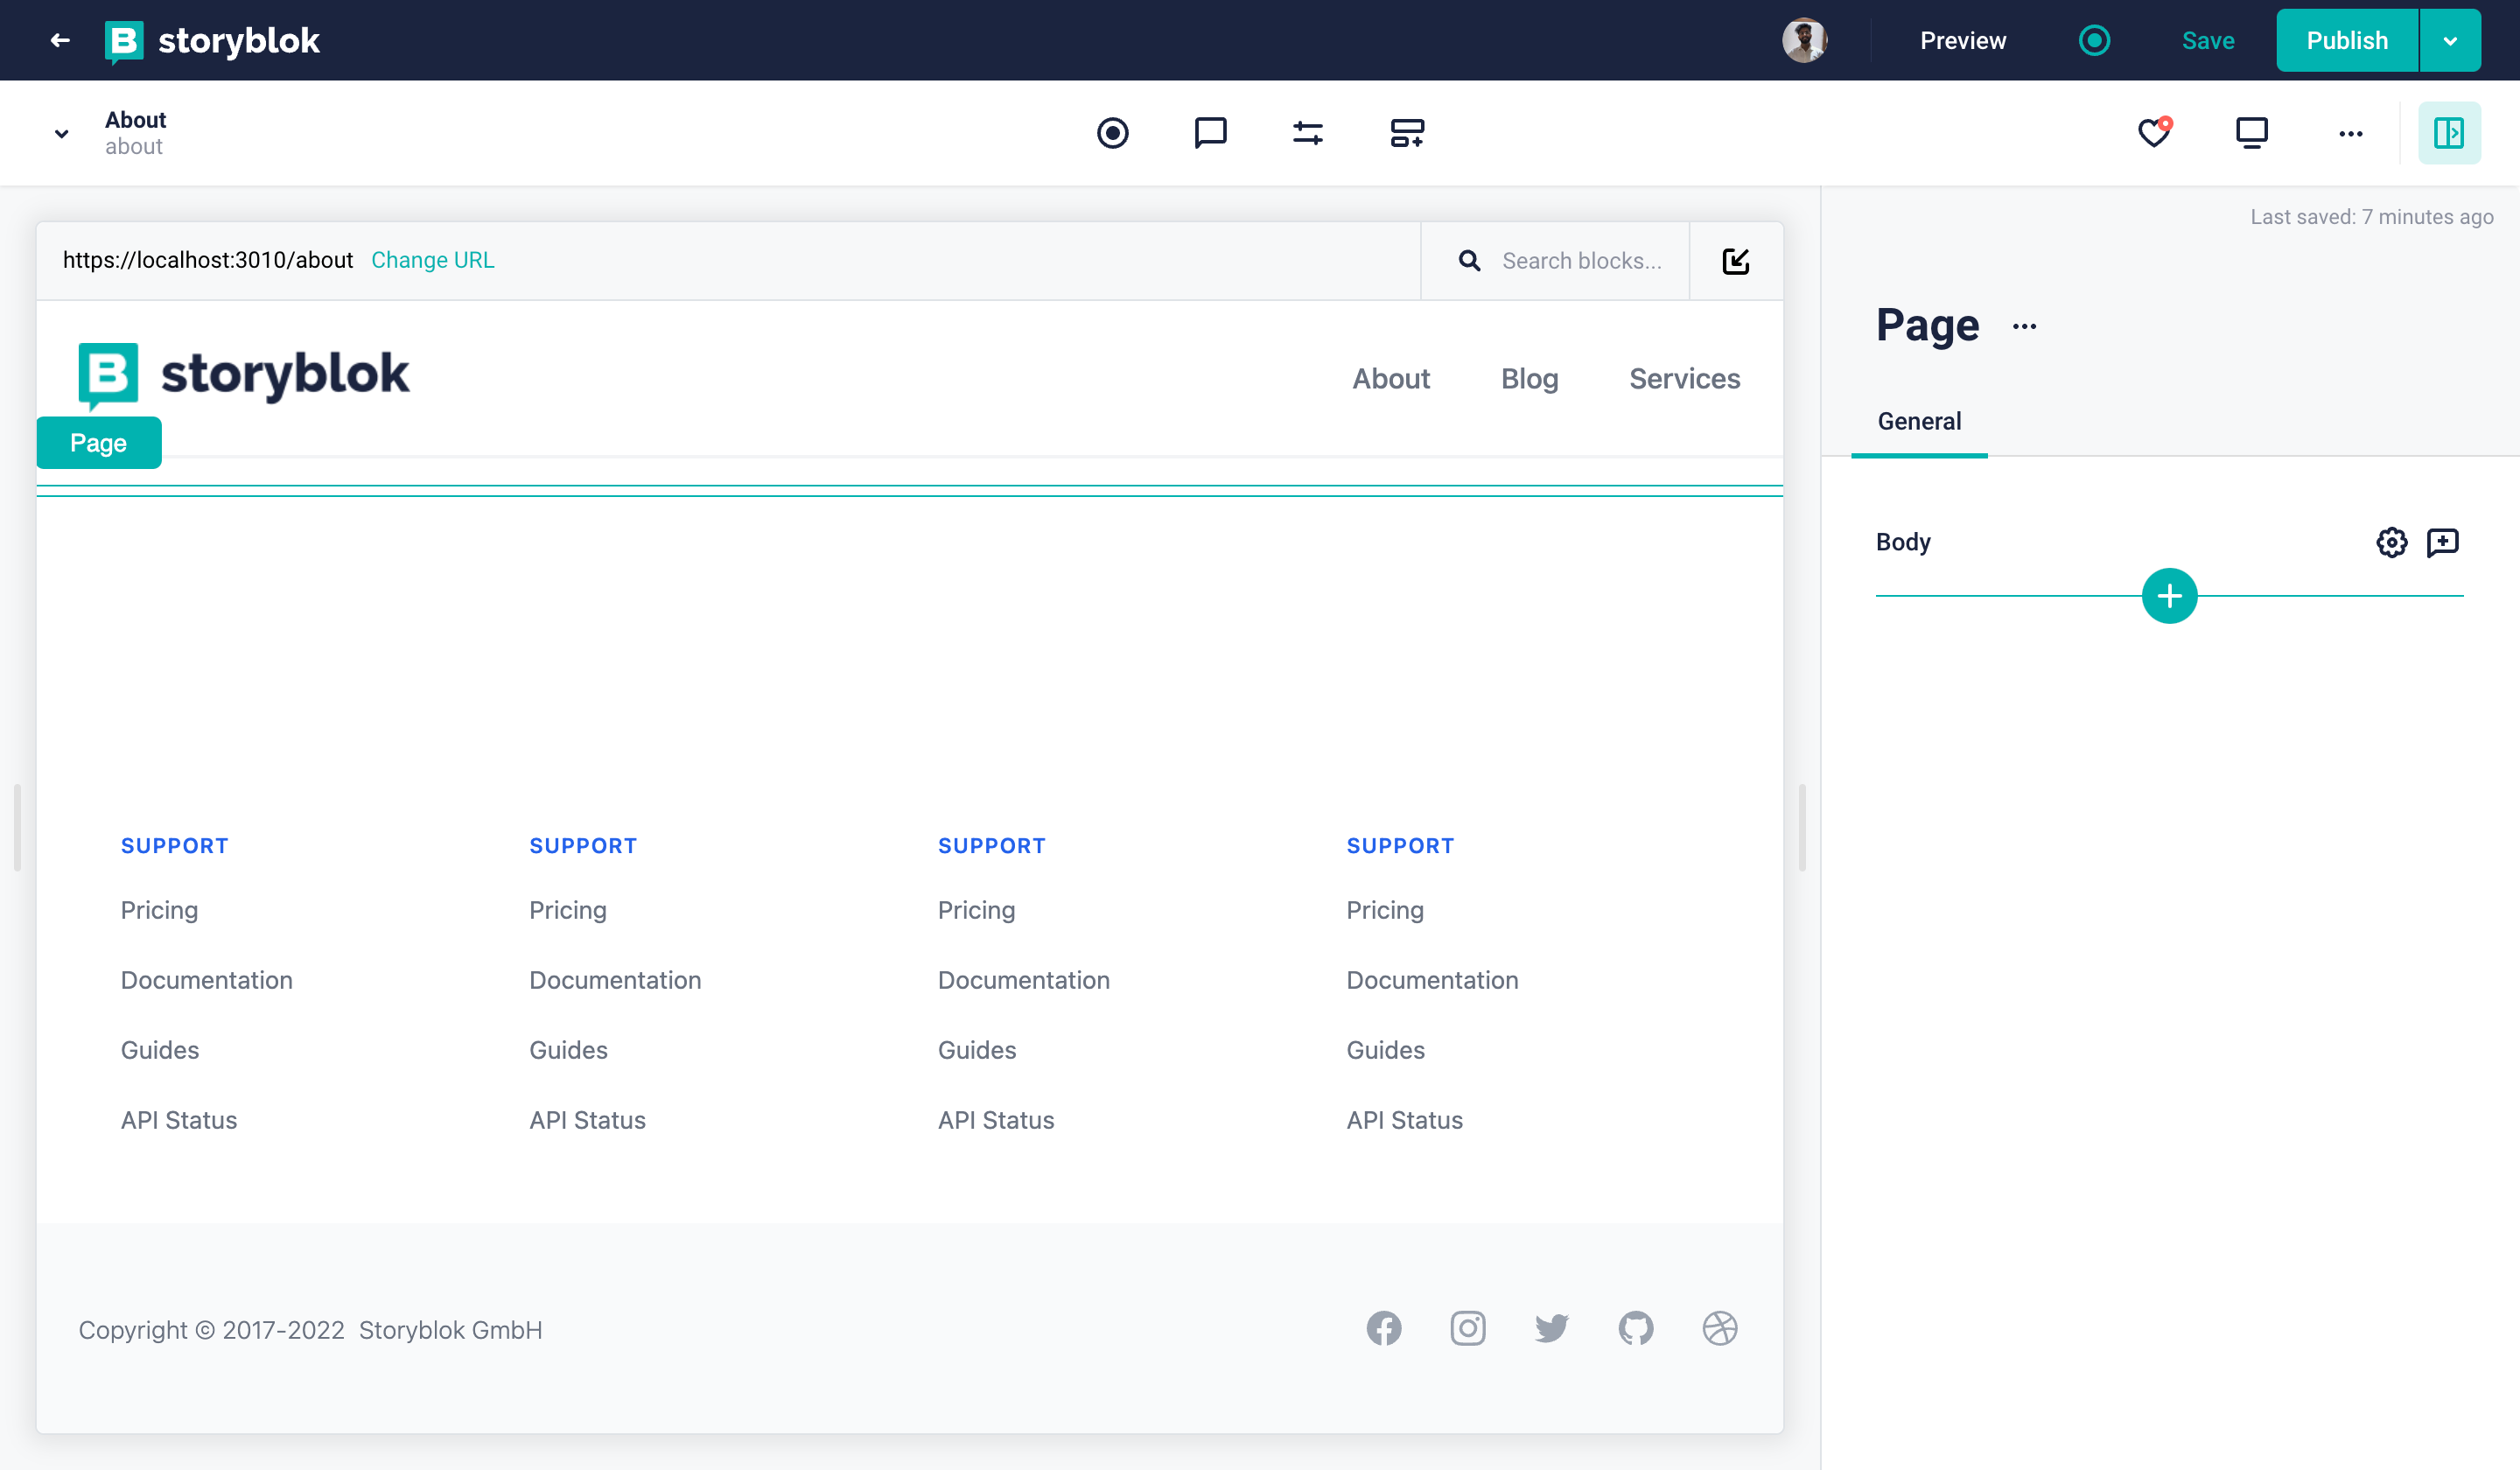
About Page
We can similarly create the Blog and the Services page as well. These stories are getting loaded with the new page.js file, which is catching the routes. Now, let’s also see how we can add the existing components to any of the pages.
On the right-hand side in the About story, we can see the empty body with a plus button that will allow us to add existing components to the page. If we click on it, we will see the following-
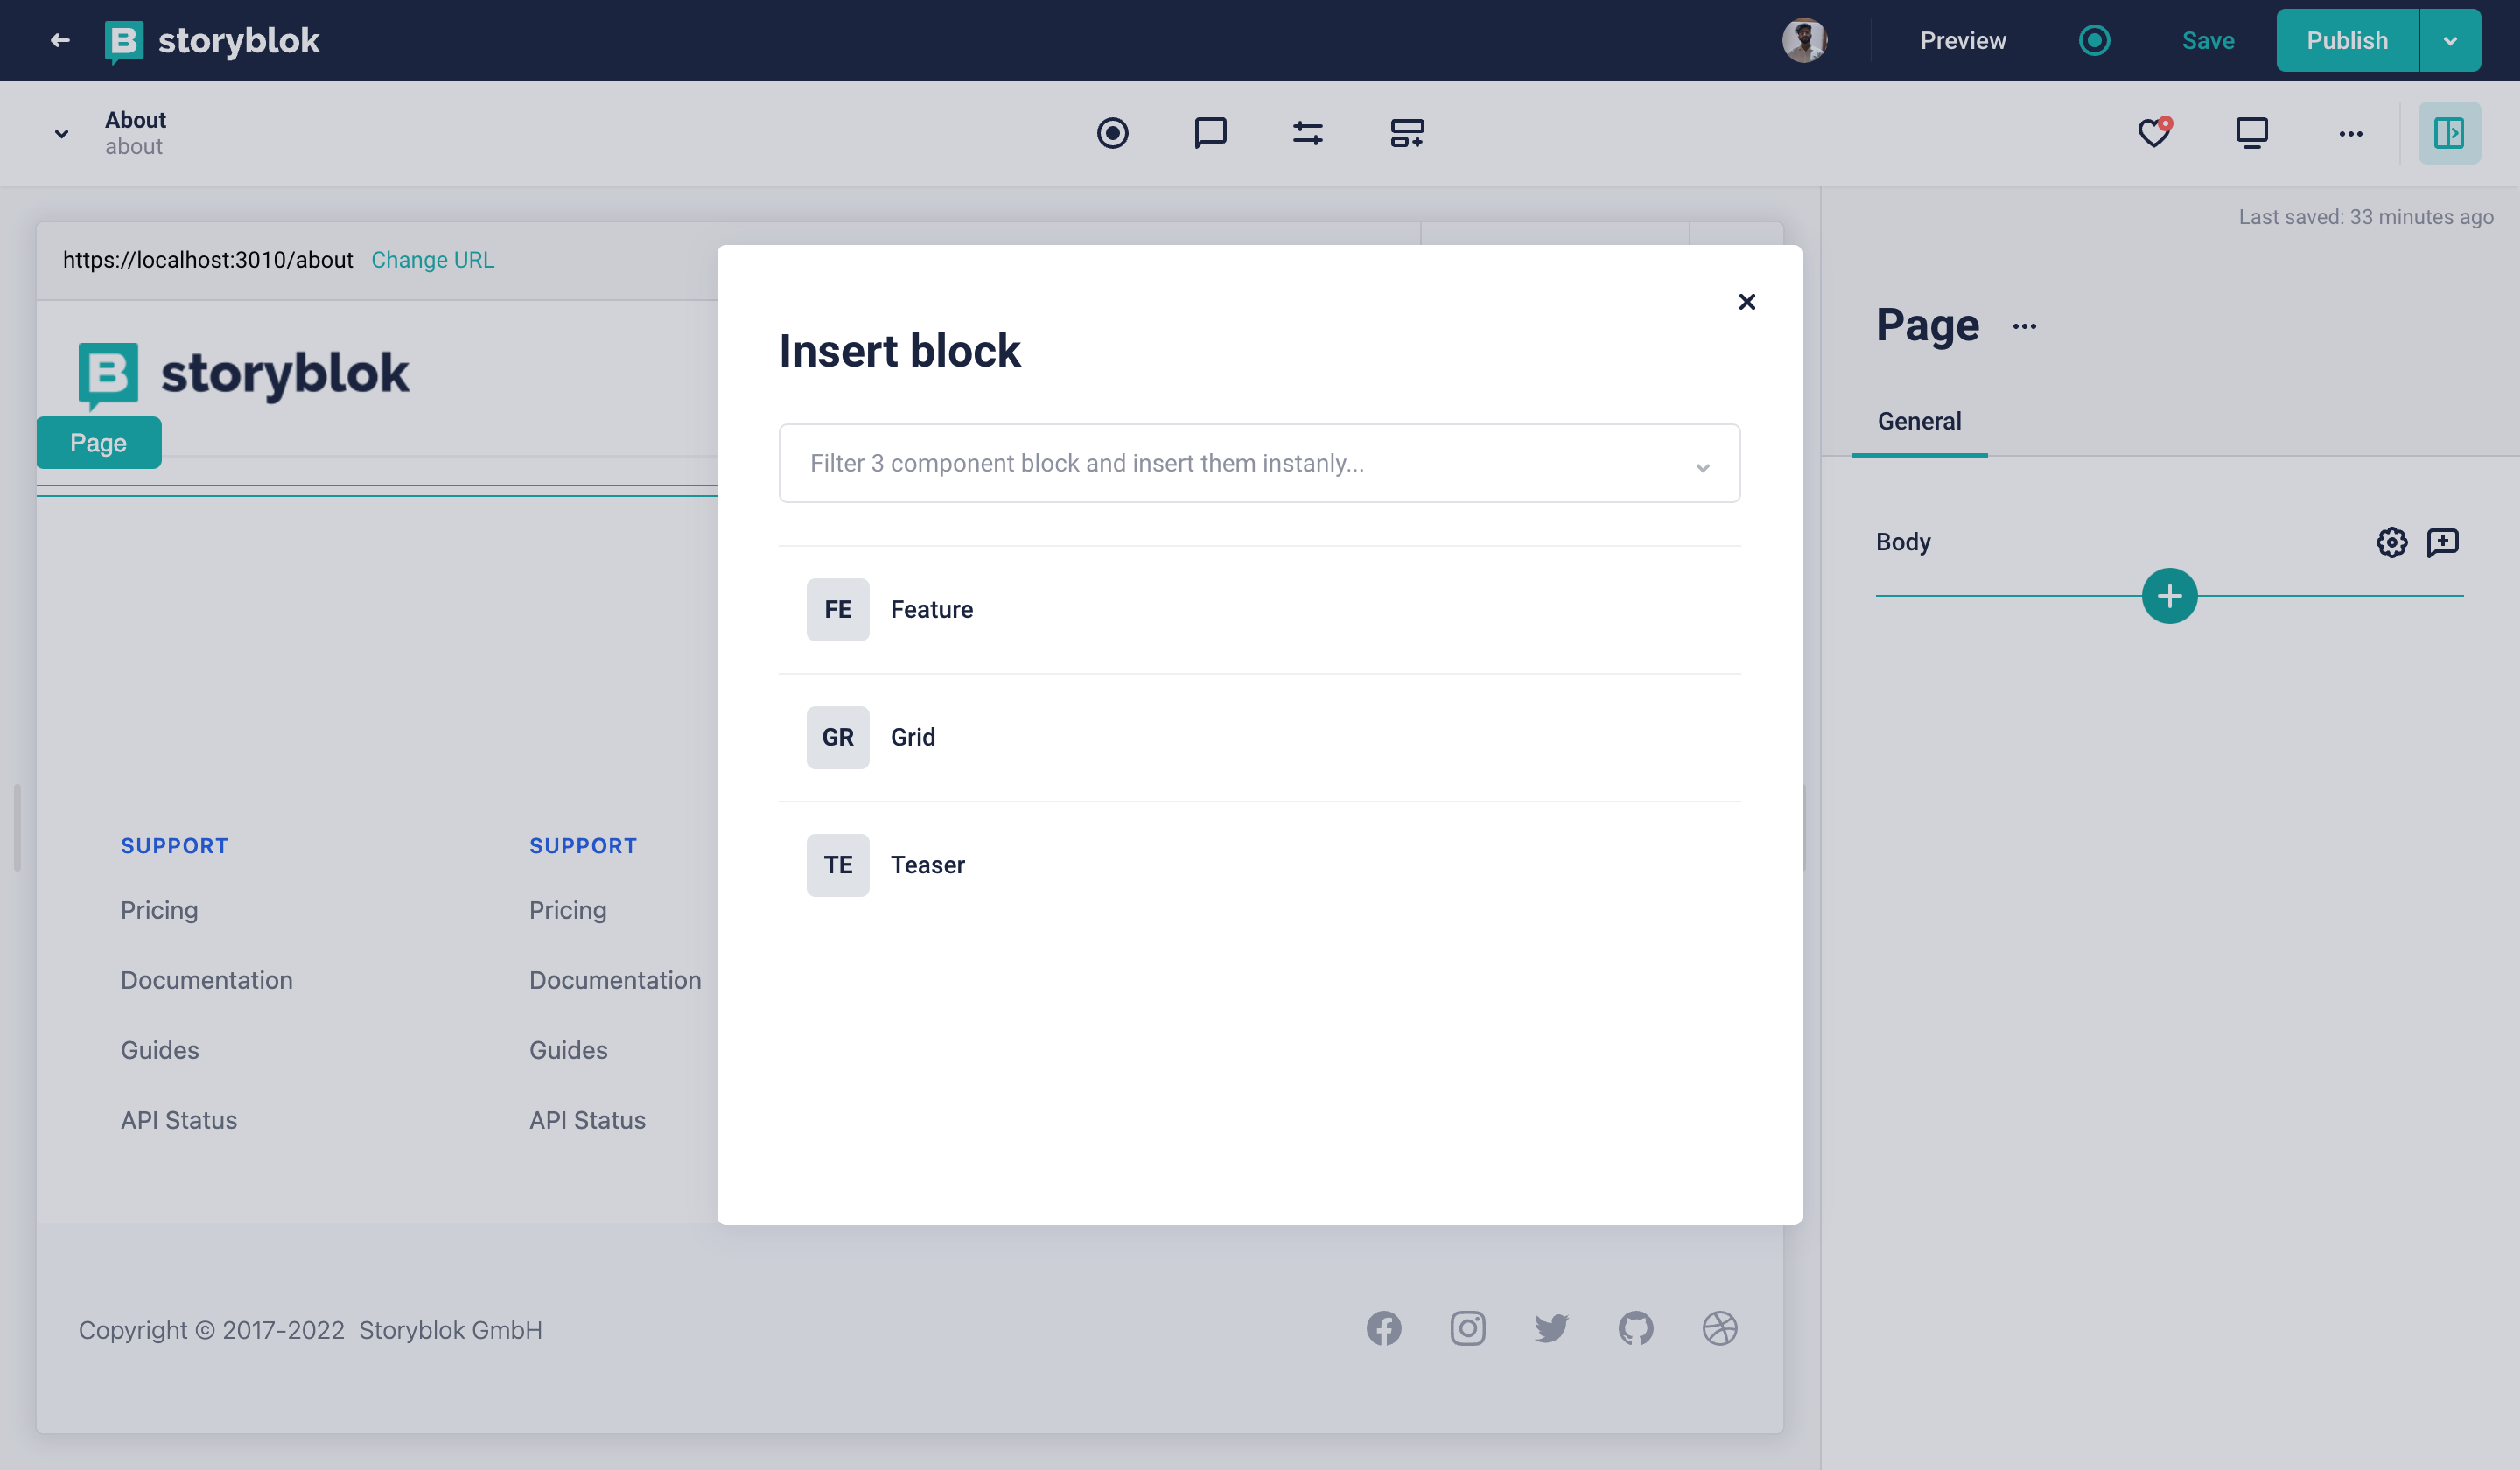
Add Components
We have a list of existing components, and we can choose any of them. Let’s add the Teaser component, and fill in the Name field for that. As soon as we start filling the content in, we see the changes on the visual editor as well.
Once we hover on the right-hand side, we should see a similar plus button below the Teaser. Let’s add a Grid component along with three Features as columns, similar to what we have on the home story. We should see something like this now -
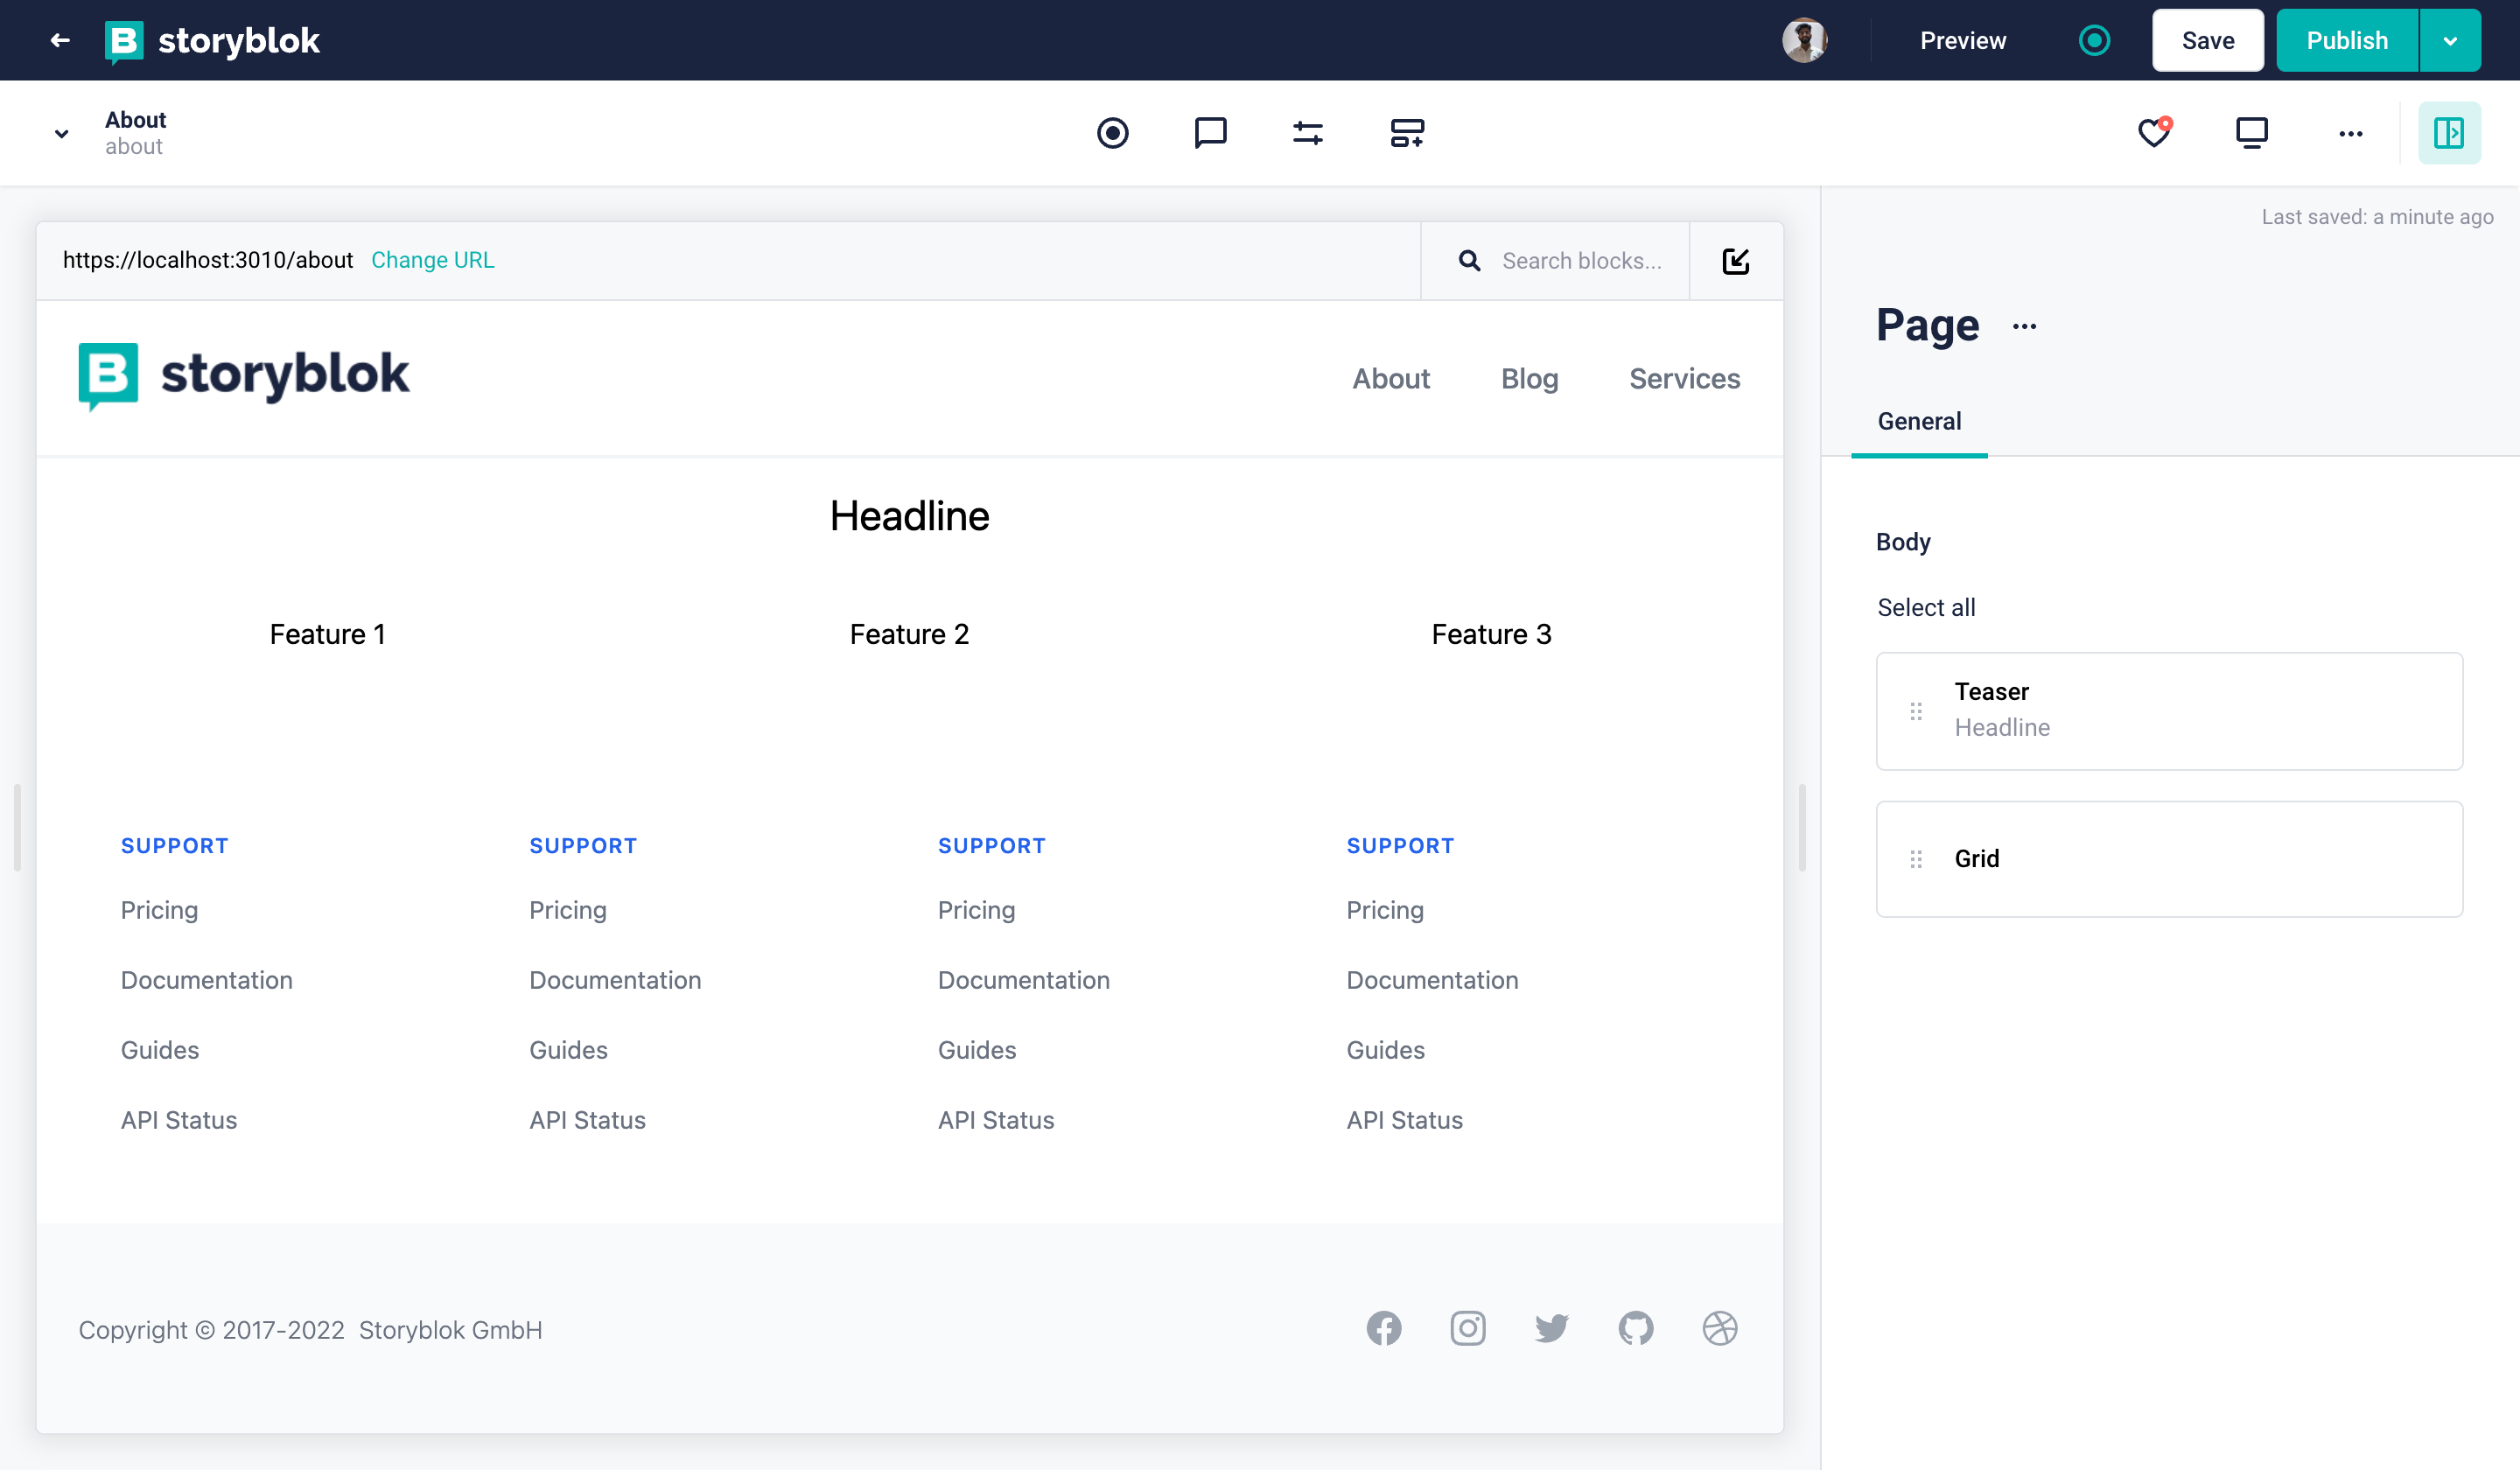
Grid Addition
In a similar way, we can add any other components and they will be rendered automatically. We could add another Grid and it should look something like this -
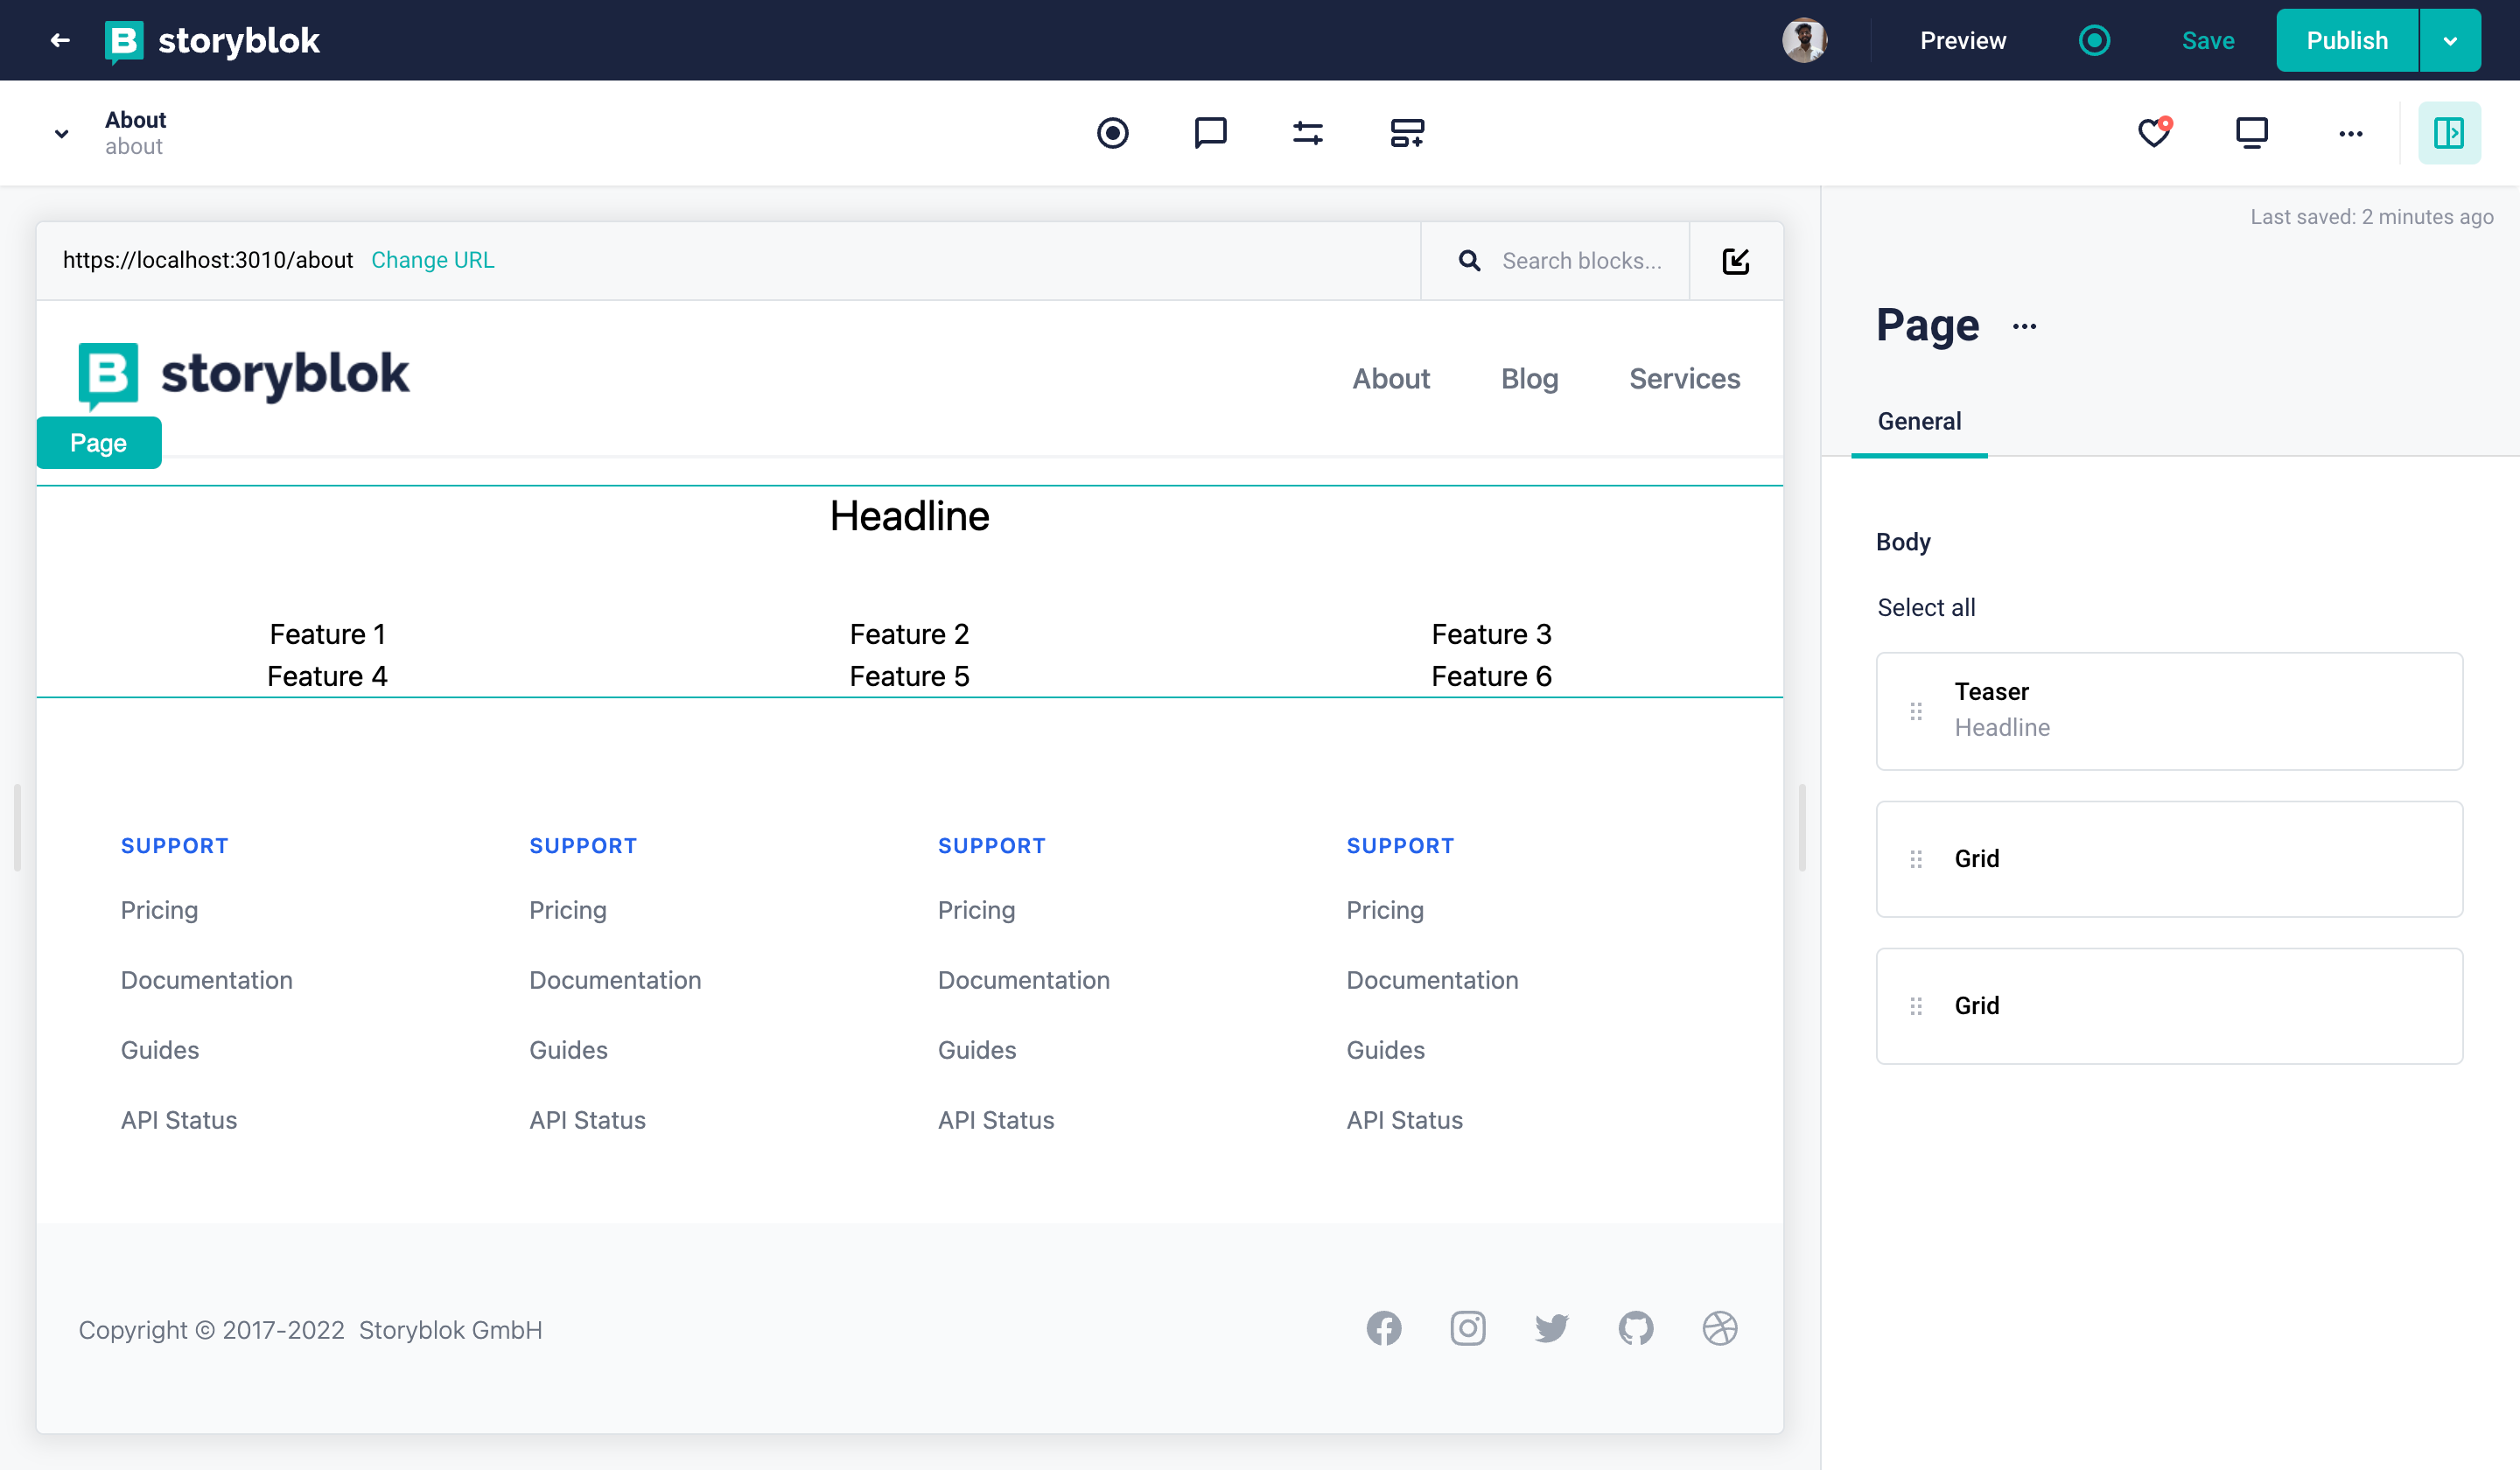
Dynamic Rendering
We can even add more components anywhere we like in the About story, if we have those created. Now, we could also add the components of choice to the two other stories, Blog and Services, as well.
Wrapping Up
In this tutorial, we saw how to start creating a real website after we set up a project using Storyblok and Next.js. Additionally, we learned how to create new stories and pages along with the dynamic rendering of the components wherever we place them.
| Resource | Link |
|---|---|
| Storyblok Next.js Ultimate Tutorial | https://www.storyblok.com/docs/guides/nextjs |
| Storyblok Technologies Hub | https://www.storyblok.com/technologies |
| Next.js Technology Hub | Storyblok Next.js Technology Hub |
| Storyblok React SDK | storyblok/storyblok-react |
