How to generate pages by createPages API with Gatsby.js
Storyblok is the first headless CMS that works for developers & marketers alike.
This tutorial will explore integrating Storyblok into a Gatsby.js site with createPages API and enabling the live preview in the Visual Editor. We will use the gatsby-source-storyblok (opens in a new window) plugin to load our data from Storyblok and enable the Storyblok Bridge (opens in a new window) to preview our changes.
You can find all the code for this tutorial and commits in our gatsby-storyblok-boilerplate (opens in a new window) repo. You can also follow the video below, which guides you through all the steps.
Officially, Gatsby.js recommends generating pages dynamically with their File System Route API. Please check our Add a headless CMS to Gatsby.js in 5 minutes tutorial .
Requirements
To follow this tutorial, there are the following requirements:
- Basic understanding of Gatsby.js and React
- Node, yarn (or npm), and Gatsby installed
- An account on Storyblok (opens in a new window) to manage content
- A new Storyblok space
The project in this article was developed using the following versions of these technologies:
- Gatsby ^4.6.1
- Nodejs v16.13.2
- npm v8.1.2
Keep in mind that these versions may be slightly behind the latest ones.
Adding Dynamic Components
Now that we kickstarted our project and have a simple connection to Storyblok, we want to load components dynamically. We will create two files in the component folder: dynamicComponent.js and teaser.js
import { sbEditable } from "@storyblok/storyblok-editable"
import Teaser from "./teaser"
import React from "react"

const Components = {
  'teaser': Teaser,
}

const DynamicComponent = ({ blok }) => {
  if (typeof Components[blok.component] !== 'undefined') {
    const Component = Components[blok.component]
    return (<div {...sbEditable(blok)}><Component blok={blok} /></div>)
  }
  return (<p>The component <strong>{blok.component}</strong> has not been created yet.</p>)
}

export default DynamicComponent
DynamicComponent is a wrapper around our components to load the correct components and enable live editing, when we click a component. You need to add all components you want to dynamically load to this loader.
import * as React from "react"

const Teaser = ({ blok }) => (
    <div>
      <h2>
          { blok.headline }
      </h2>
      <p>
          { blok.intro }
      </p>
    </div>
)

export default Teaser
Teaser is a component that is dynamically loaded through the dynamic component loader. The teaser component is a component, that already exists in your Storyblok space, whenever you create a new space.
Loading Dynamic Components
Finally, we need to add the last part to our pages/index.js file to display our components.
import * as React from "react"
import { Link } from "gatsby"
import { StaticImage } from "gatsby-plugin-image"
import { graphql } from "gatsby"
import { sbEditable } from "@storyblok/storyblok-editable"

import Layout from "../components/layout"
import Seo from "../components/seo"
import DynamicComponent from "../components/dynamicComponent"

const IndexPage = ({ data }) => {
  let story = data.storyblokEntry
  story.content = JSON.parse(story.content)

  const components = story.content.body.map(blok => {
    return (<DynamicComponent blok={blok} key={blok._uid} />)
  })

  return (
  <Layout>
    <Seo title="Home" />
    <h1>{ story.content.title }</h1>
    { components }
    <StaticImage
      src="../images/gatsby-astronaut.png"
      width={300}
      quality={95}
      formats={["AUTO", "WEBP", "AVIF"]}
      alt="A Gatsby astronaut"
      style={{ marginBottom: `1.45rem` }}
    />
    <p>
      <Link to="/page-2/">Go to page 2</Link> <br />
      <Link to="/using-typescript/">Go to "Using TypeScript"</Link>
    </p>
  </Layout>
)}

export default IndexPage

export const query = graphql`
  query HomeQuery {
    storyblokEntry(full_slug: {eq: "home"}) {
      content
      name
    }
  }
`
On Line 15 we map over all the components in our page body to display them dynamically.
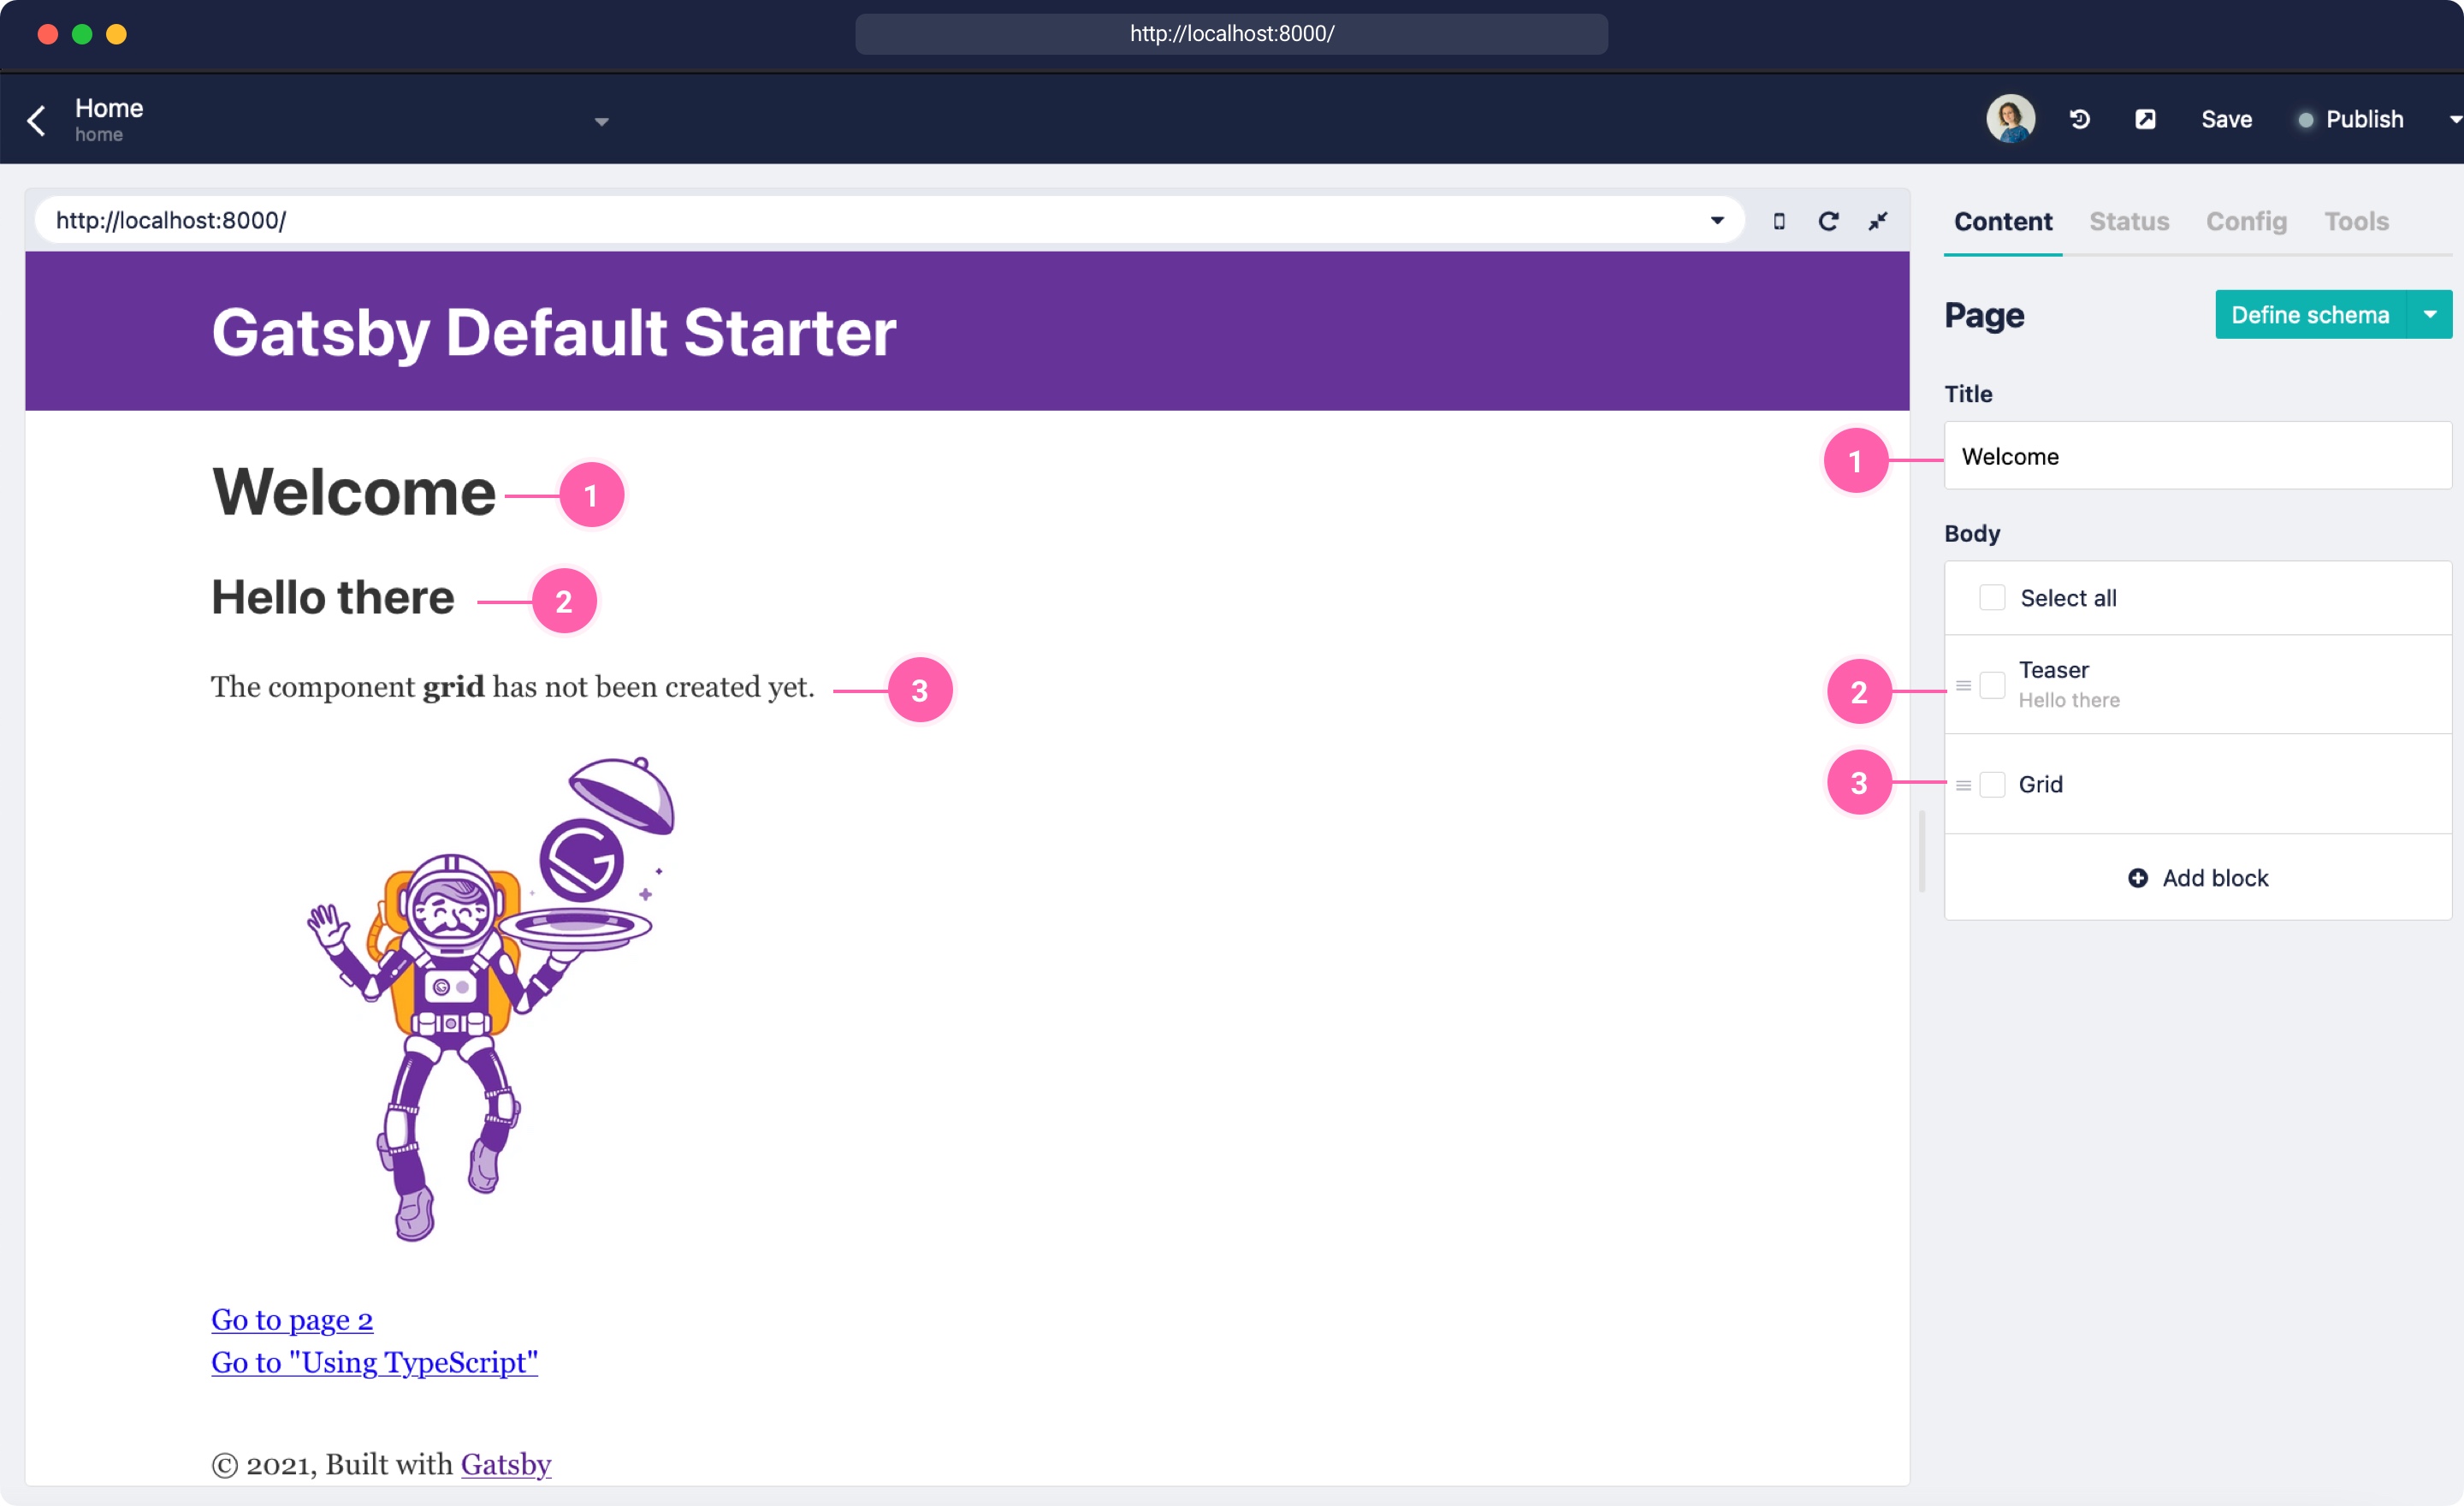
If you added a Title field to the page component {1} by defining the schema (see video around minute 19:00), you should be able to see the title. Then the components should be loaded {2} automatically. If the component is not defined in your component/dynamicComponent.js file, you will see the fallback text {3}.
You can check the commit feat: add storyblok source plugin to index and feat: add dynamic component for the changes.
Enabling the Visual Editor & Live Preview
So far we loaded our content from Storyblok, but we aren't able to directly select the different components. To enable Storyblok's Visual Editor, we need to connect the Storyblok Bridge. For this tutorial, we will already use the new Storyblok Bridge Version 2 (opens in a new window). After loading the bridge, we will need to add a React hook to enable live updating of the story content.
Adding the Storyblok Bridge
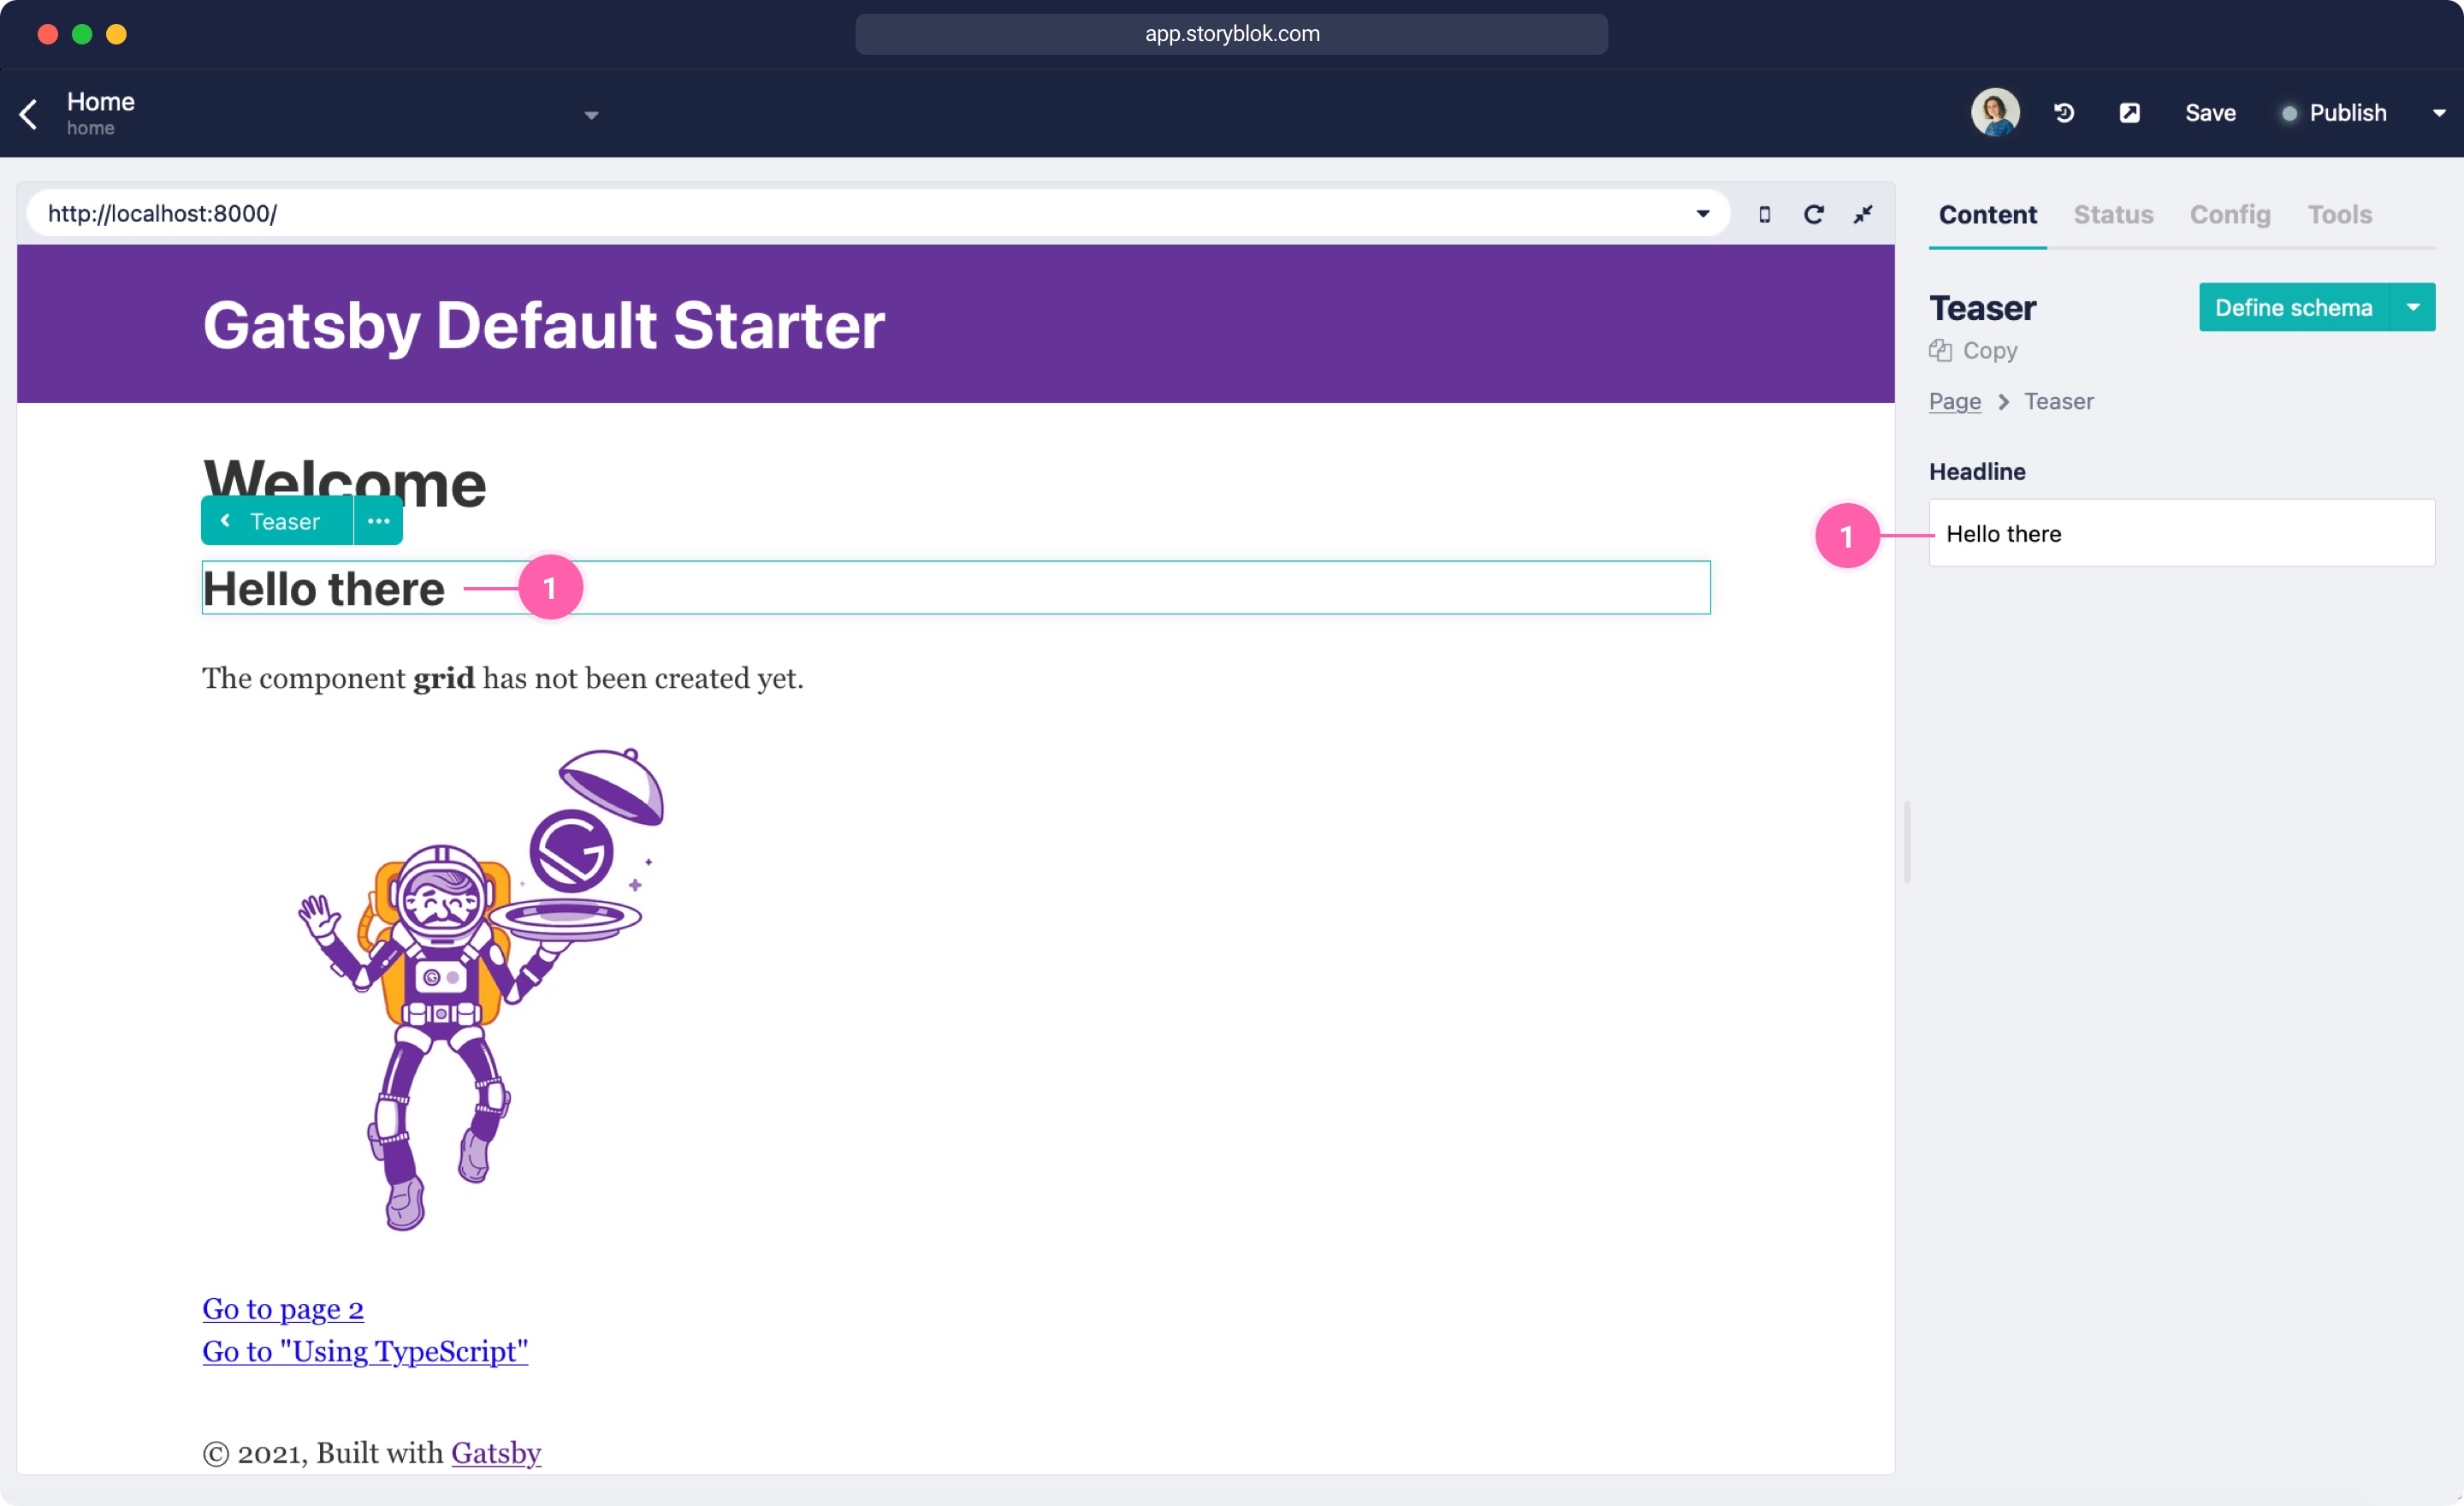
To do that we have to add a specific <script> tag to the end of our document, whenever we want to enable it. This is mostly the case when you're inside the Storyblok editor. By wrapping the page in a component with sbEditablefunction, we also make the page fields like the title clickable.
<script src="//app.storyblok.com/f/storyblok-v2-latest.js" type="text/javascript" id="storyblokBridge">
</script>
Inside our lib/storyblok.js file, add the following code after the client. In Line 12, we're creating a custom React hook called useStoryblok.
import { useEffect, useState } from "react"

export default function useStoryblok(originalStory, location) {
    let [story, setStory] = useState(originalStory)

    if(story && typeof story.content === "string"){
      story.content = JSON.parse(story.content)
    }

    // see https://www.storyblok.com/docs/packages/storyblok-bridge
    function initEventListeners() {
      const { StoryblokBridge } = window

      if (typeof StoryblokBridge !== 'undefined') {
        const storyblokInstance = new StoryblokBridge()

        storyblokInstance.on(['published', 'change'], (event) => {
          // reloade project on save an publish
          window.location.reload(true)
        })

        storyblokInstance.on(['input'], (event) => {
          // live updates when editing
          if (event.story._uid === story._uid) {
            setStory(event.story)
          }
        })

        storyblokInstance.on(['enterEditmode'], (event) => {
          // loading the story with the client
        })
      }
    }

    function addBridge(callback) {
        // check if the script is already present
        const existingScript = document.getElementById("storyblokBridge");
        if (!existingScript) {
          const script = document.createElement("script");
          script.src = `//app.storyblok.com/f/storyblok-v2-latest.js`;
          script.id = "storyblokBridge";
          document.body.appendChild(script);
          script.onload = () => {
            // call a function once the bridge is loaded
            callback()
          };
        } else {
            callback();
        }
    }

    useEffect(() => {
      // load bridge only inside the storyblok editor
      if(location.search.includes("_storyblok")) {
        // first load the bridge and then attach the events
        addBridge(initEventListeners)
      }
    }, []) // it's important to run the effect only once to avoid multiple event attachment

    return story;
}
Inside this hook, we have a function addBridge (Line 39), which basically just adds the script tag, if it's not already present. Once the loading of the bridge is completed (Line 58), it will call the initEventListeners function (Line 17) to enable input (Line 25) and published and change events (Line 22) inside Storyblok. We could also make use of the enterEditmode event to load the draft story when the editor is open.
Finally, we need to load this hook in our pages/index.js file on Line 13. We will also move the parsing of the story content to the lib/storyblok.js file.
import * as React from "react"
import { Link } from "gatsby"
import { StaticImage } from "gatsby-plugin-image"
import { graphql } from "gatsby"
import { sbEditable } from "@storyblok/storyblok-editable"

import Layout from "../components/layout"
import Seo from "../components/seo"
import DynamicComponent from "../components/dynamicComponent"
import useStoryblok from "../lib/storyblok"

const IndexPage = ({ data, location }) => {
  let story = data.storyblokEntry
  story = useStoryblok(story, location)

  const components = story.content.body.map(blok => {
    return (<DynamicComponent blok={blok} key={blok._uid} />)
  })

  return (
  <Layout>
    <div {...sbEditable(story.content)}>
      <Seo title="Home" />
      <h1>{ story.content.title }</h1>
      { components }
        <StaticImage
          src="../images/gatsby-astronaut.png"
          width={300}
          quality={95}
          formats={["AUTO", "WEBP", "AVIF"]}
          alt="A Gatsby astronaut"
          style={{ marginBottom: `1.45rem` }}
        />
        <p>
          <Link to="/page-2/">Go to page 2</Link> <br />
          <Link to="/using-typescript/">Go to "Using TypeScript"</Link>
        </p>
    </div>
  </Layout>
)}

export default IndexPage

export const query = graphql`
  query HomeQuery {
    storyblokEntry(full_slug: {eq: "home"}) {
      content
      name
    }
  }
`
If the connection with the Storyblok hook is working, you should be able to select the component directly.
You can check the commit feat: add storyblok bridge and live updates for the changes.
Using Storyblok JS client
Finally, we can extend our hook to also make use of the JS client to load the draft version of our content when the editor is open. Add the following to the lib/storyblok.js file on Line 3 and Line 42:
import { useEffect, useState } from "react"
import StoryblokClient from "storyblok-js-client";
import config from "../../gatsby-config"
const sbConfig = config.plugins.find((item) => item.resolve === 'gatsby-source-storyblok')

const Storyblok = new StoryblokClient({
  accessToken: sbConfig.options.accessToken,
  cache: {
    clear: "auto",
    type: "memory",
  },
});

export default function useStoryblok(originalStory, location) {
    let [story, setStory] = useState(originalStory)

    if(story && typeof story.content === "string"){
      story.content = JSON.parse(story.content)
    }

    // see https://www.storyblok.com/docs/packages/storyblok-bridge
    function initEventListeners() {
      const { StoryblokBridge } = window

      if (typeof StoryblokBridge !== 'undefined') {
        const storyblokInstance = new StoryblokBridge()

        storyblokInstance.on(['published', 'change'], (event) => {
          // reloade project on save an publish
          window.location.reload(true)
        })

        storyblokInstance.on(['input'], (event) => {
          // live updates when editing
          if (event.story._uid === story._uid) {
            setStory(event.story)
          }
        })

        storyblokInstance.on(['enterEditmode'], (event) => {
          // loading the draft version on initial view of the page
          Storyblok
            .get(`cdn/stories/${event.storyId}`, {
              version: 'draft',
            })
            .then(({ data }) => {
              if(data.story) {
                setStory(data.story)
              }
            })
            .catch((error) => {
              console.log(error);
            })
        })
      }
    }

    function addBridge(callback) {
        // check if the script is already present
        const existingScript = document.getElementById("storyblokBridge");
        if (!existingScript) {
          const script = document.createElement("script");
          script.src = `//app.storyblok.com/f/storyblok-v2-latest.js`;
          script.id = "storyblokBridge";
          document.body.appendChild(script);
          script.onload = () => {
            // call a function once the bridge is loaded
            callback()
          };
        } else {
            callback();
        }
    }

    useEffect(() => {
      // load bridge only inside the storyblok editor
      if(location.search.includes("_storyblok")) {
        // first load the bridge and then attach the events
        addBridge(initEventListeners)
      }
    }, []) // it's important to run the effect only once to avoid multiple event attachment

    return story;
}
Using the enterEditmode event to request the draft content from Storyblok with the open story entry.
Automatic Page Generation
In most cases, you would want to automatically generate the pages from the content you have set up in Storyblok. To do that with Gatsby, we can follow this tutorial (opens in a new window). Basically, what we need to do is to add a template file: templates/page.js as well as change our gatsby-node.js.
Let's start by creating the template, similar to our pages/index.js. Create a new folder templates with a file page.js:
import * as React from "react"
import { Link } from "gatsby"
import { StaticImage } from "gatsby-plugin-image"
import { graphql } from "gatsby"

import Layout from "../components/layout"
import Seo from "../components/seo"
import DynamicComponent from "../components/dynamicComponent"
import useStoryblok from "../lib/storyblok"

const Page = ({ pageContext, location }) => {
  let story = pageContext.story
  story = useStoryblok(story, location)

  const components = story.content.body.map(blok => {
    return (<DynamicComponent blok={blok} key={blok._uid} />)
  })

  return (
  <Layout>
    <Seo title="Home" />
    <h1>{ story.content.title }</h1>
    { components }
    <StaticImage
      src="../images/gatsby-astronaut.png"
      width={300}
      quality={95}
      formats={["AUTO", "WEBP", "AVIF"]}
      alt="A Gatsby astronaut"
      style={{ marginBottom: `1.45rem` }}
    />
    <p>
      <Link to="/page-2/">Go to page 2</Link> <br />
      <Link to="/using-typescript/">Go to "Using TypeScript"</Link>
    </p>
  </Layout>
)}

export default Page
The biggest difference to the pages/index.js is that it's not using GraphQl directly on the page, but exposing the story via the pageContext object.
To get that working we also need to add some logic to our gatsby-node.js file.
const path = require('path')

 exports.createPages = ({ graphql, actions }) => {
    const { createPage } = actions

    return new Promise((resolve, reject) => {
        const storyblokEntry = path.resolve('src/templates/page.js')

        resolve(
          graphql(
            `{
              stories: allStoryblokEntry(filter: {field_component: {eq: "page"}}) {
                edges {
                  node {
                    id
                    name
                    slug
                    field_component
                    full_slug
                    content
                  }
                }
              }
            }`
          ).then(result => {
            if (result.errors) {
              console.log(result.errors)
              reject(result.errors)
            }

            const entries = result.data.stories.edges

            entries.forEach((entry) => {
                if(entry.slug !== "home") {
                    const page = {
                        path: `/${entry.node.full_slug}`,
                        component: storyblokEntry,
                        context: {
                            story: entry.node
                        }
                    }
                    createPage(page)
                }
            })
          })
        )
      })
 }
On Line 7, we're loading our template we just created for all pages. On Line 10 we're requesting all stories from Storyblok with the content type Page. On Line 35, we're creating the actual pages, but are skipping the Home story, because we're already loading that one in the index.js file.
When we create a new entry in Storyblok, saving it, and restarting the development server (or using the refresh button in the GraphiQL explorer), the new page should now be visible on your localhost.
You can check the commit feat: automatic page generation for the changes.
| Resource | Link |
|---|---|
| Github Repository | https://github.com/storyblok/gatsby-storyblok-boilerplate |
| Youtube Video | https://www.youtube.com/watch?v=got3f860O-8 |
| Gatsby Source Storyblok Plugin | https://github.com/storyblok/gatsby-source-storyblok |
| Storyblok Bridge Documentation | https://www.storyblok.com/docs/packages/storyblok-bridge |
| Gatsby Refresh Content Docs | https://www.gatsbyjs.com/docs/refreshing-content/ |
| Gatsby Page Generation Tutorial | https://www.gatsbyjs.com/docs/tutorial/part-seven/ |
