Data migration from any platform to Storyblok
Storyblok is the first headless CMS that works for developers & marketers alike.
In this tutorial, we will learn how to migrate data from any platform to Storyblok. We will get the sample data from the following GitHub repo for this tutorial. However, this could be any CMS API endpoint.
Before we move forward, let's understand the structure of our sample data. We have 4 types of data in our example repo.
Post data example
{
  id: 10,
  date: '2023-05-11T19:59:55',
  modified: '2023-06-19T10:21:20',
  slug: 'provident-dolor-suscipit-ut',
  status: 'publish',
  title: 'Provident dolor suscipit ut',
  featuredimage: {
    alttext: 'Provident dolor suscipit ut',
    url: 'https://images.pexels.com/photos/4737484/pexels-photo-4737484.jpeg',
  },
  content: '<p>Some html content</p>',
  excerpt: '<p>Some html content</p>',
  author: 1,
  categories: [1],
  tags: [1, 2, 3],
}
Author data example
{
  id: 1,
  name: 'Dipankar Maikap',
  description:
    '\[Dipankar\](https://dipankarmaikap.com/) is a **Developer Relations Engineer at Storyblok**. He is a Frontend Developer, and **NextJS** + **TailwindCSS** are his weapons of choice. He also likes to write about **web development** and **javascript**.',
  slug: 'dipankarmaikap',
  avatar_url: 'https://dipankarmaikap.com/resume/assets/My-Profile-Picture.png',
  links: [
    {
      name: 'Website',
      url: 'https://dipankarmaikap.com/',
    },
    {
      name: 'Github',
      url: 'https://github.com/dipankarmaikap',
    },
    {
      name: 'Twitter',
      url: 'https://twitter.com/maikap_dipankar',
    },
  ],
}
Category data example
{
  id: 1,
  name: 'Web Development',
  description: 'All my posts related to Web Development',
  slug: 'web-development',
}
Tag data example
{
  id: 1,
  name: 'Cloud',
  description: '',
  slug: 'cloud',
}
Now that we have seen the data structure, let's create a Storyblok space and model the following schema.
This tutorial assumes you are familiar with Storyblok. If you are just getting started you can read our Structure of Content guide first. Next, you can use one of our ultimate tutorial series to familiarize yourself with Storyblok.
Content modeling in Storyblok
Content modeling means defining the structure of your content. For this tutorial, we are going to create a schema that could match the data structure of our example data. However, it could also be an opportunity to create a better structure.
If you want to learn more about Content modeling you can download our Content Modeling Whitepaper.
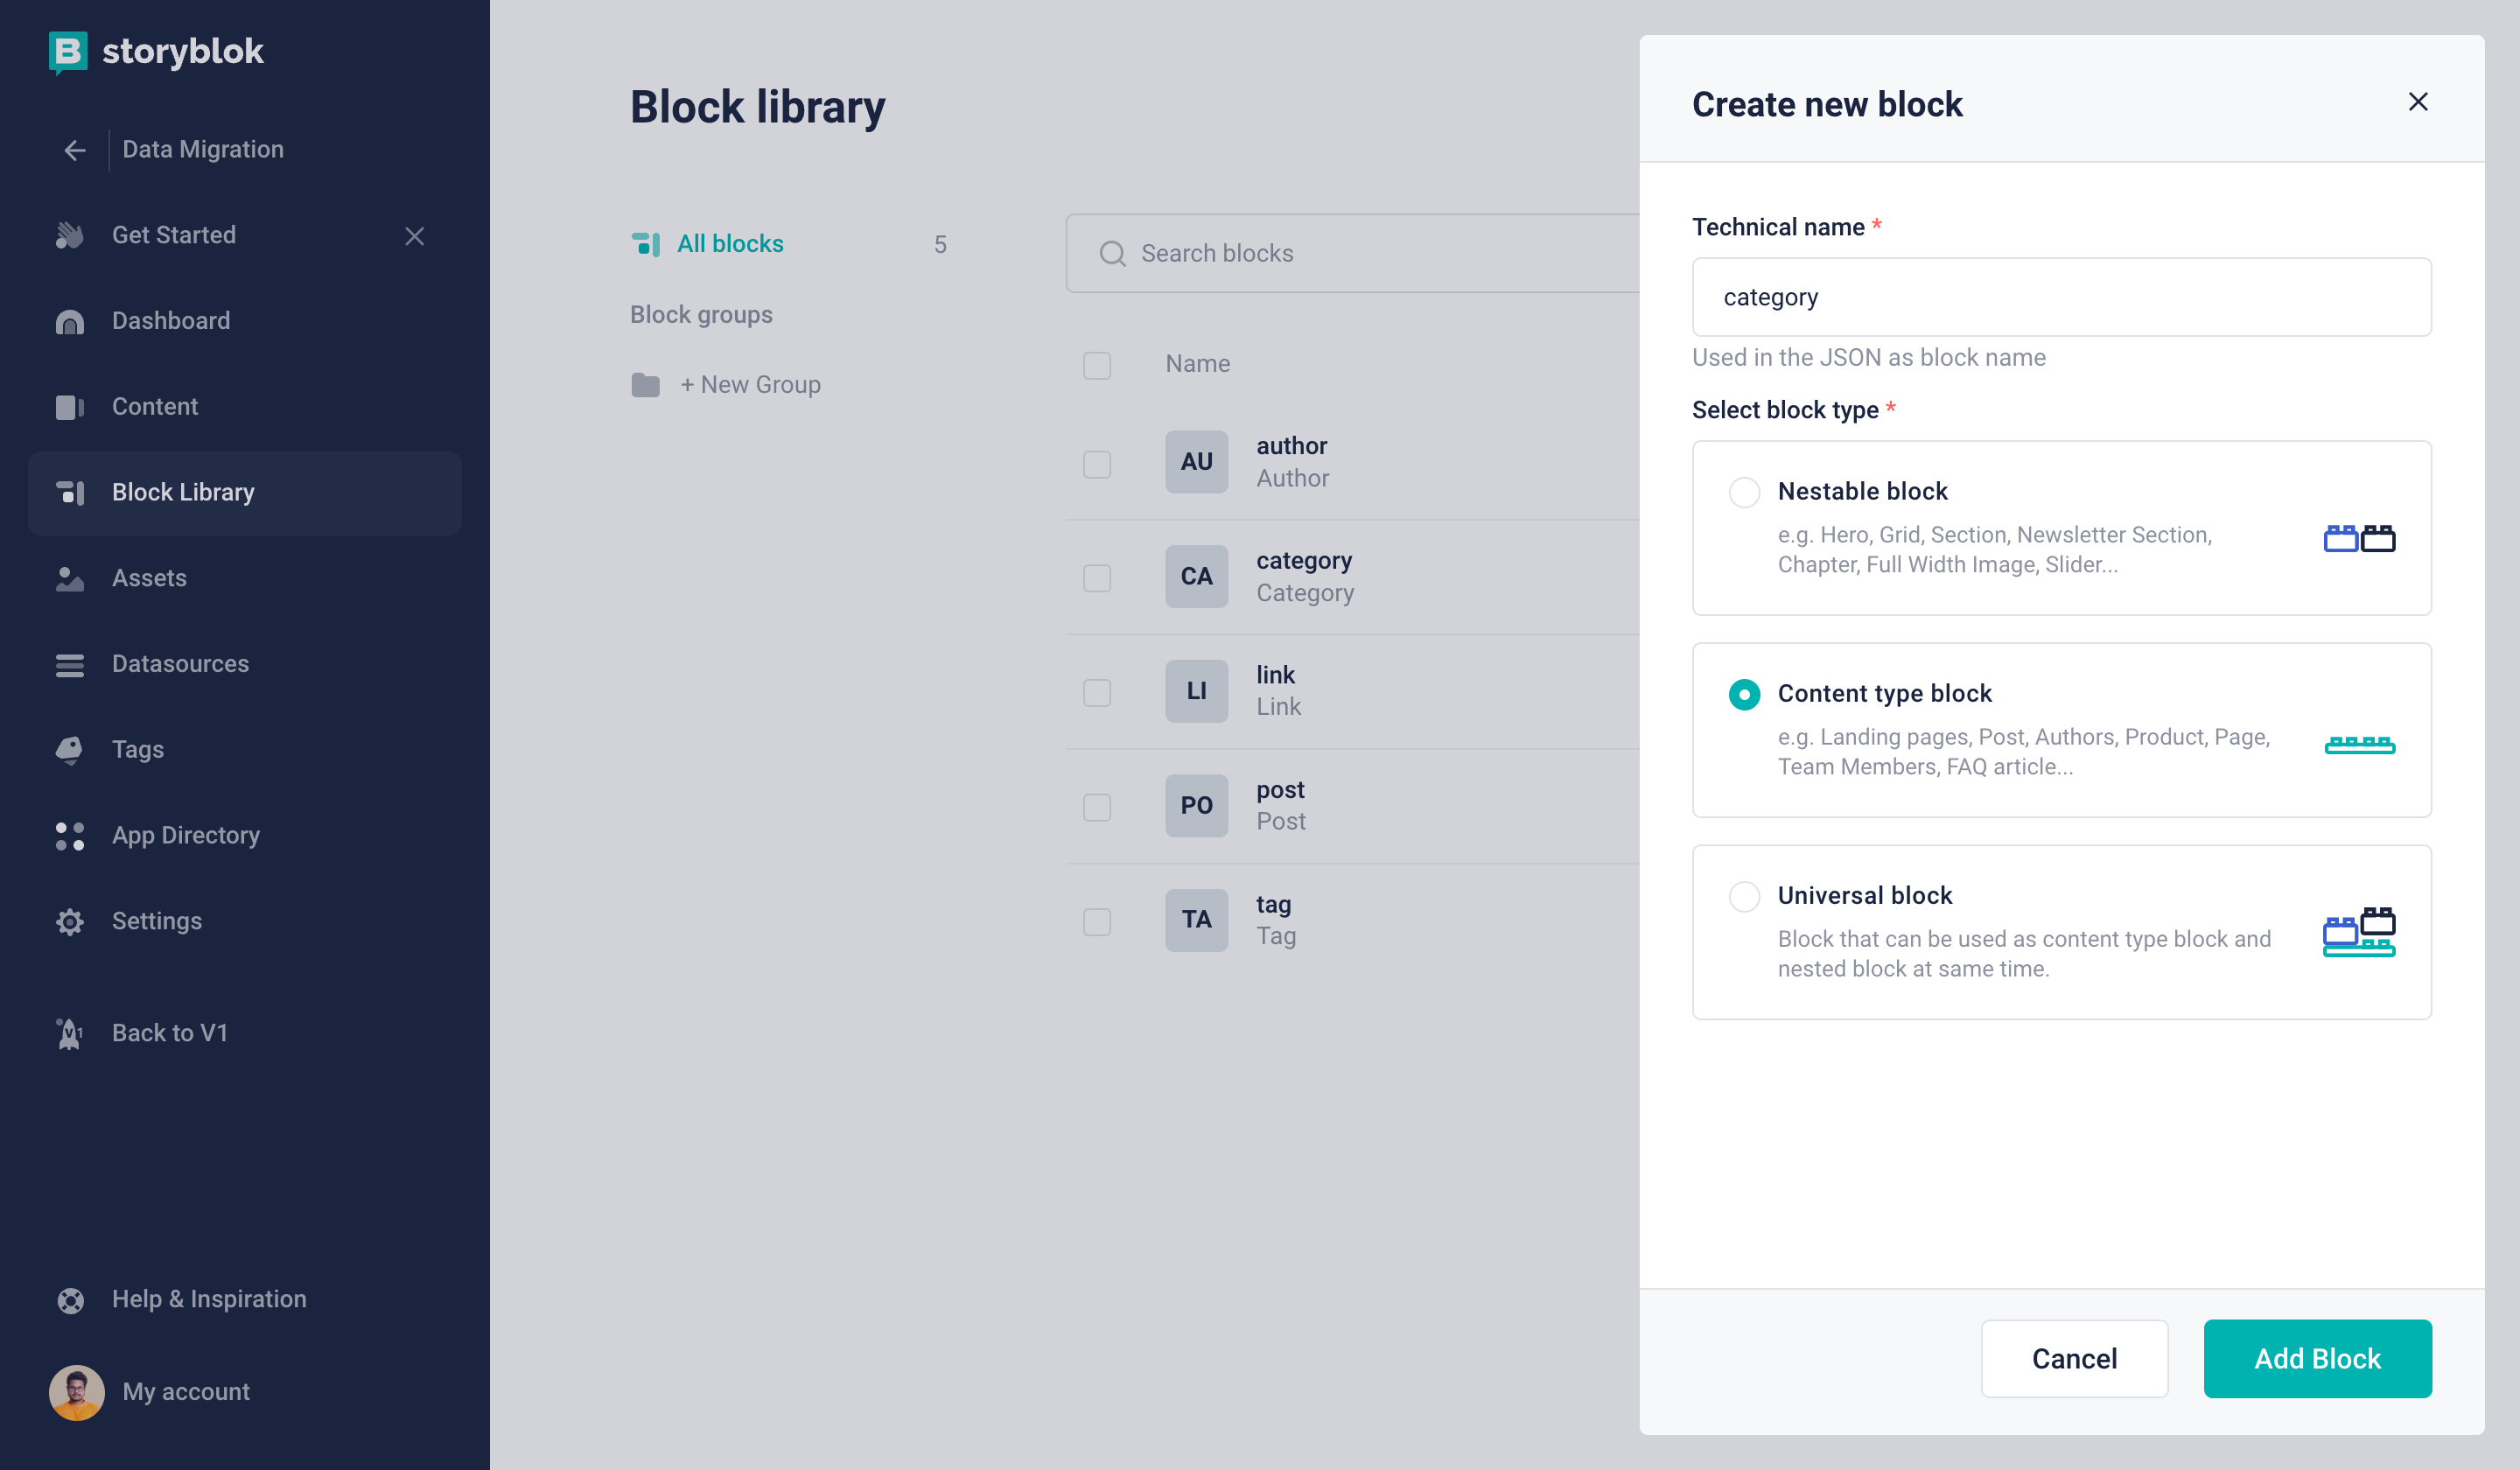
Creating a new content type block in Storyblok
First, we are going to create Category Block (technical name: category). This will be a Content Type Block with the following fields:
id: Textname: Textdescription: Textarea
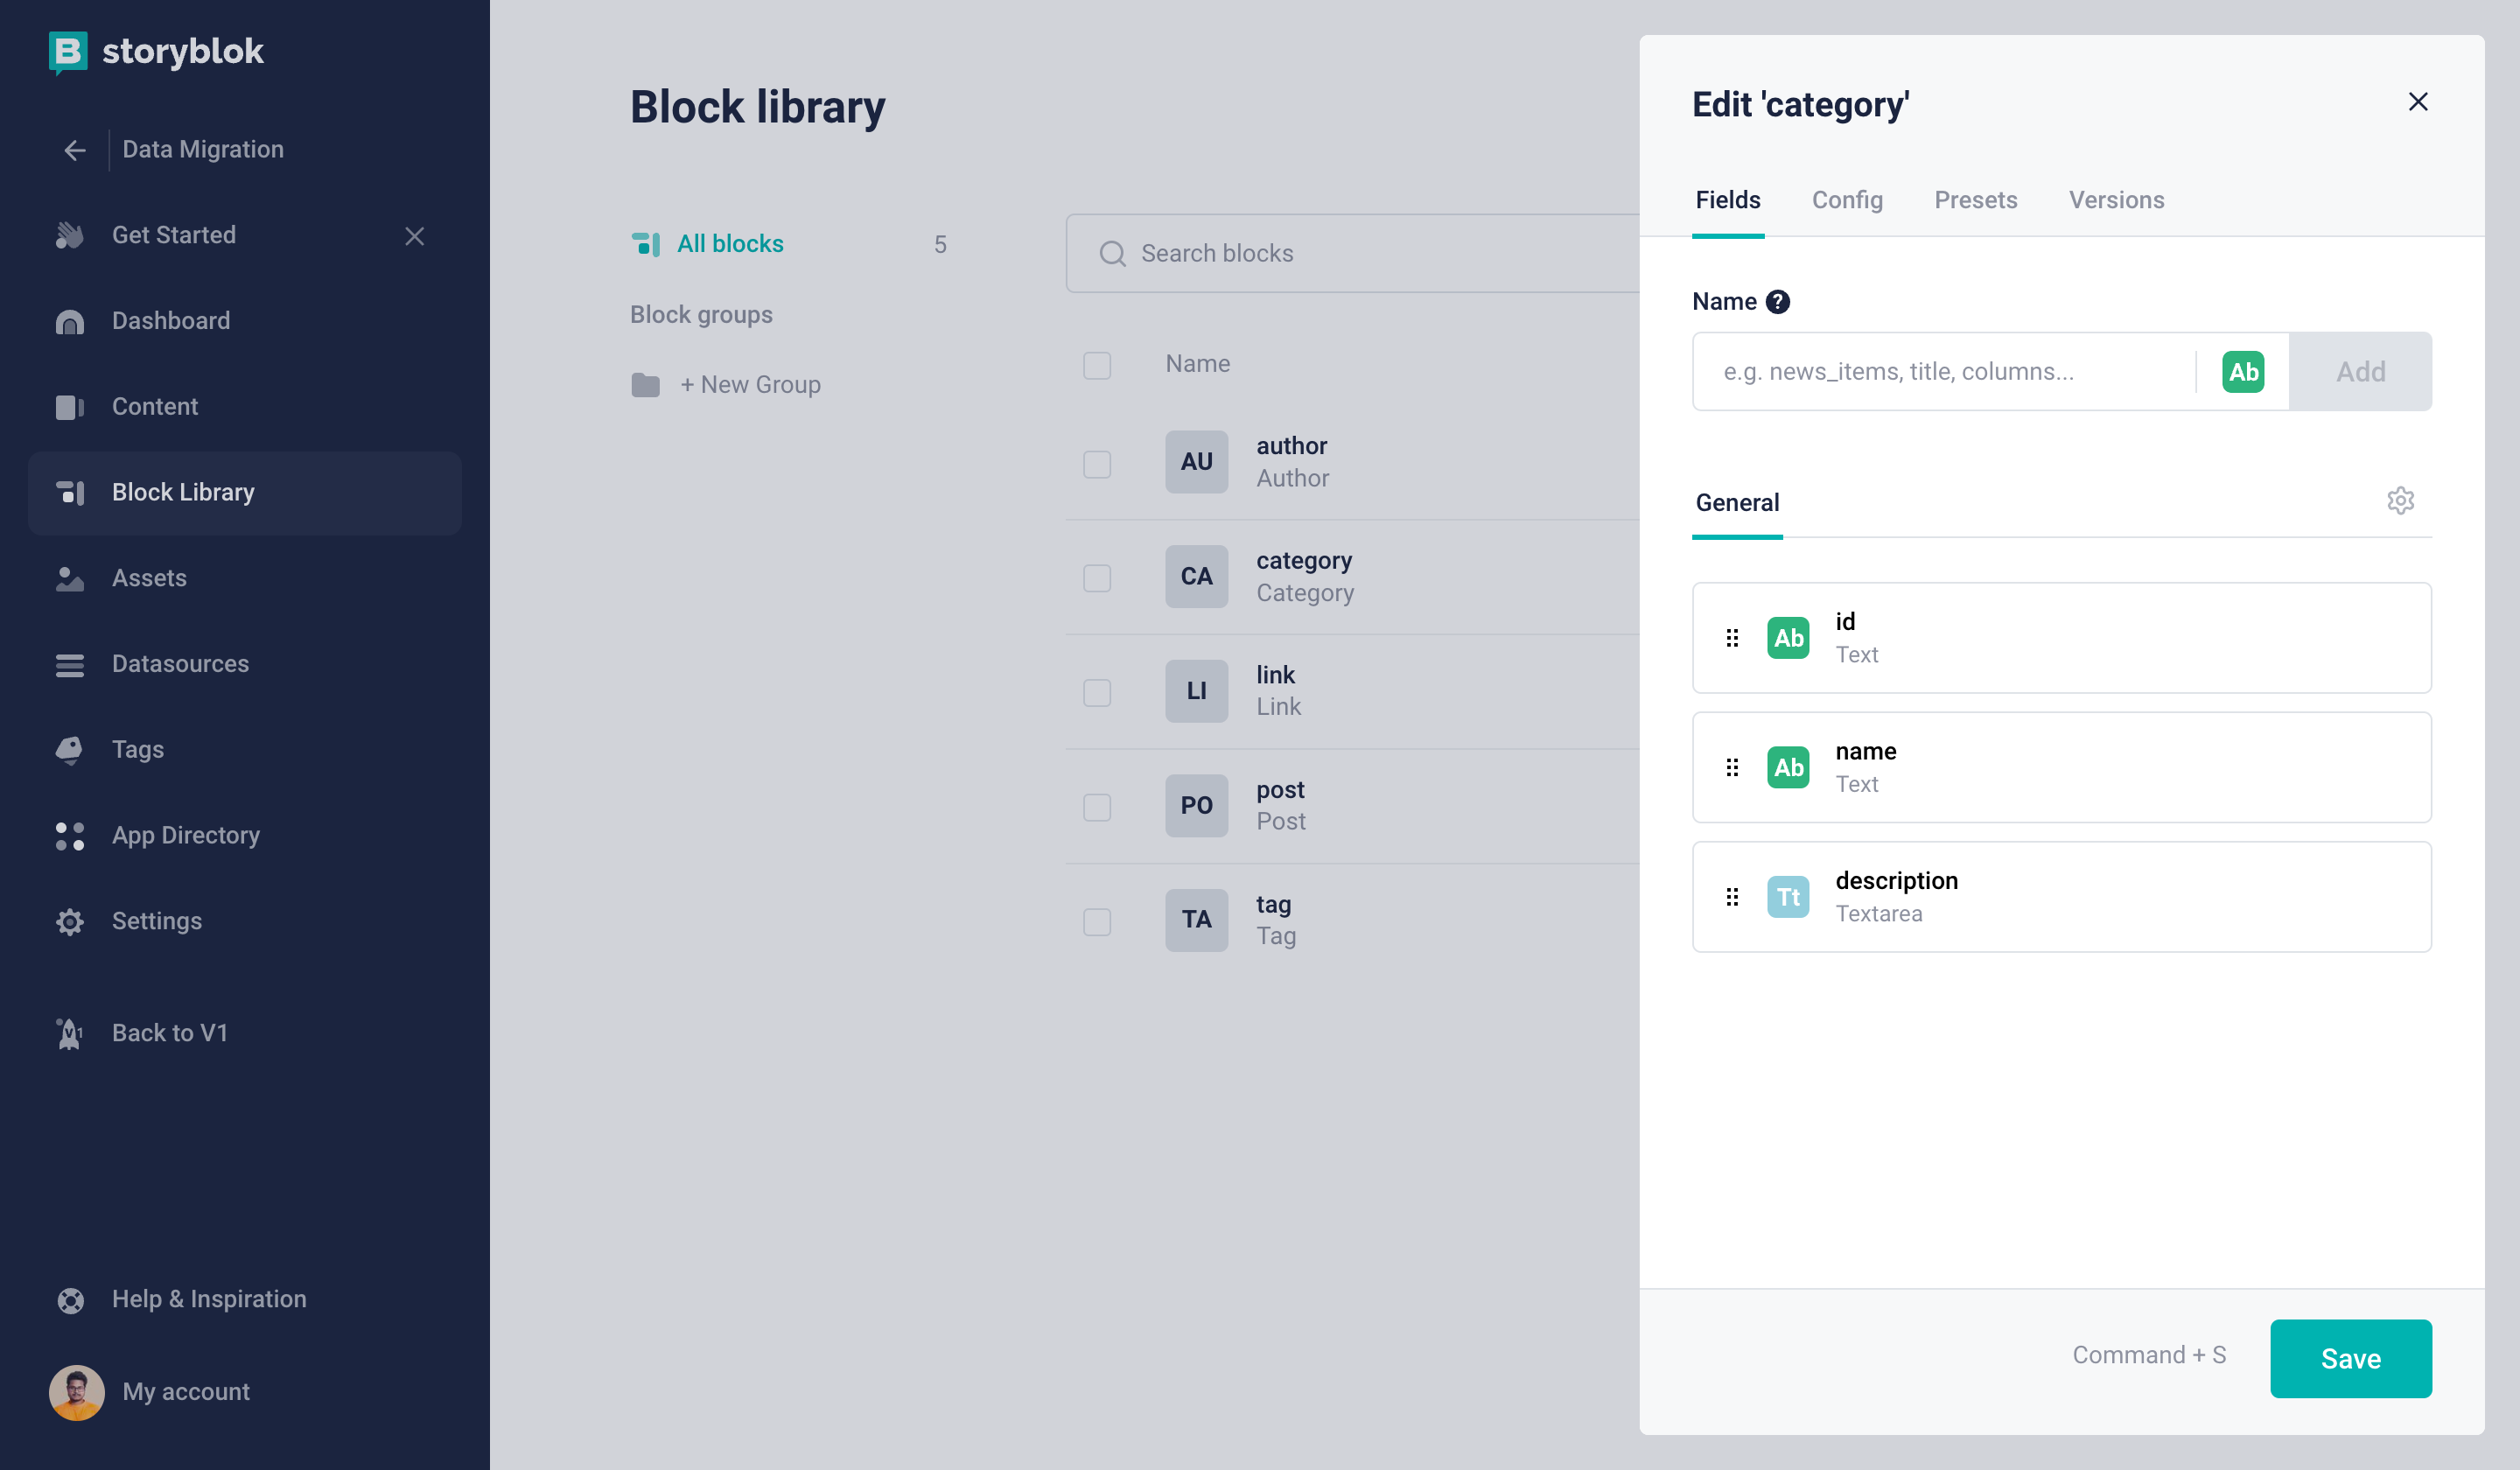
Category Content Type block
Next, we will create our Tag Content Type Block (technical name: tag) which will be identical to the Category schema.
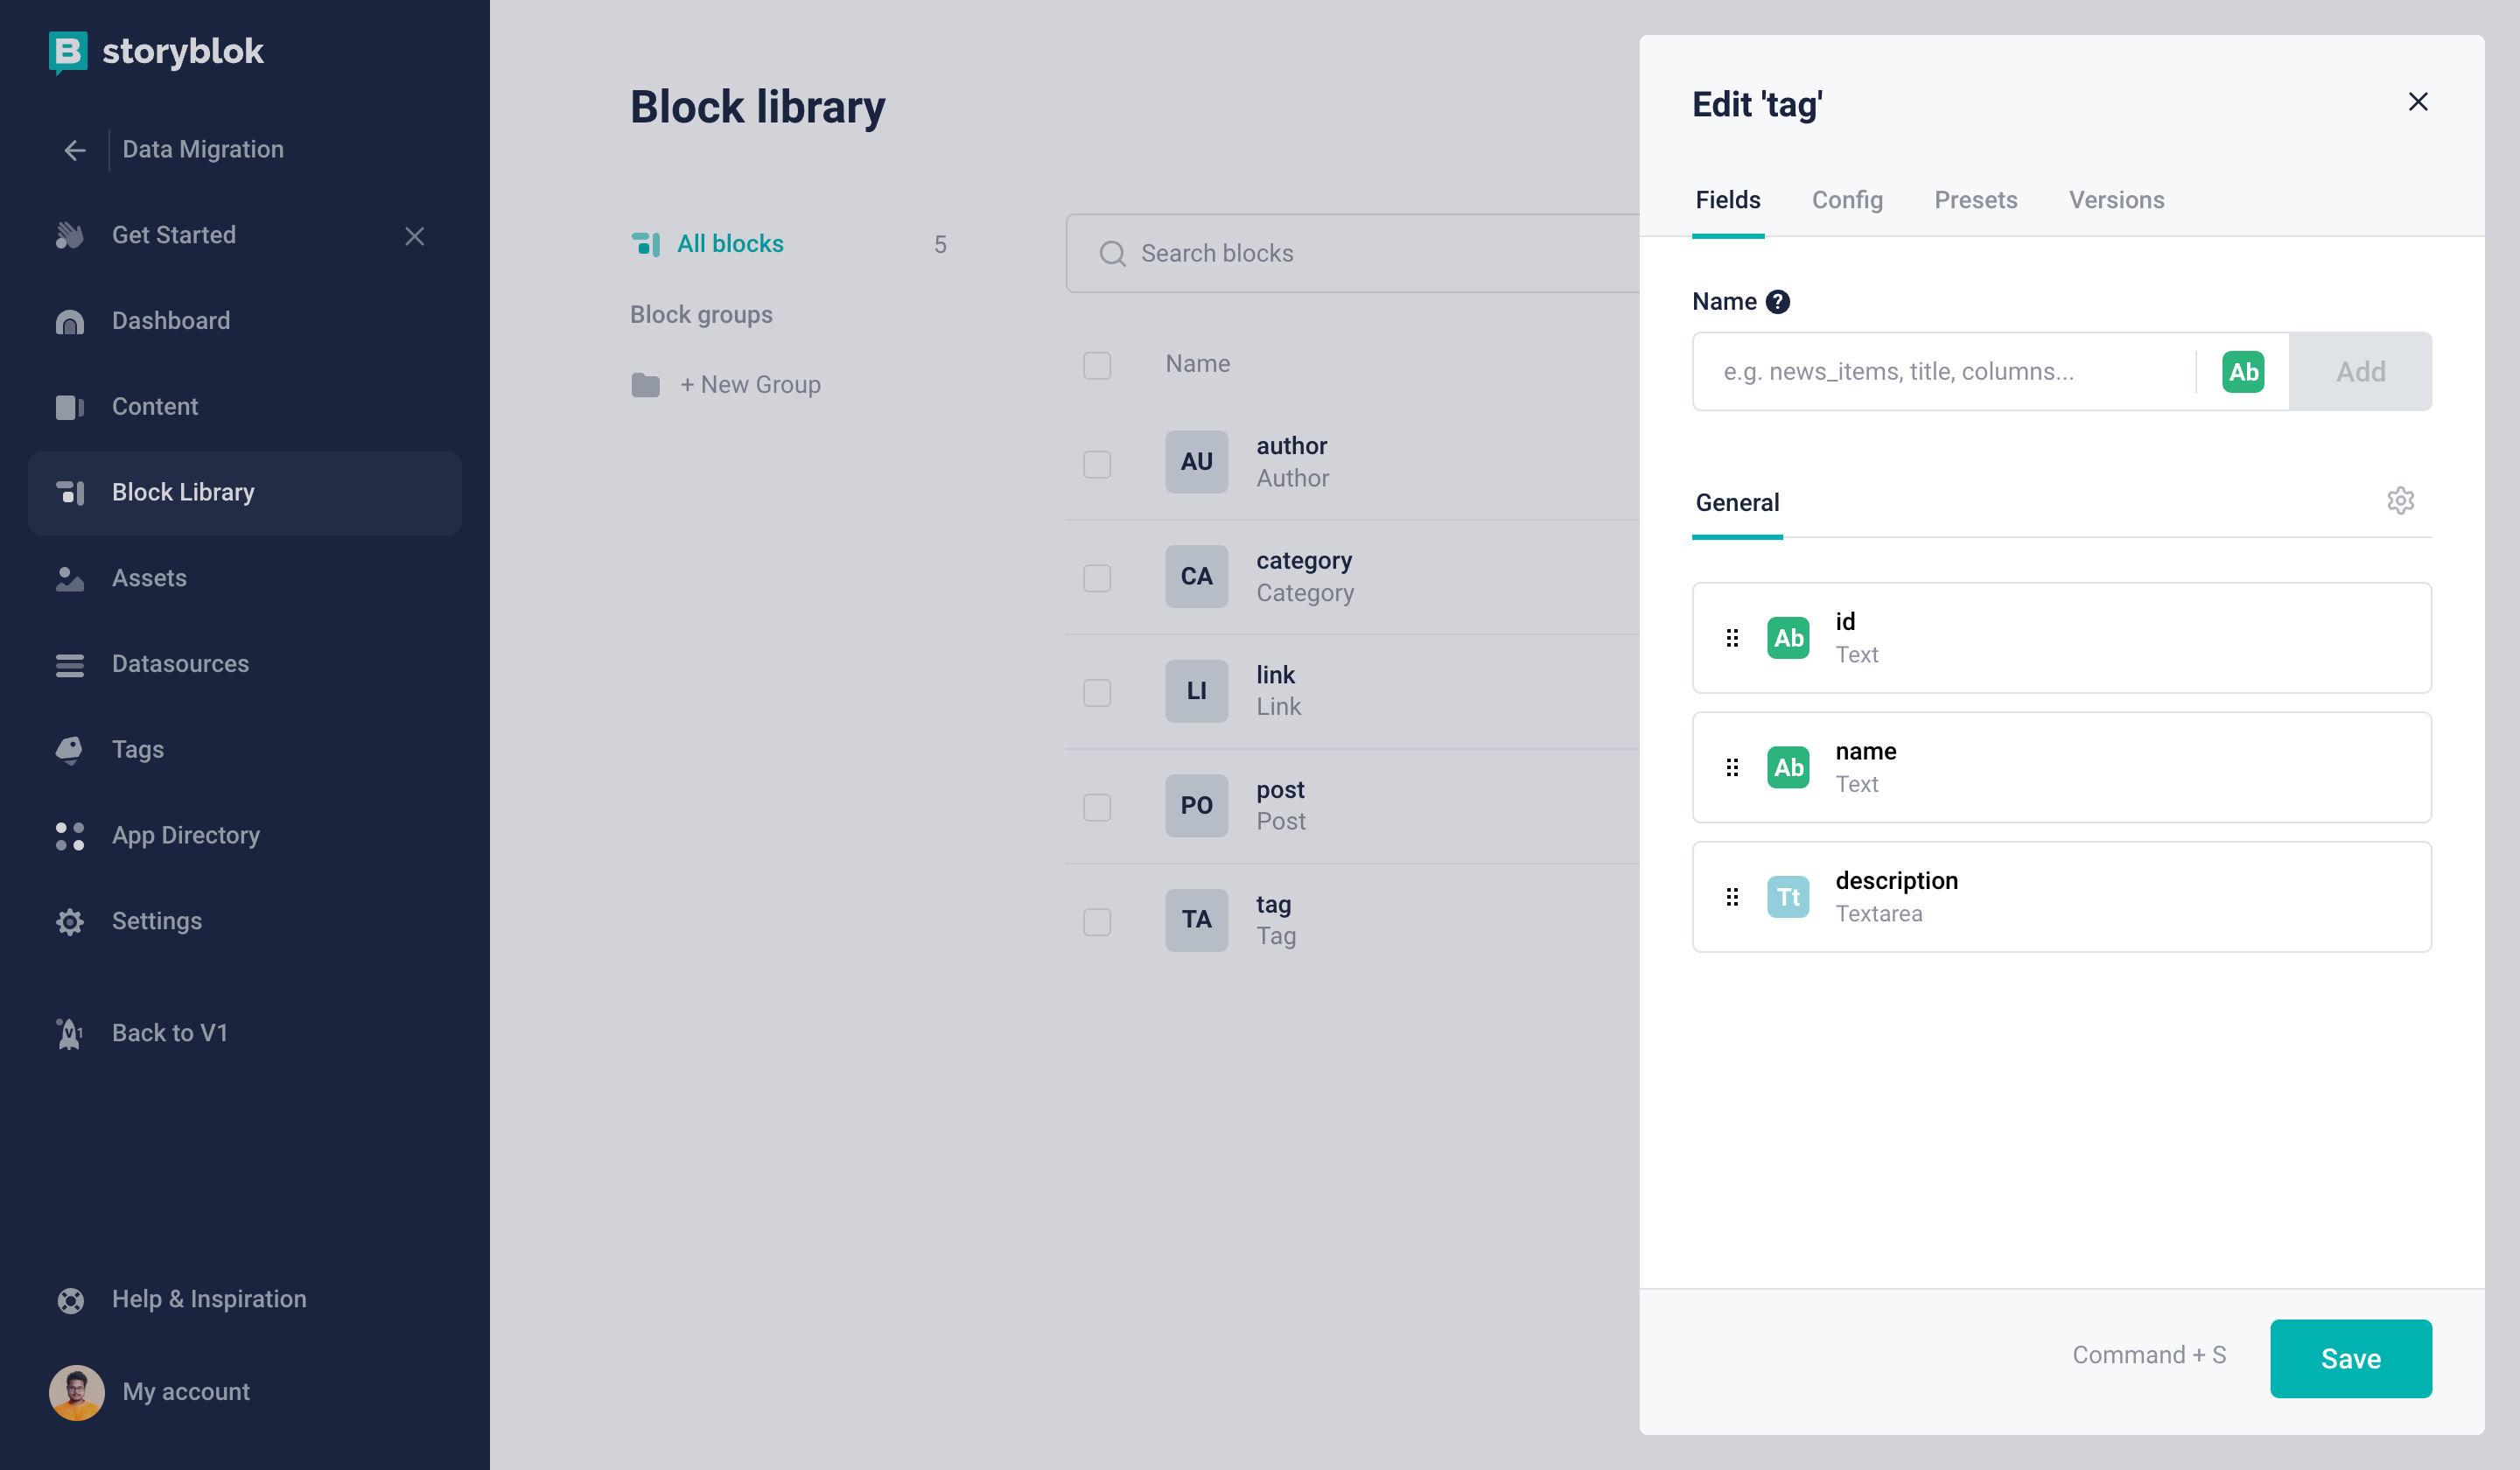
Tag Content Type block
After the Tag Content Type Block, we will create the Author Content Type Block. You may remember this one is slightly more complex compared to the Category or Tag schema.
If we break it down, we have a links property in our Author schema which contains multiple link objects, which include two properties name and url.
Let’s first create a Link Nestable Block (technical name: link) that can be reused.

Creating a Nestable block in Storyblok
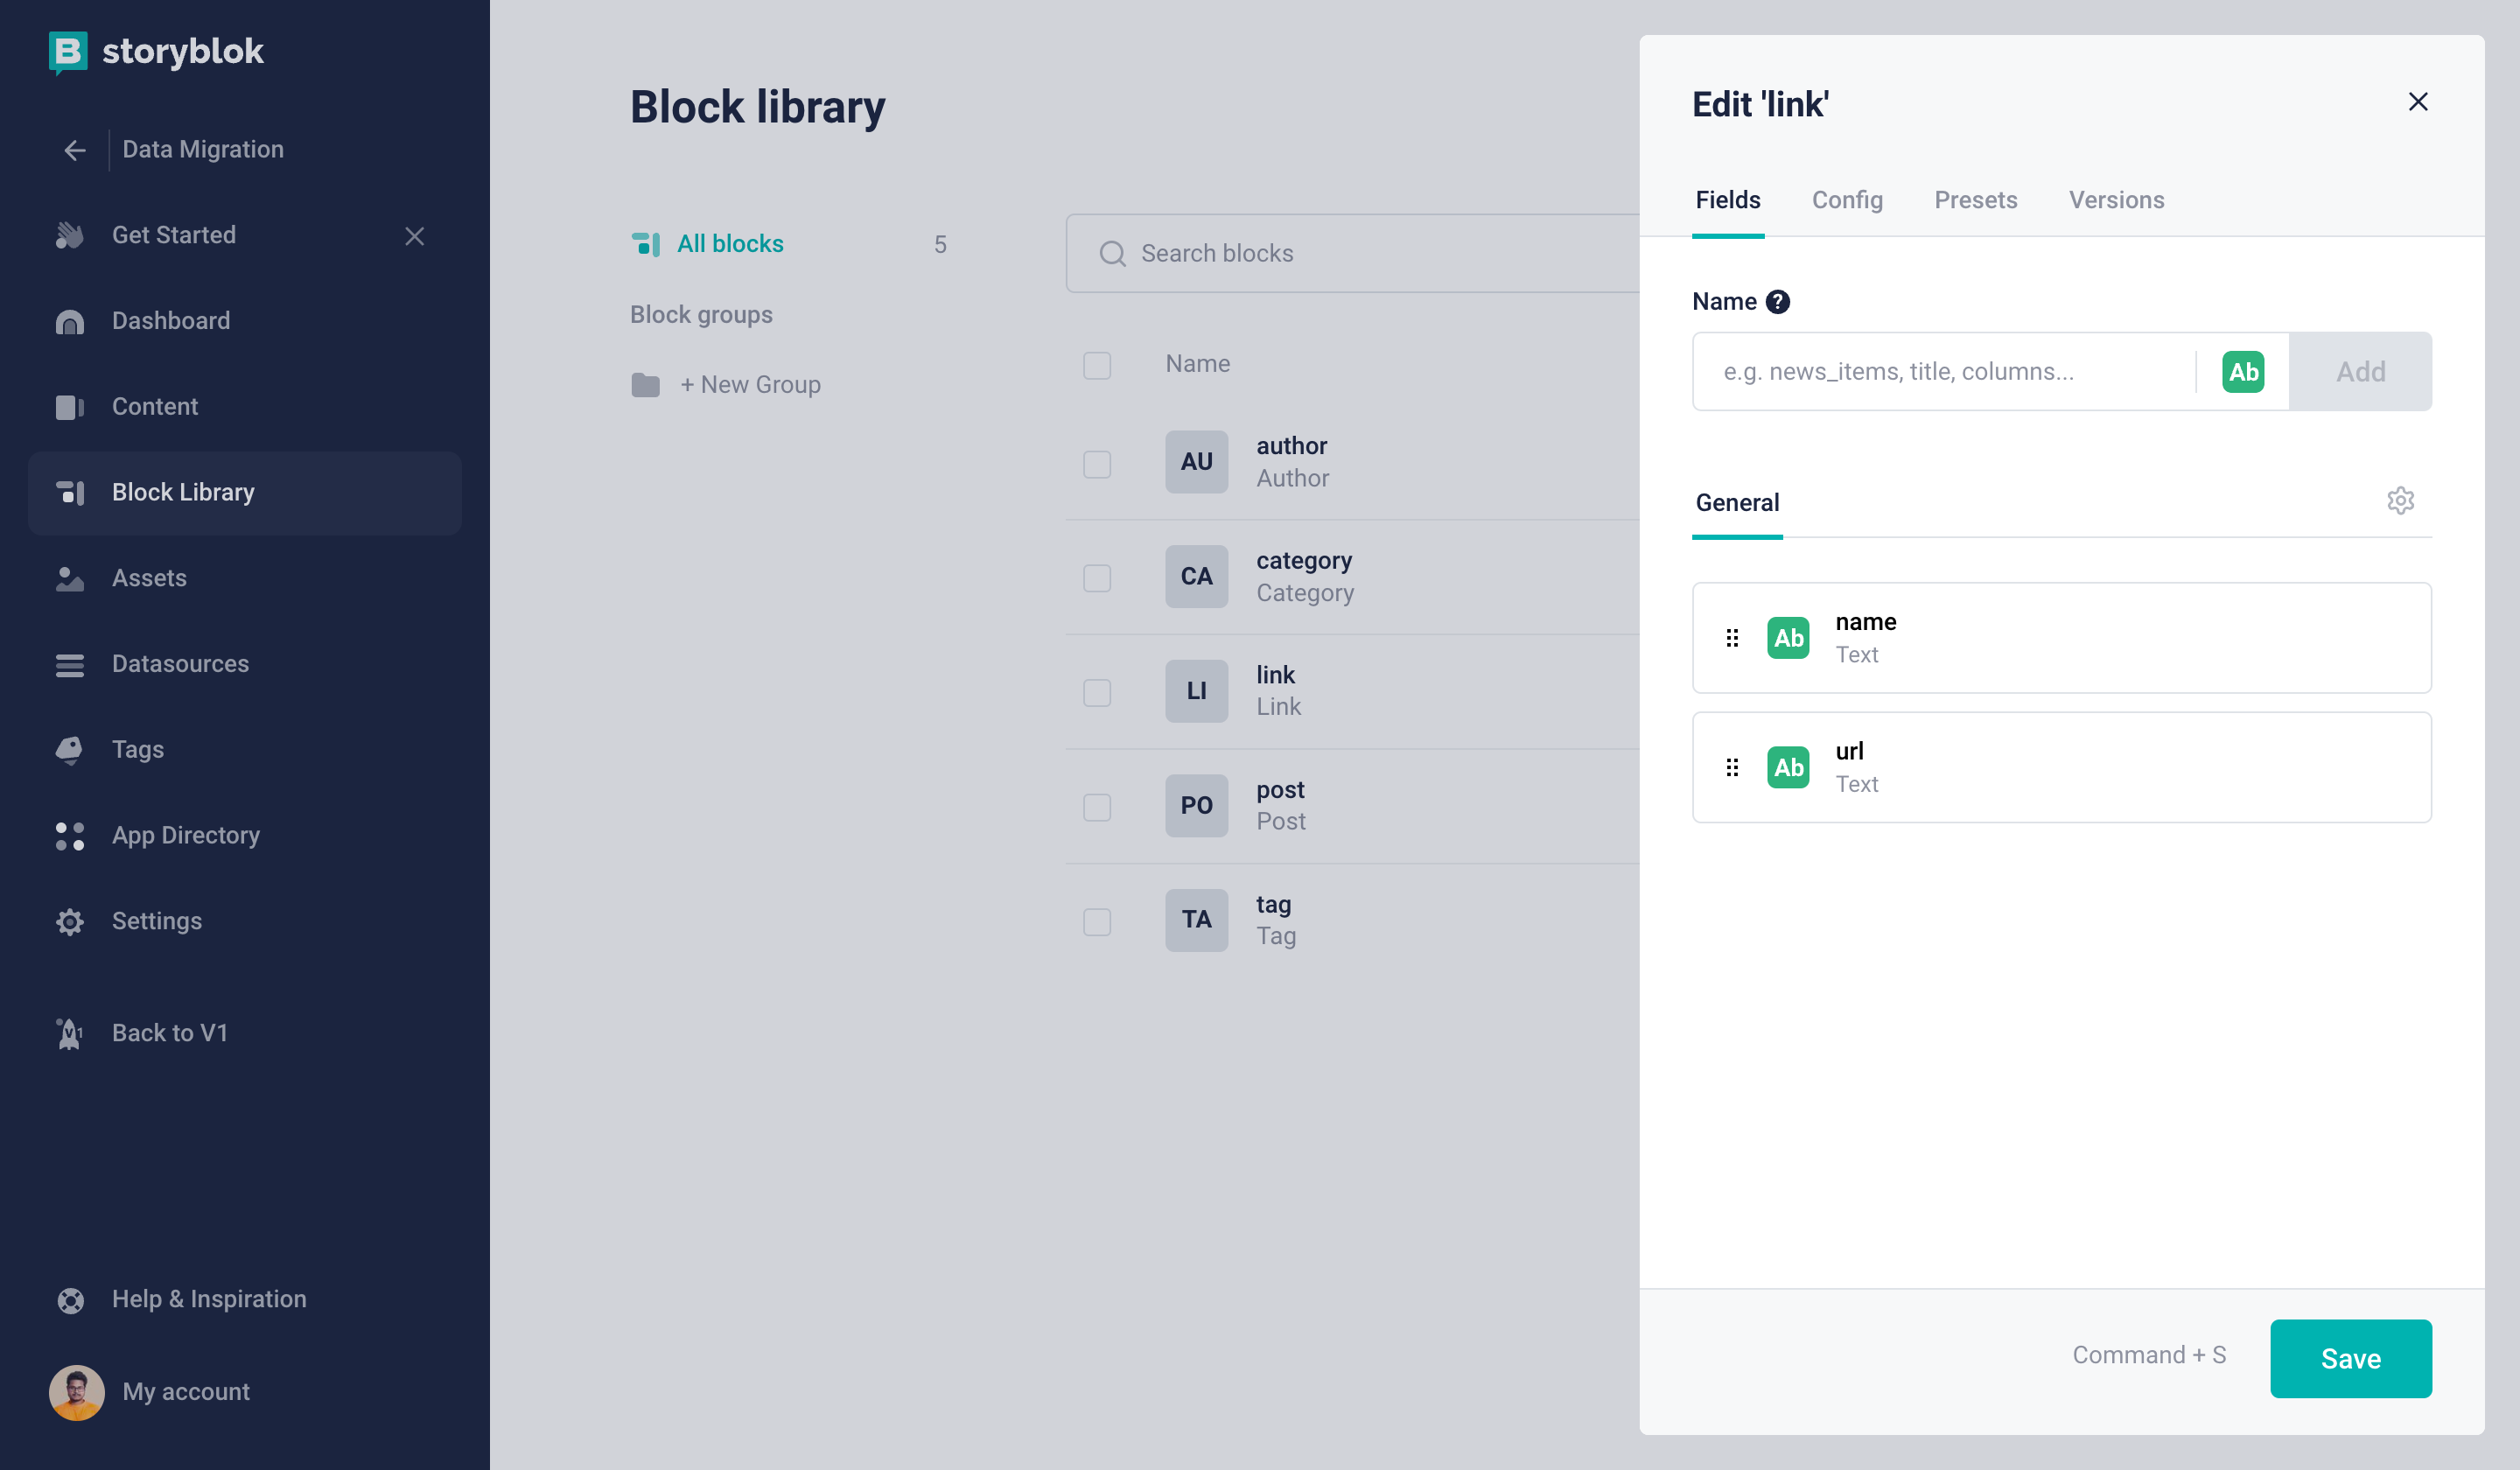
Link Nestable block
Now that we have the Link Nestable Block we can now create our Author Content Type Block (technical name: author).
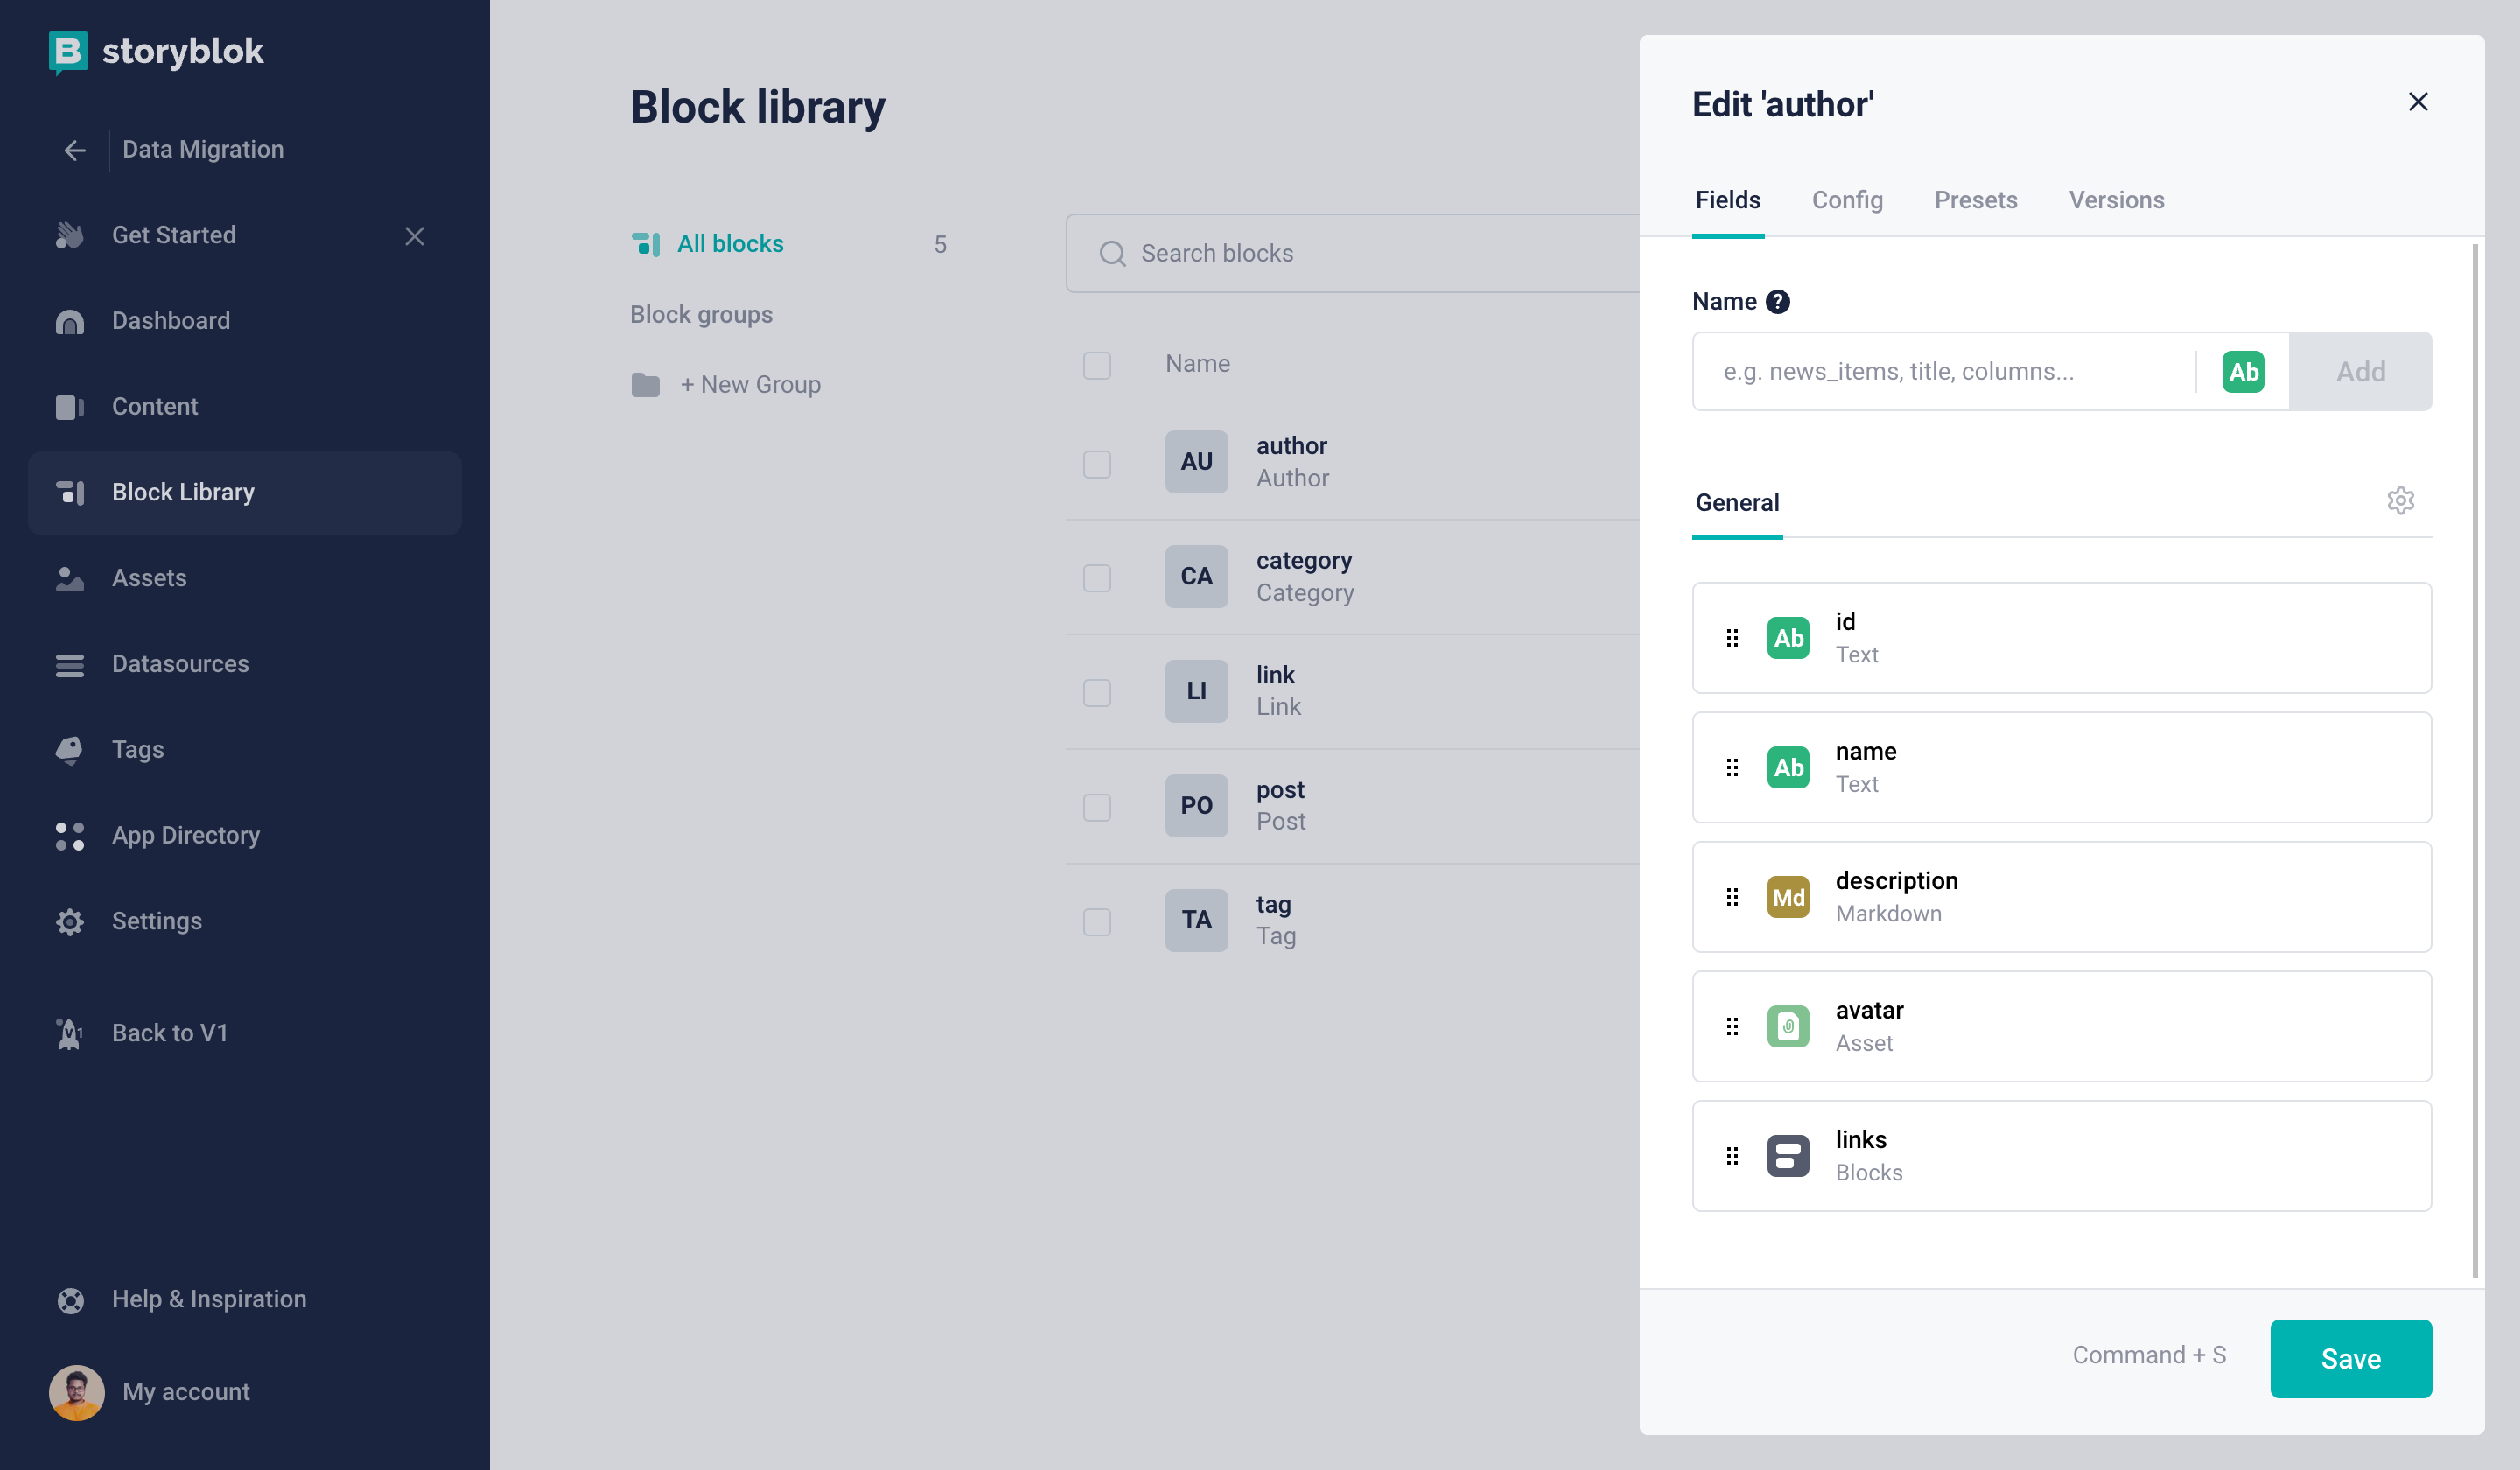
Author Content Type Block
id: Textname: Textdescription: Markdownavatar: Asset (Image)links: Blocks
The first four fields are pretty straightforward, but we used the Blocks field provided by Storyblok for the links property. By default, the Storyblok Blocks field will allow us to select all Nestable blocks in our project. But we don't want that we only want a specific component to be added here. In our case, we only want to allow our previously created Link component.
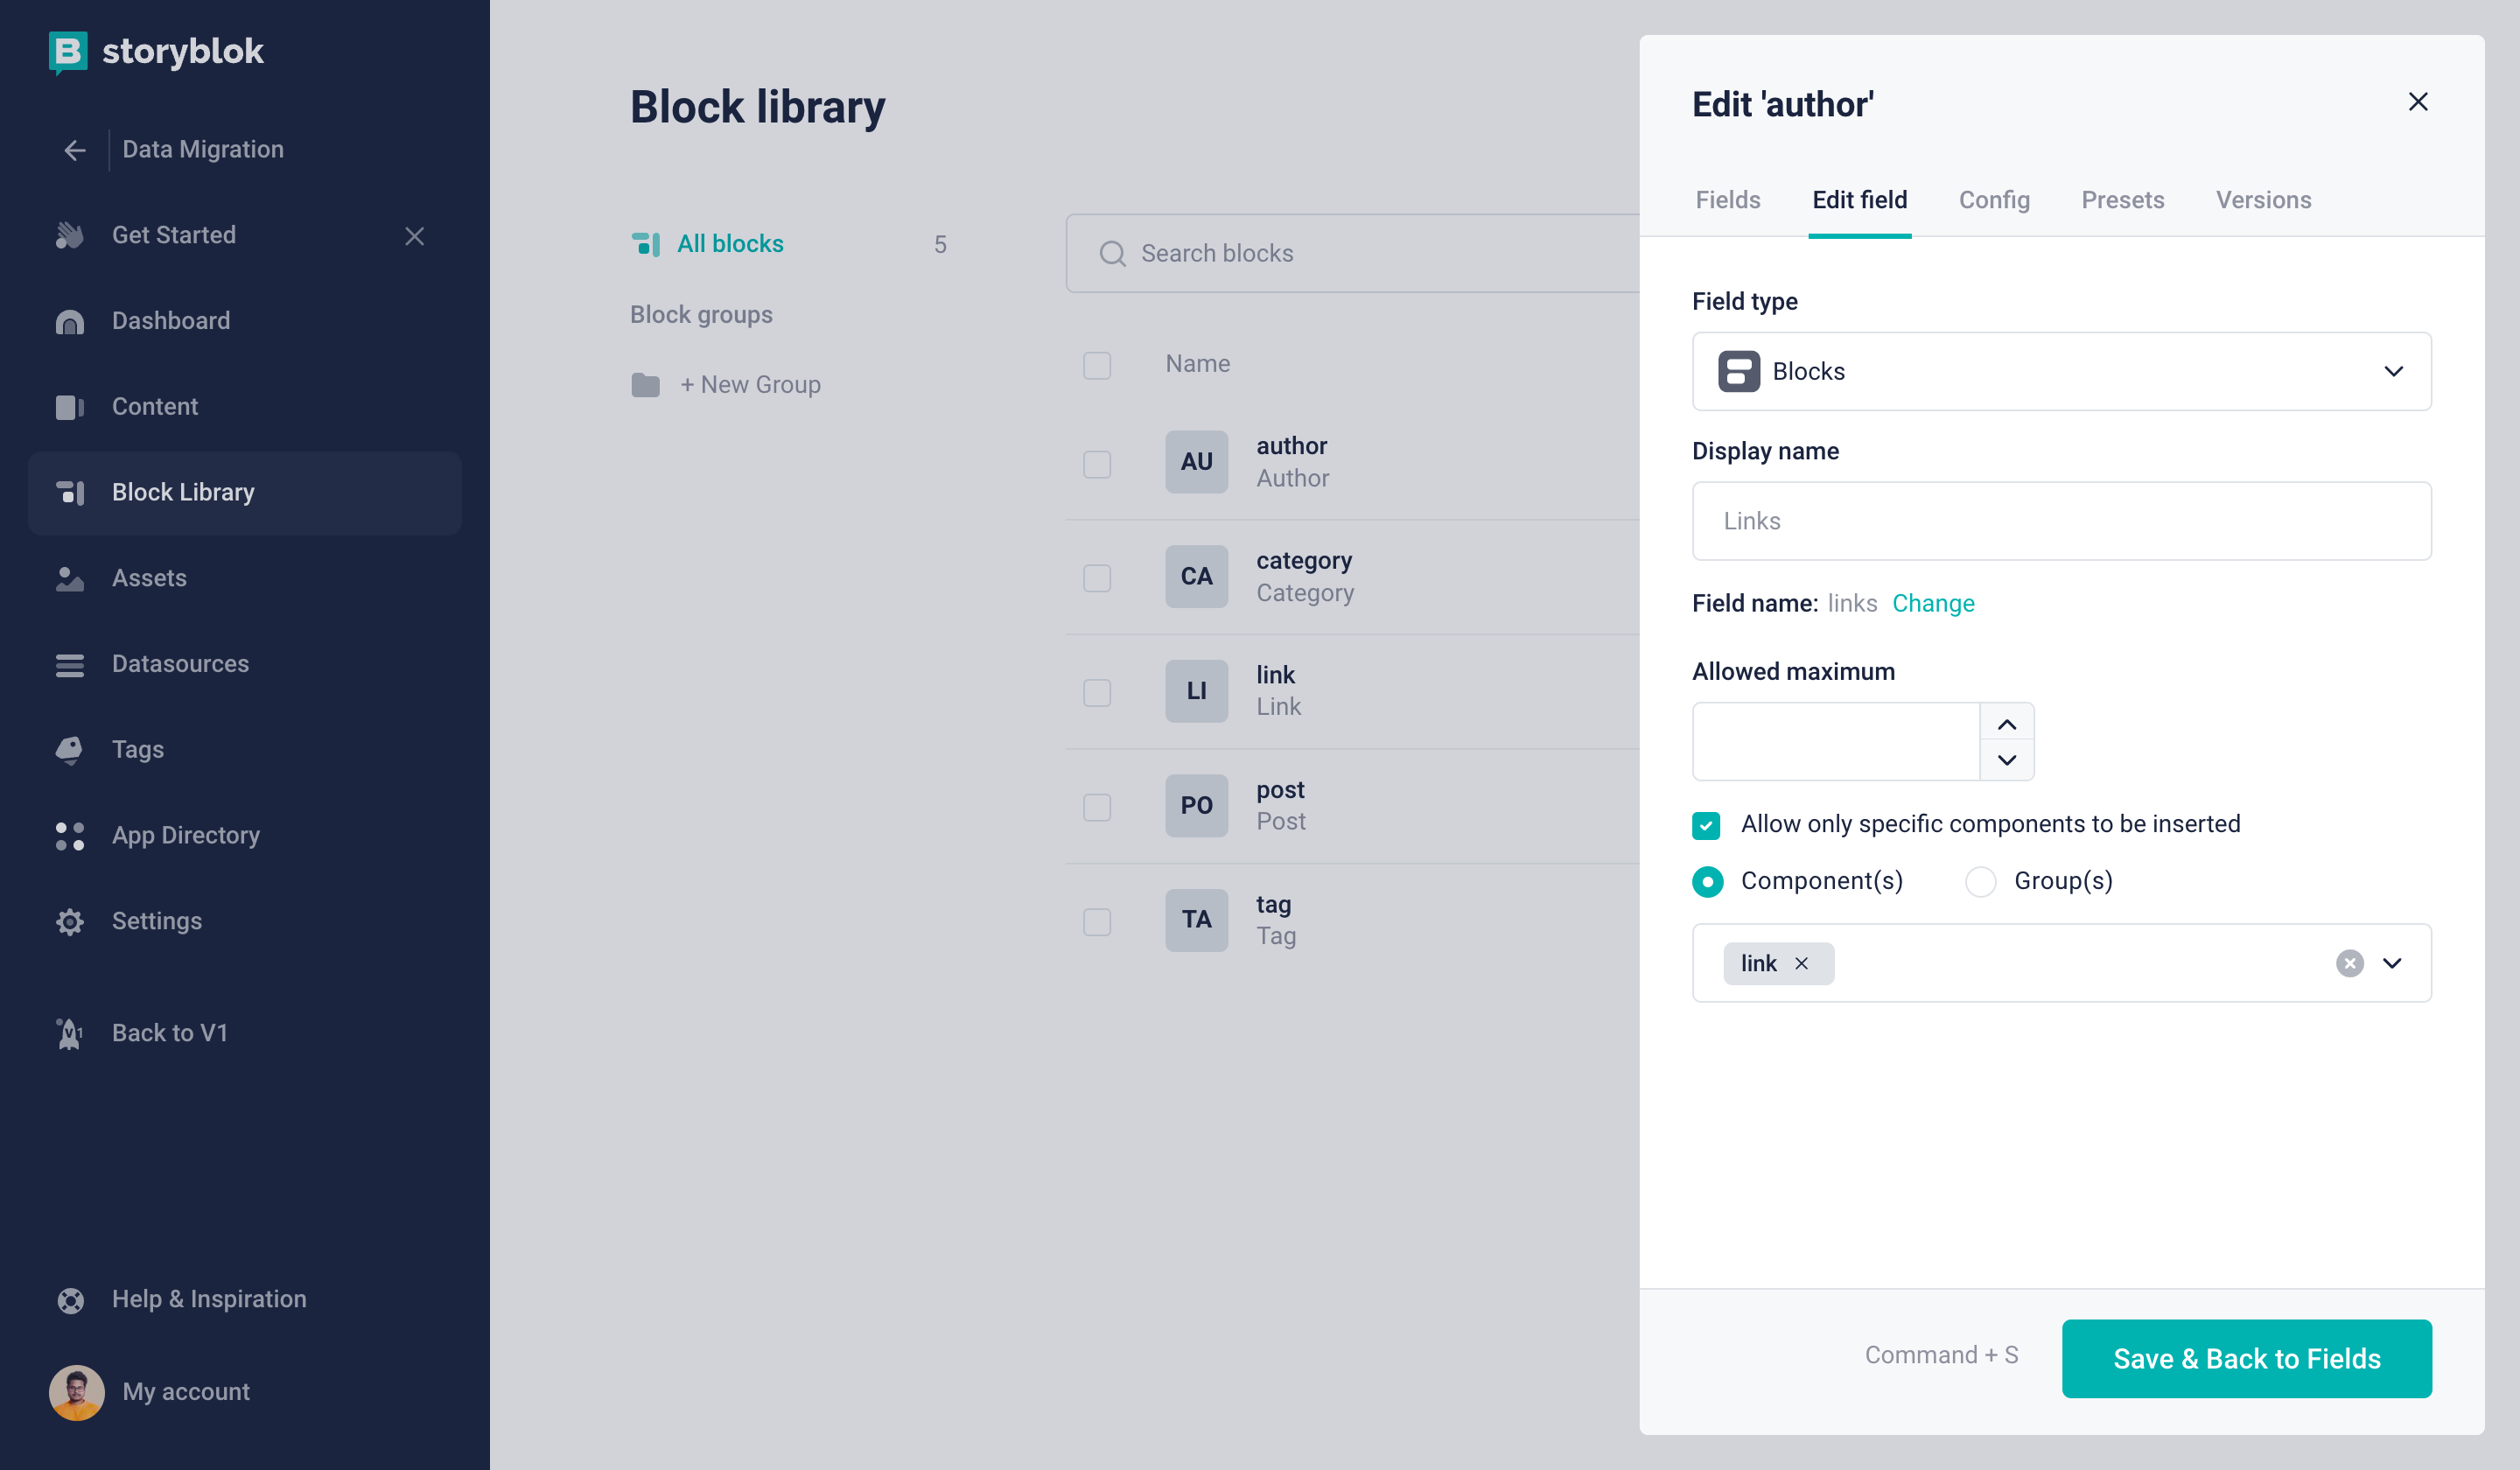
Only allow Link Nestable Block
Finally, it's time for our Post Content Type Block (technical name: post).
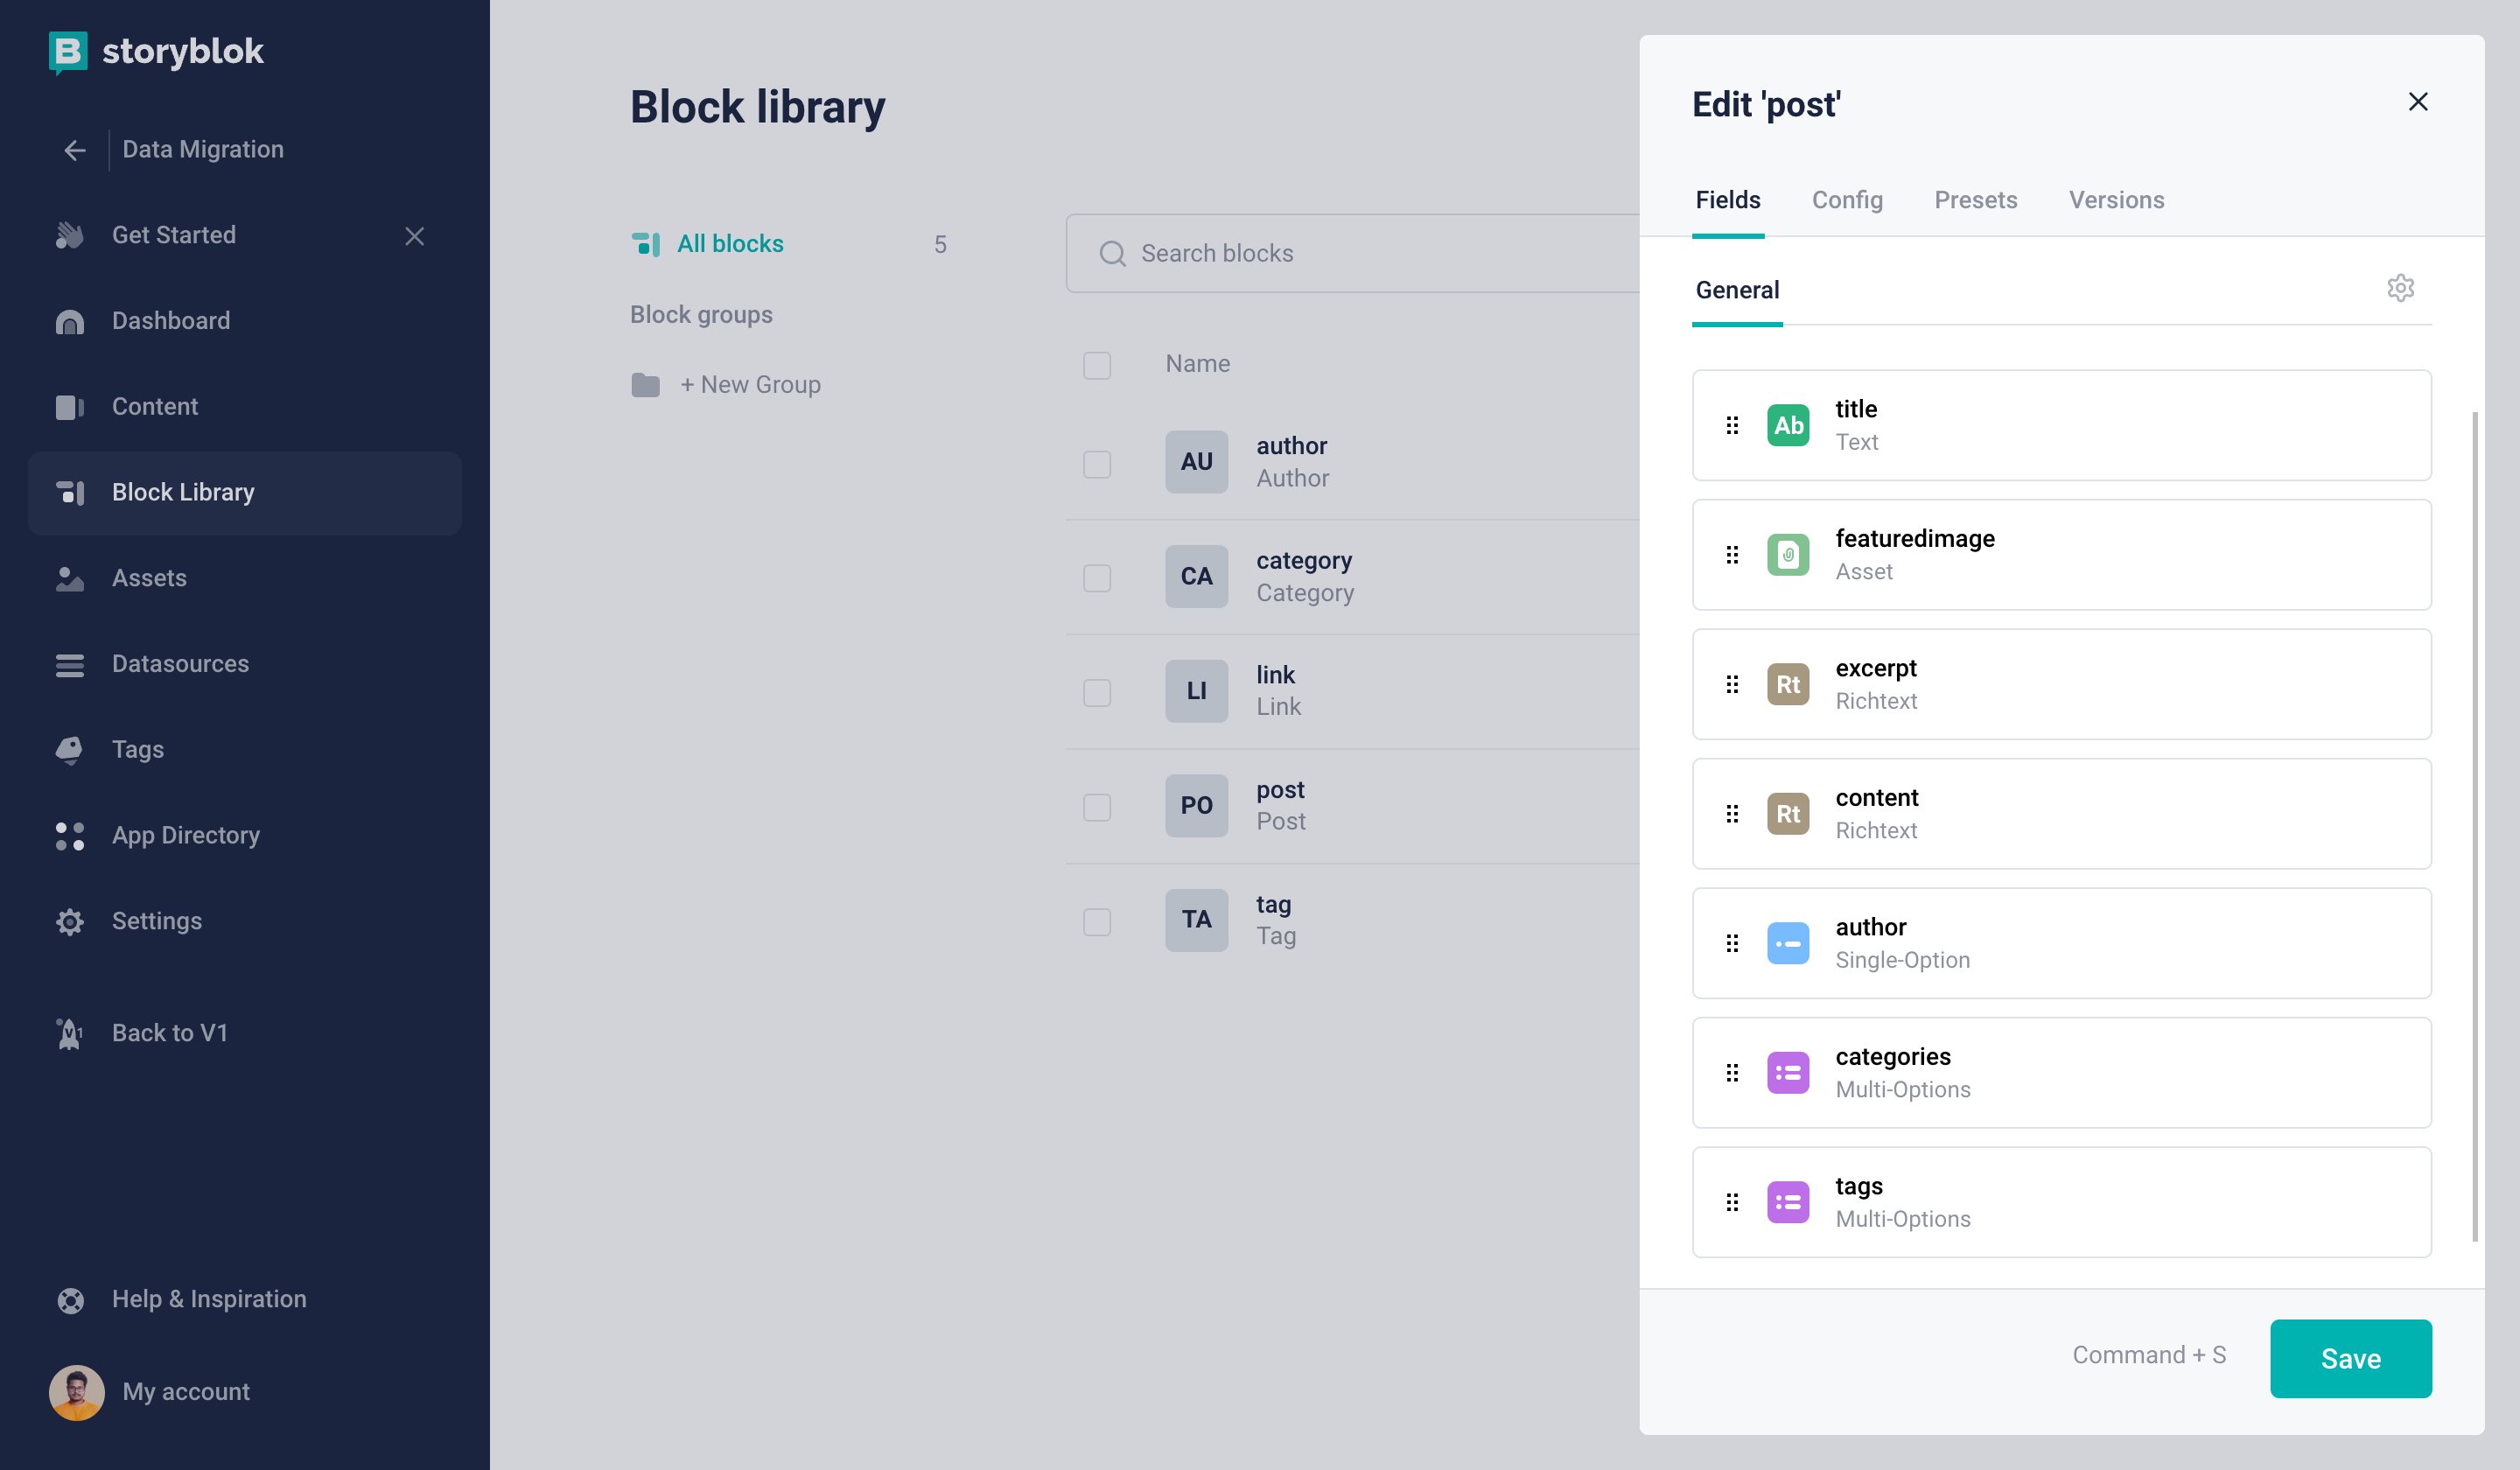
Post Content Type Block
title: Textfeaturedimage: Asset (Image)excerpt: Richtextcontent: Richtextauthor: Single-Optioncategories: Multi-Optionstags: Multi-Options
For the last three fields, you can see we used Single-Option and Multi-Options fields. Let’s configure these so that only specified data can be selected.
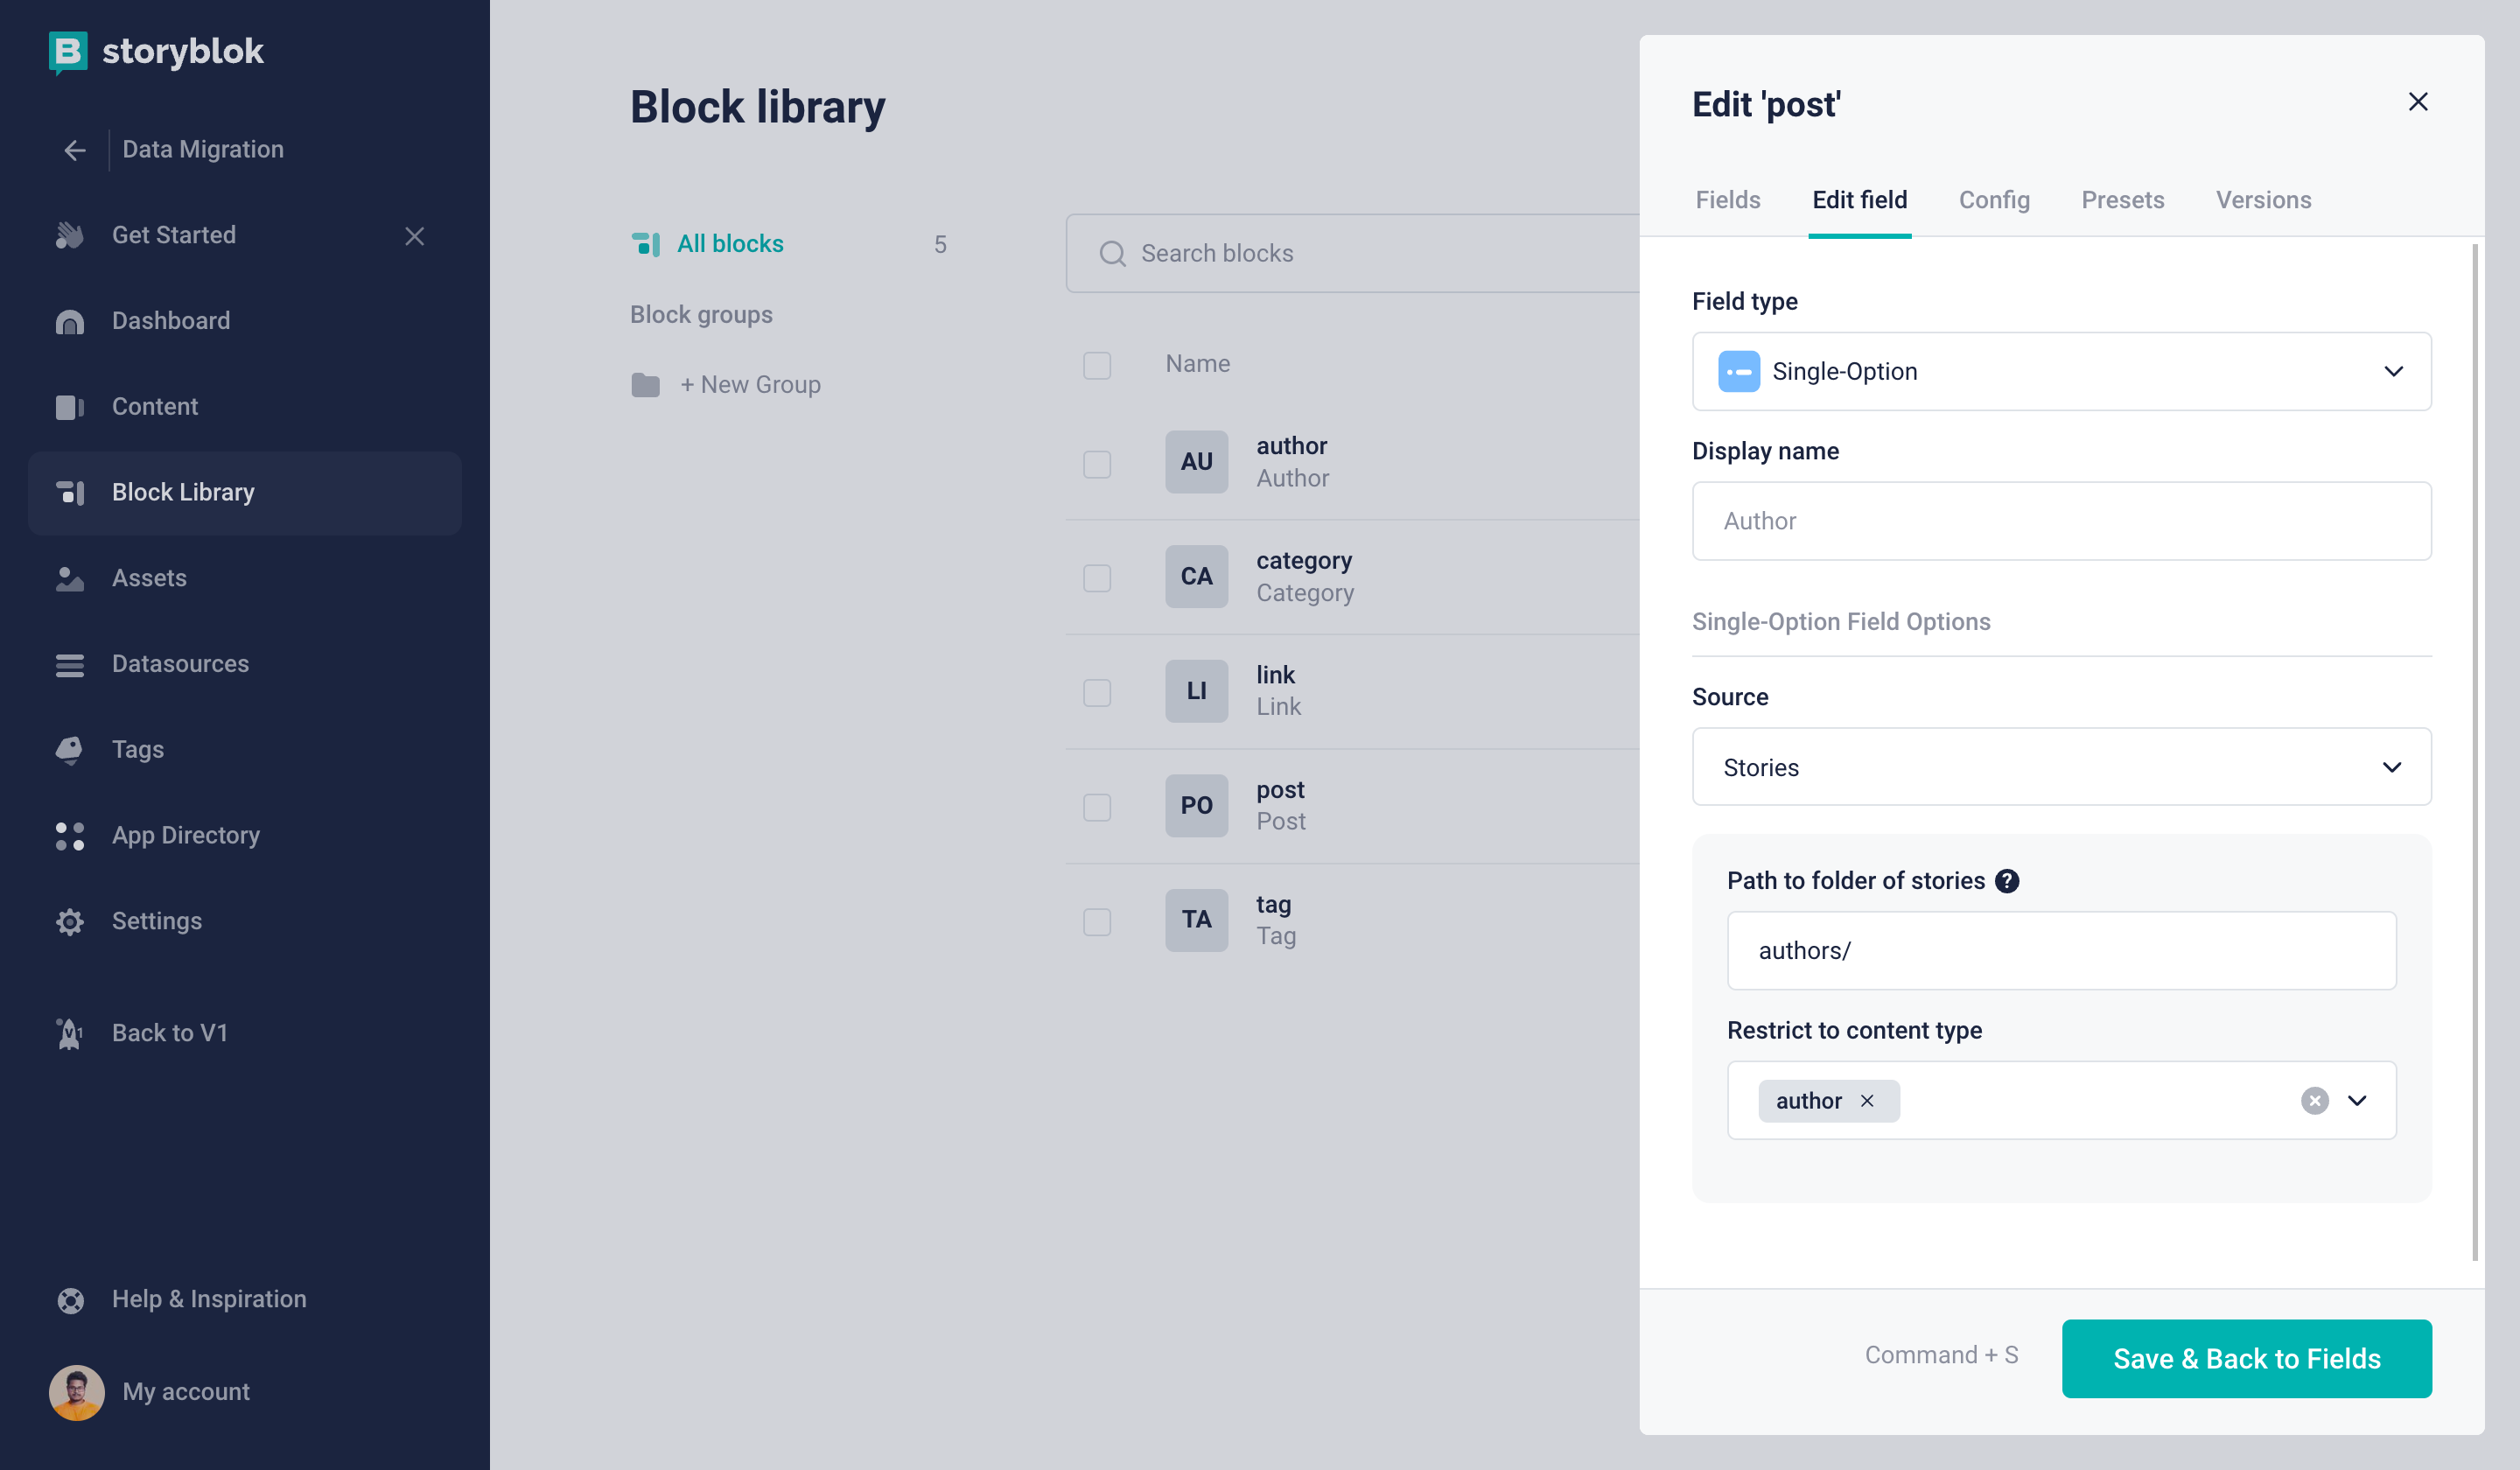
Only the Author Content Type can be selected
In the author Single-Option field, we can set the source to be Stories and restrict the content type to author. Let’s also set the path to be authors/. This folder does not exist yet but we will shortly create it.
Next, we have categories and tags field we are going to configure those as below Images.
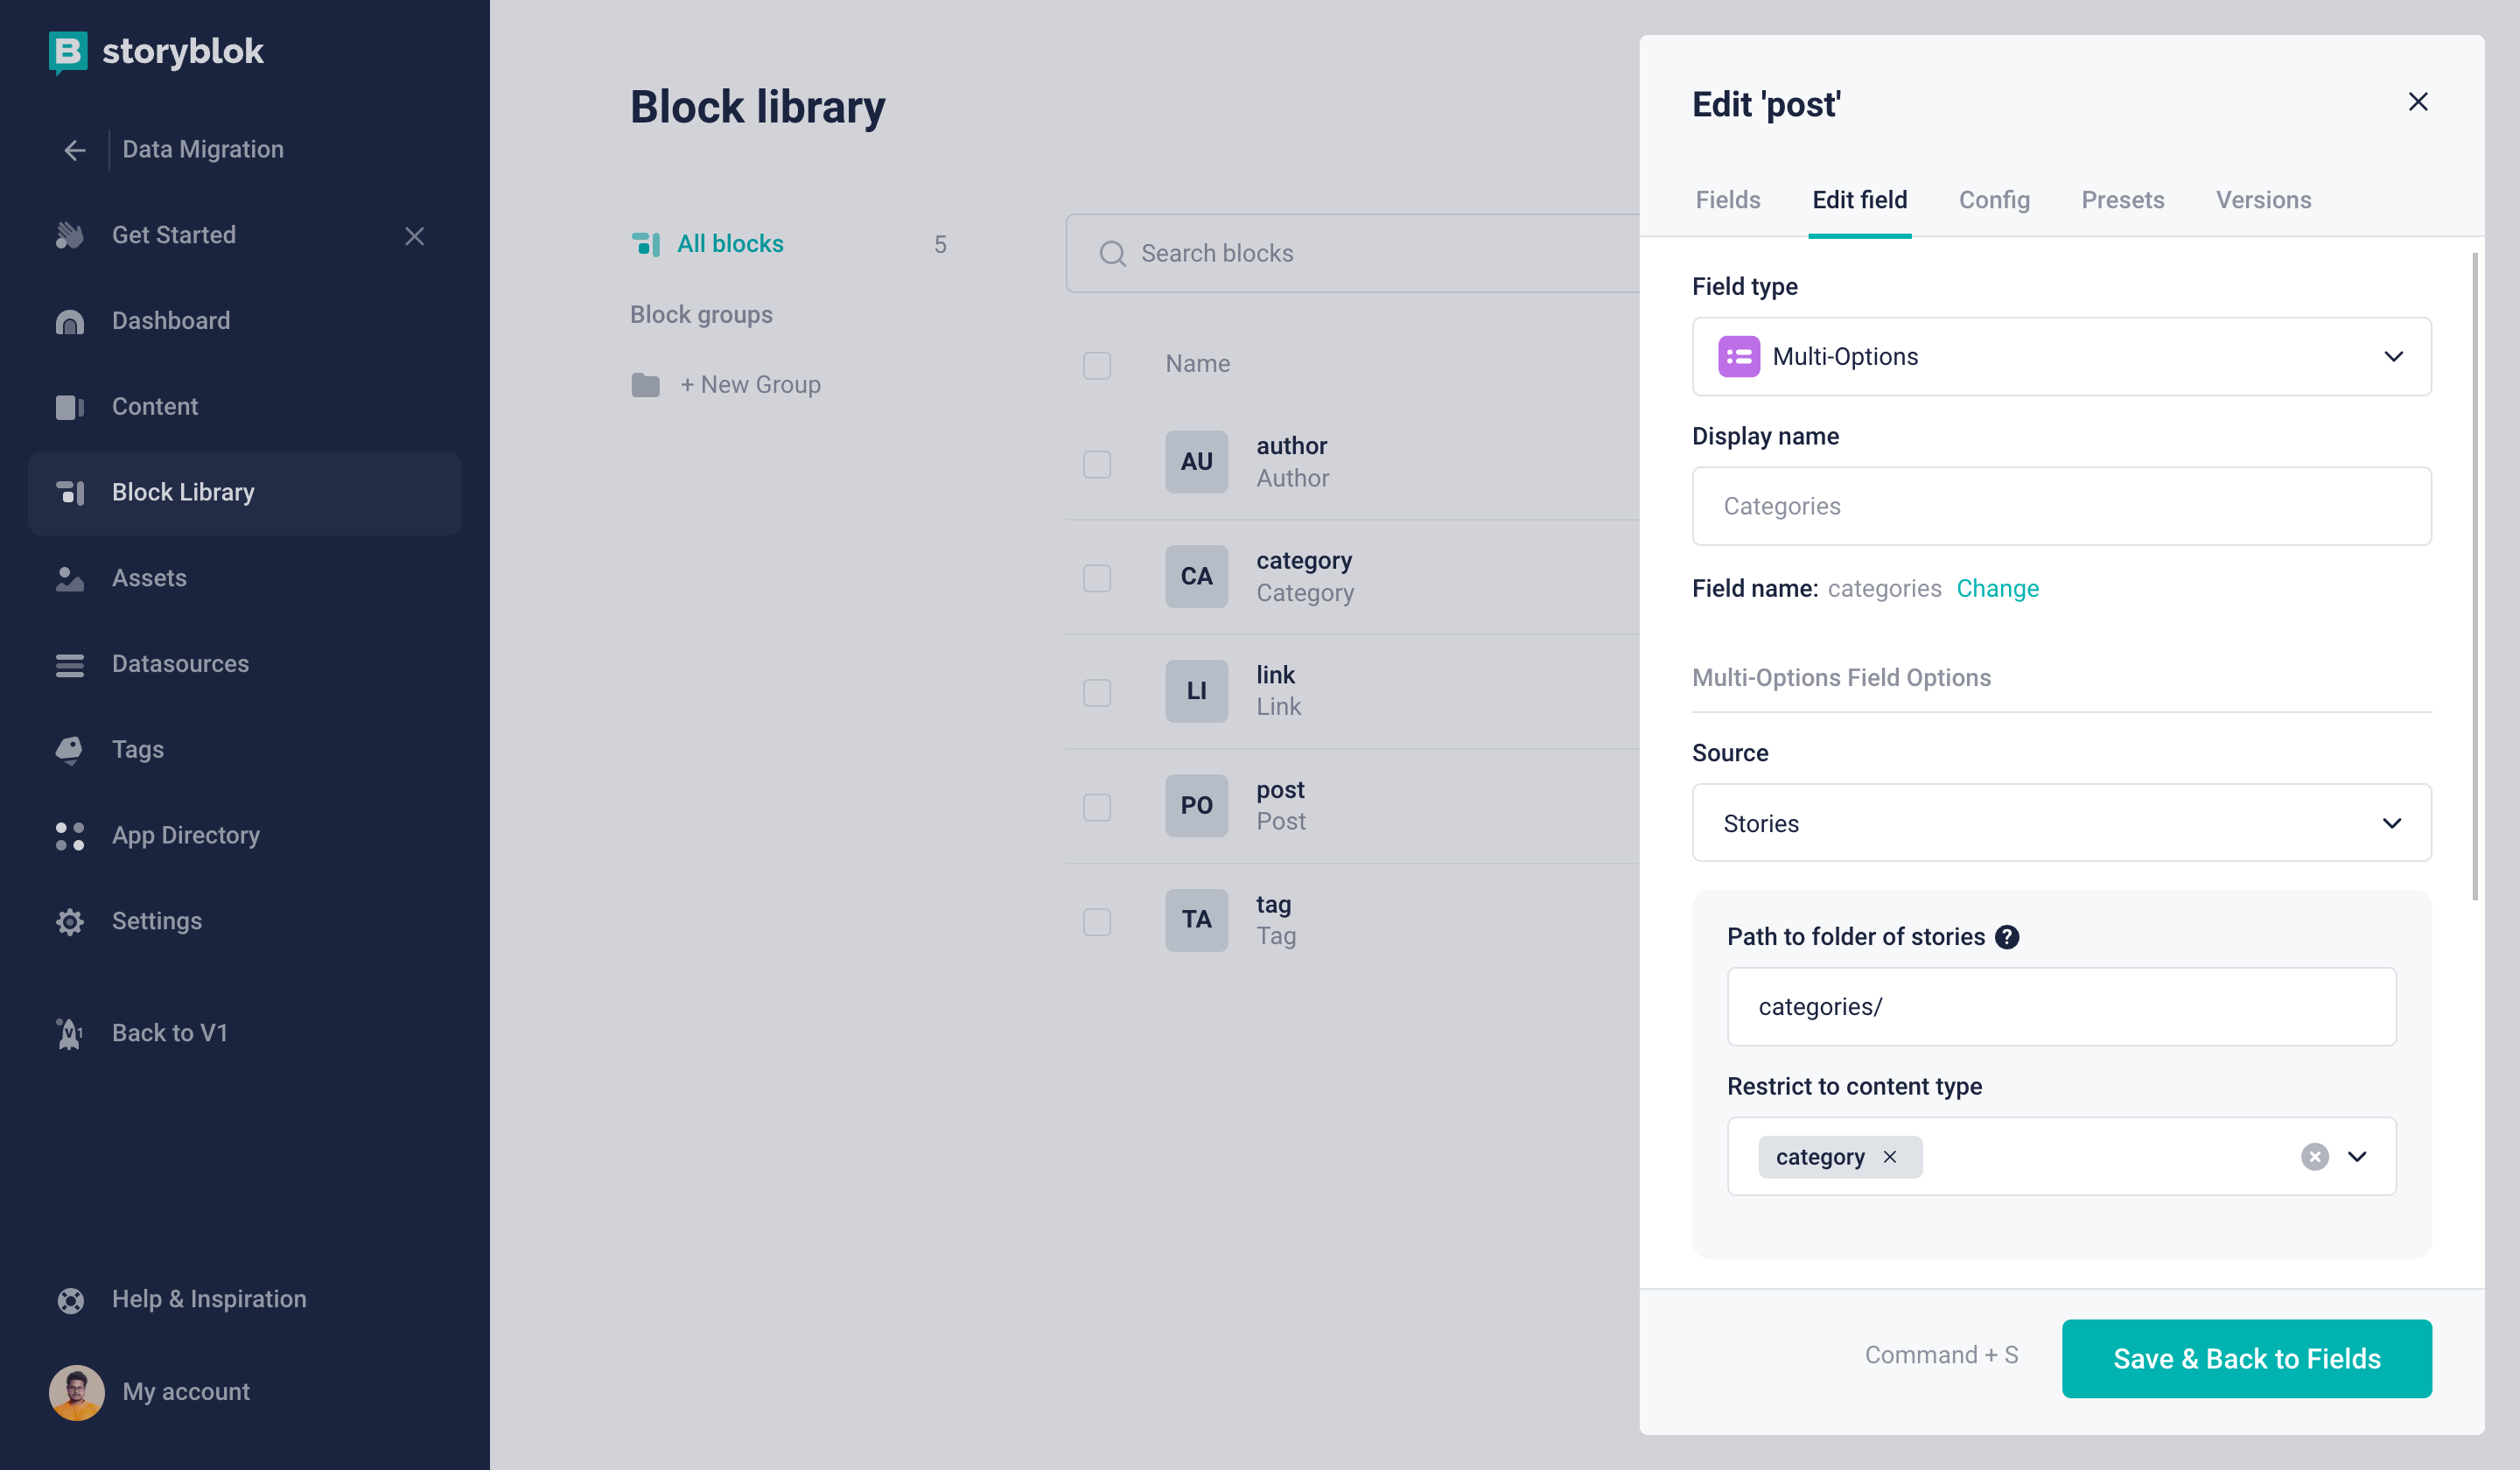
Only the Category Content Type can be selected
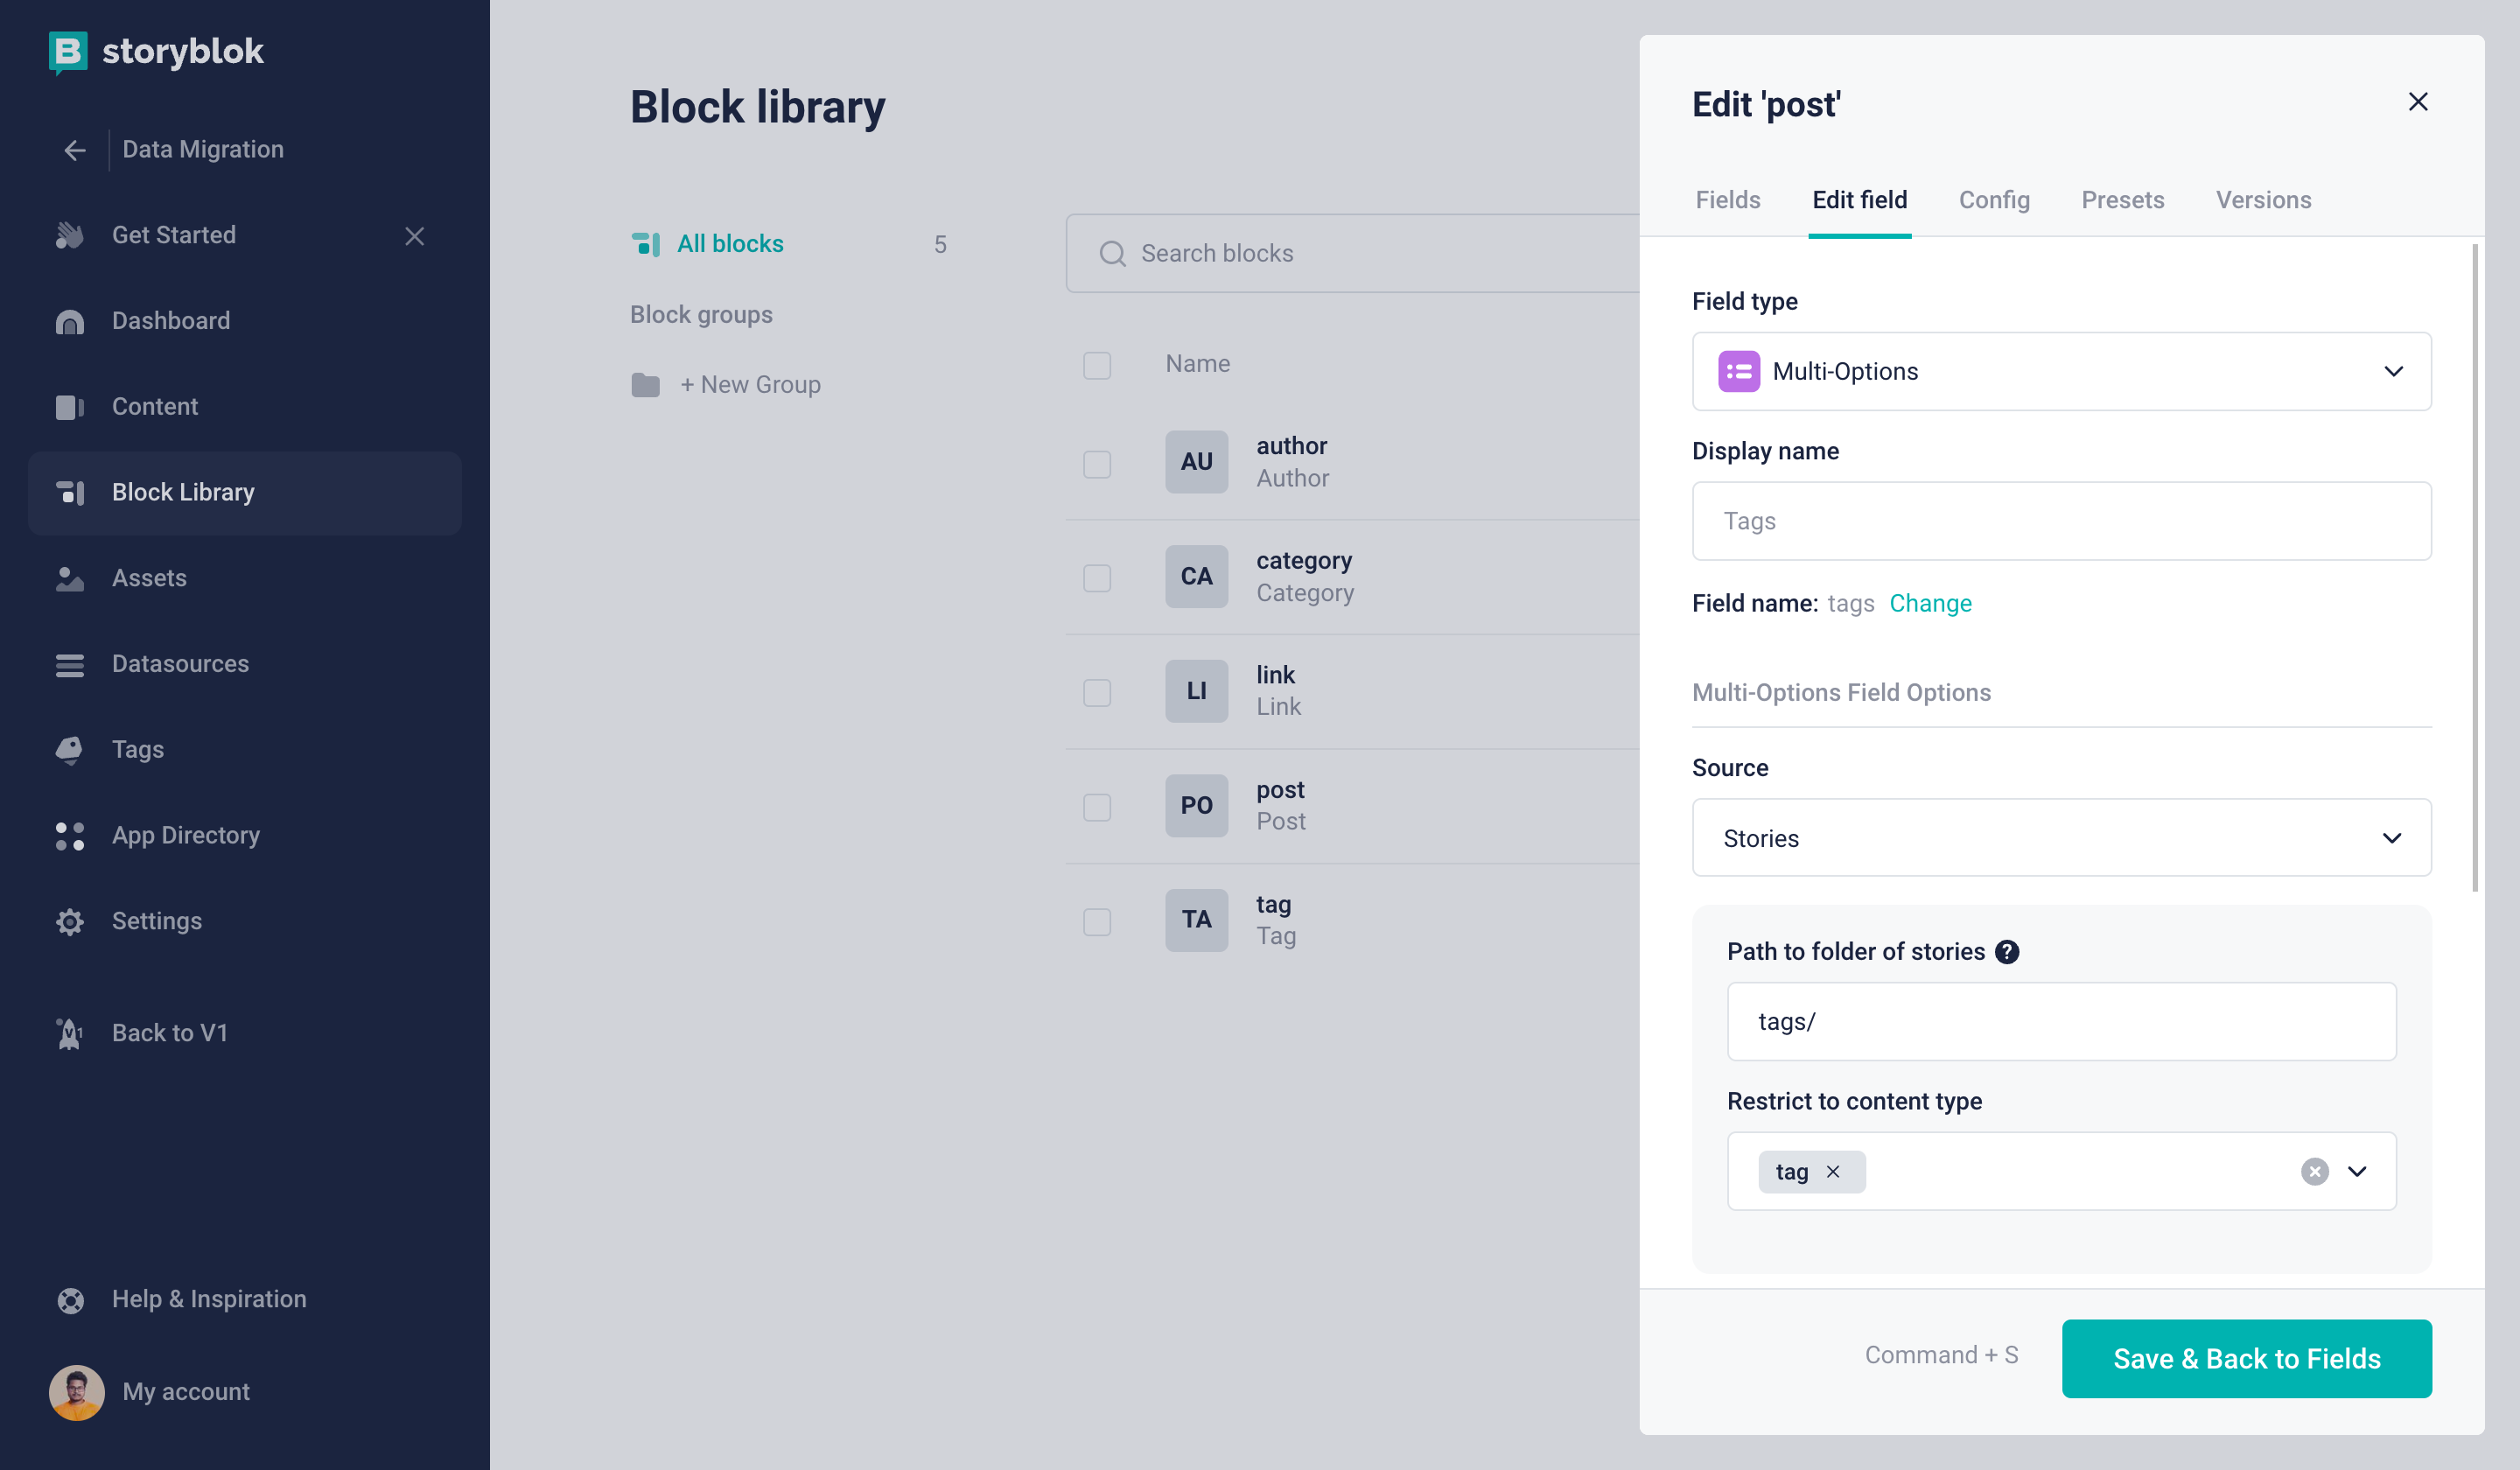
Only the Tag Content Type can be selected
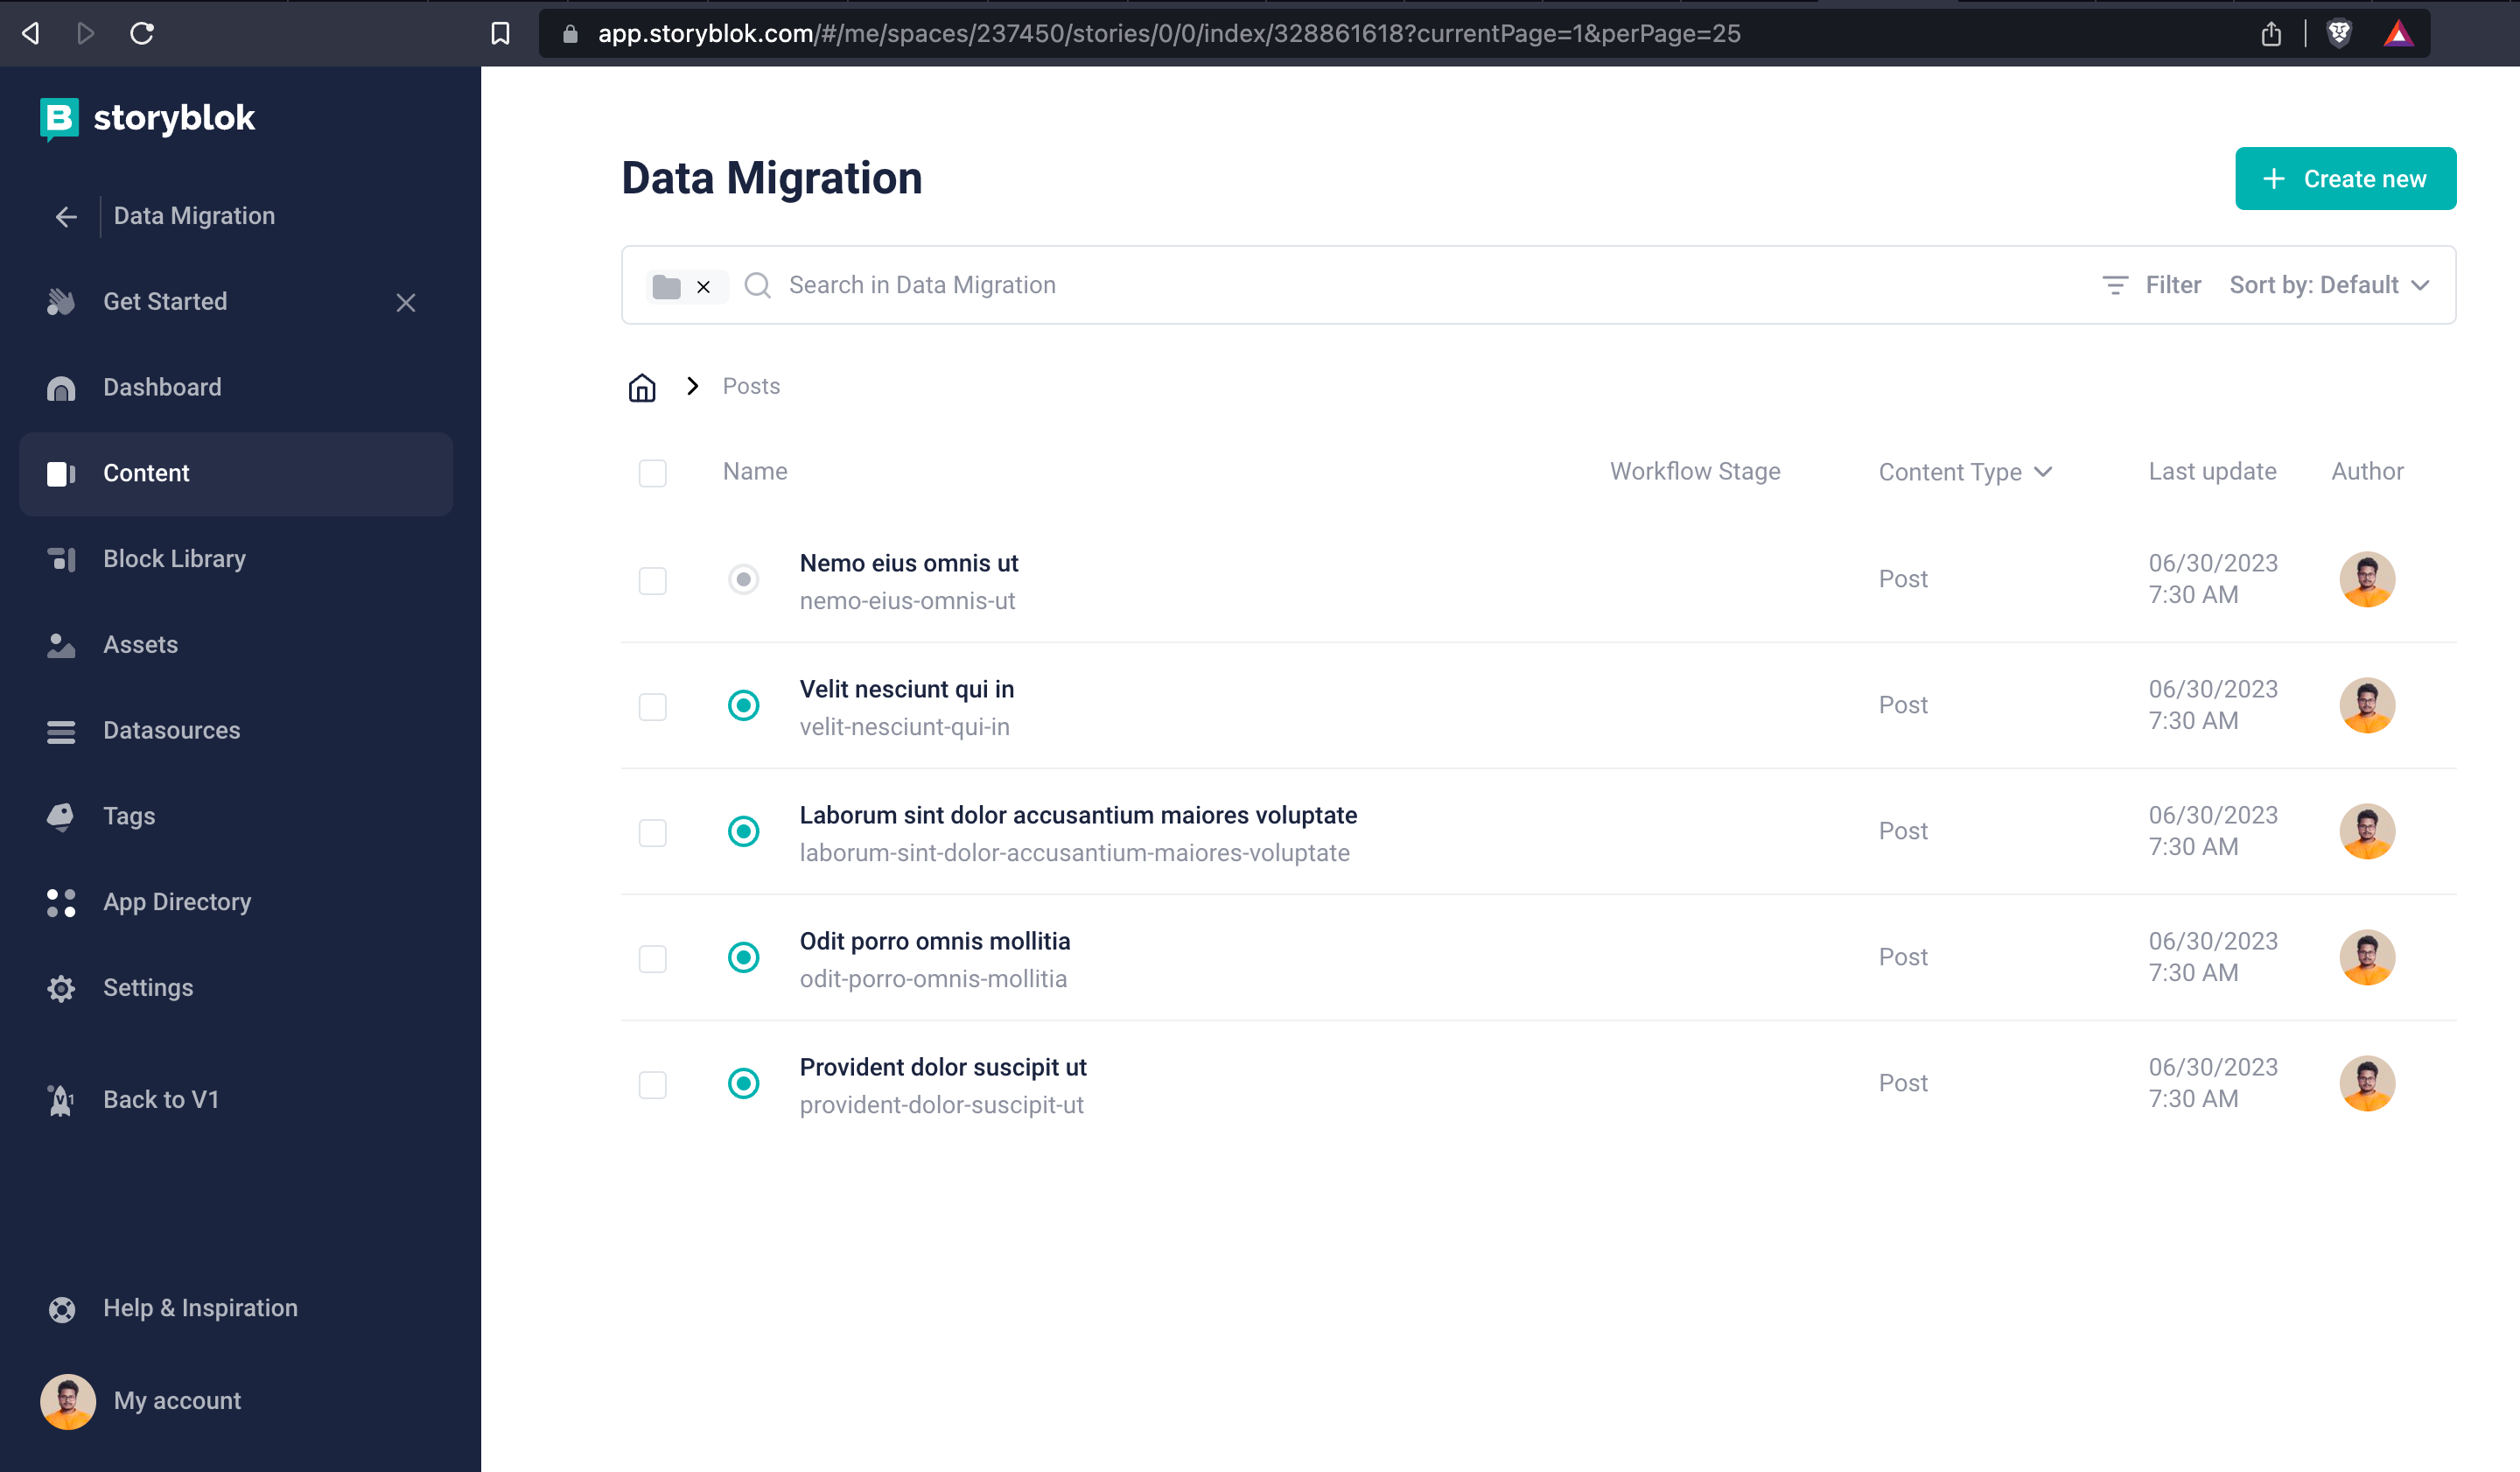
Now that we have modelled all of our content in Storyblok to match our current data, let's move on and create a few folders for the respective content types.
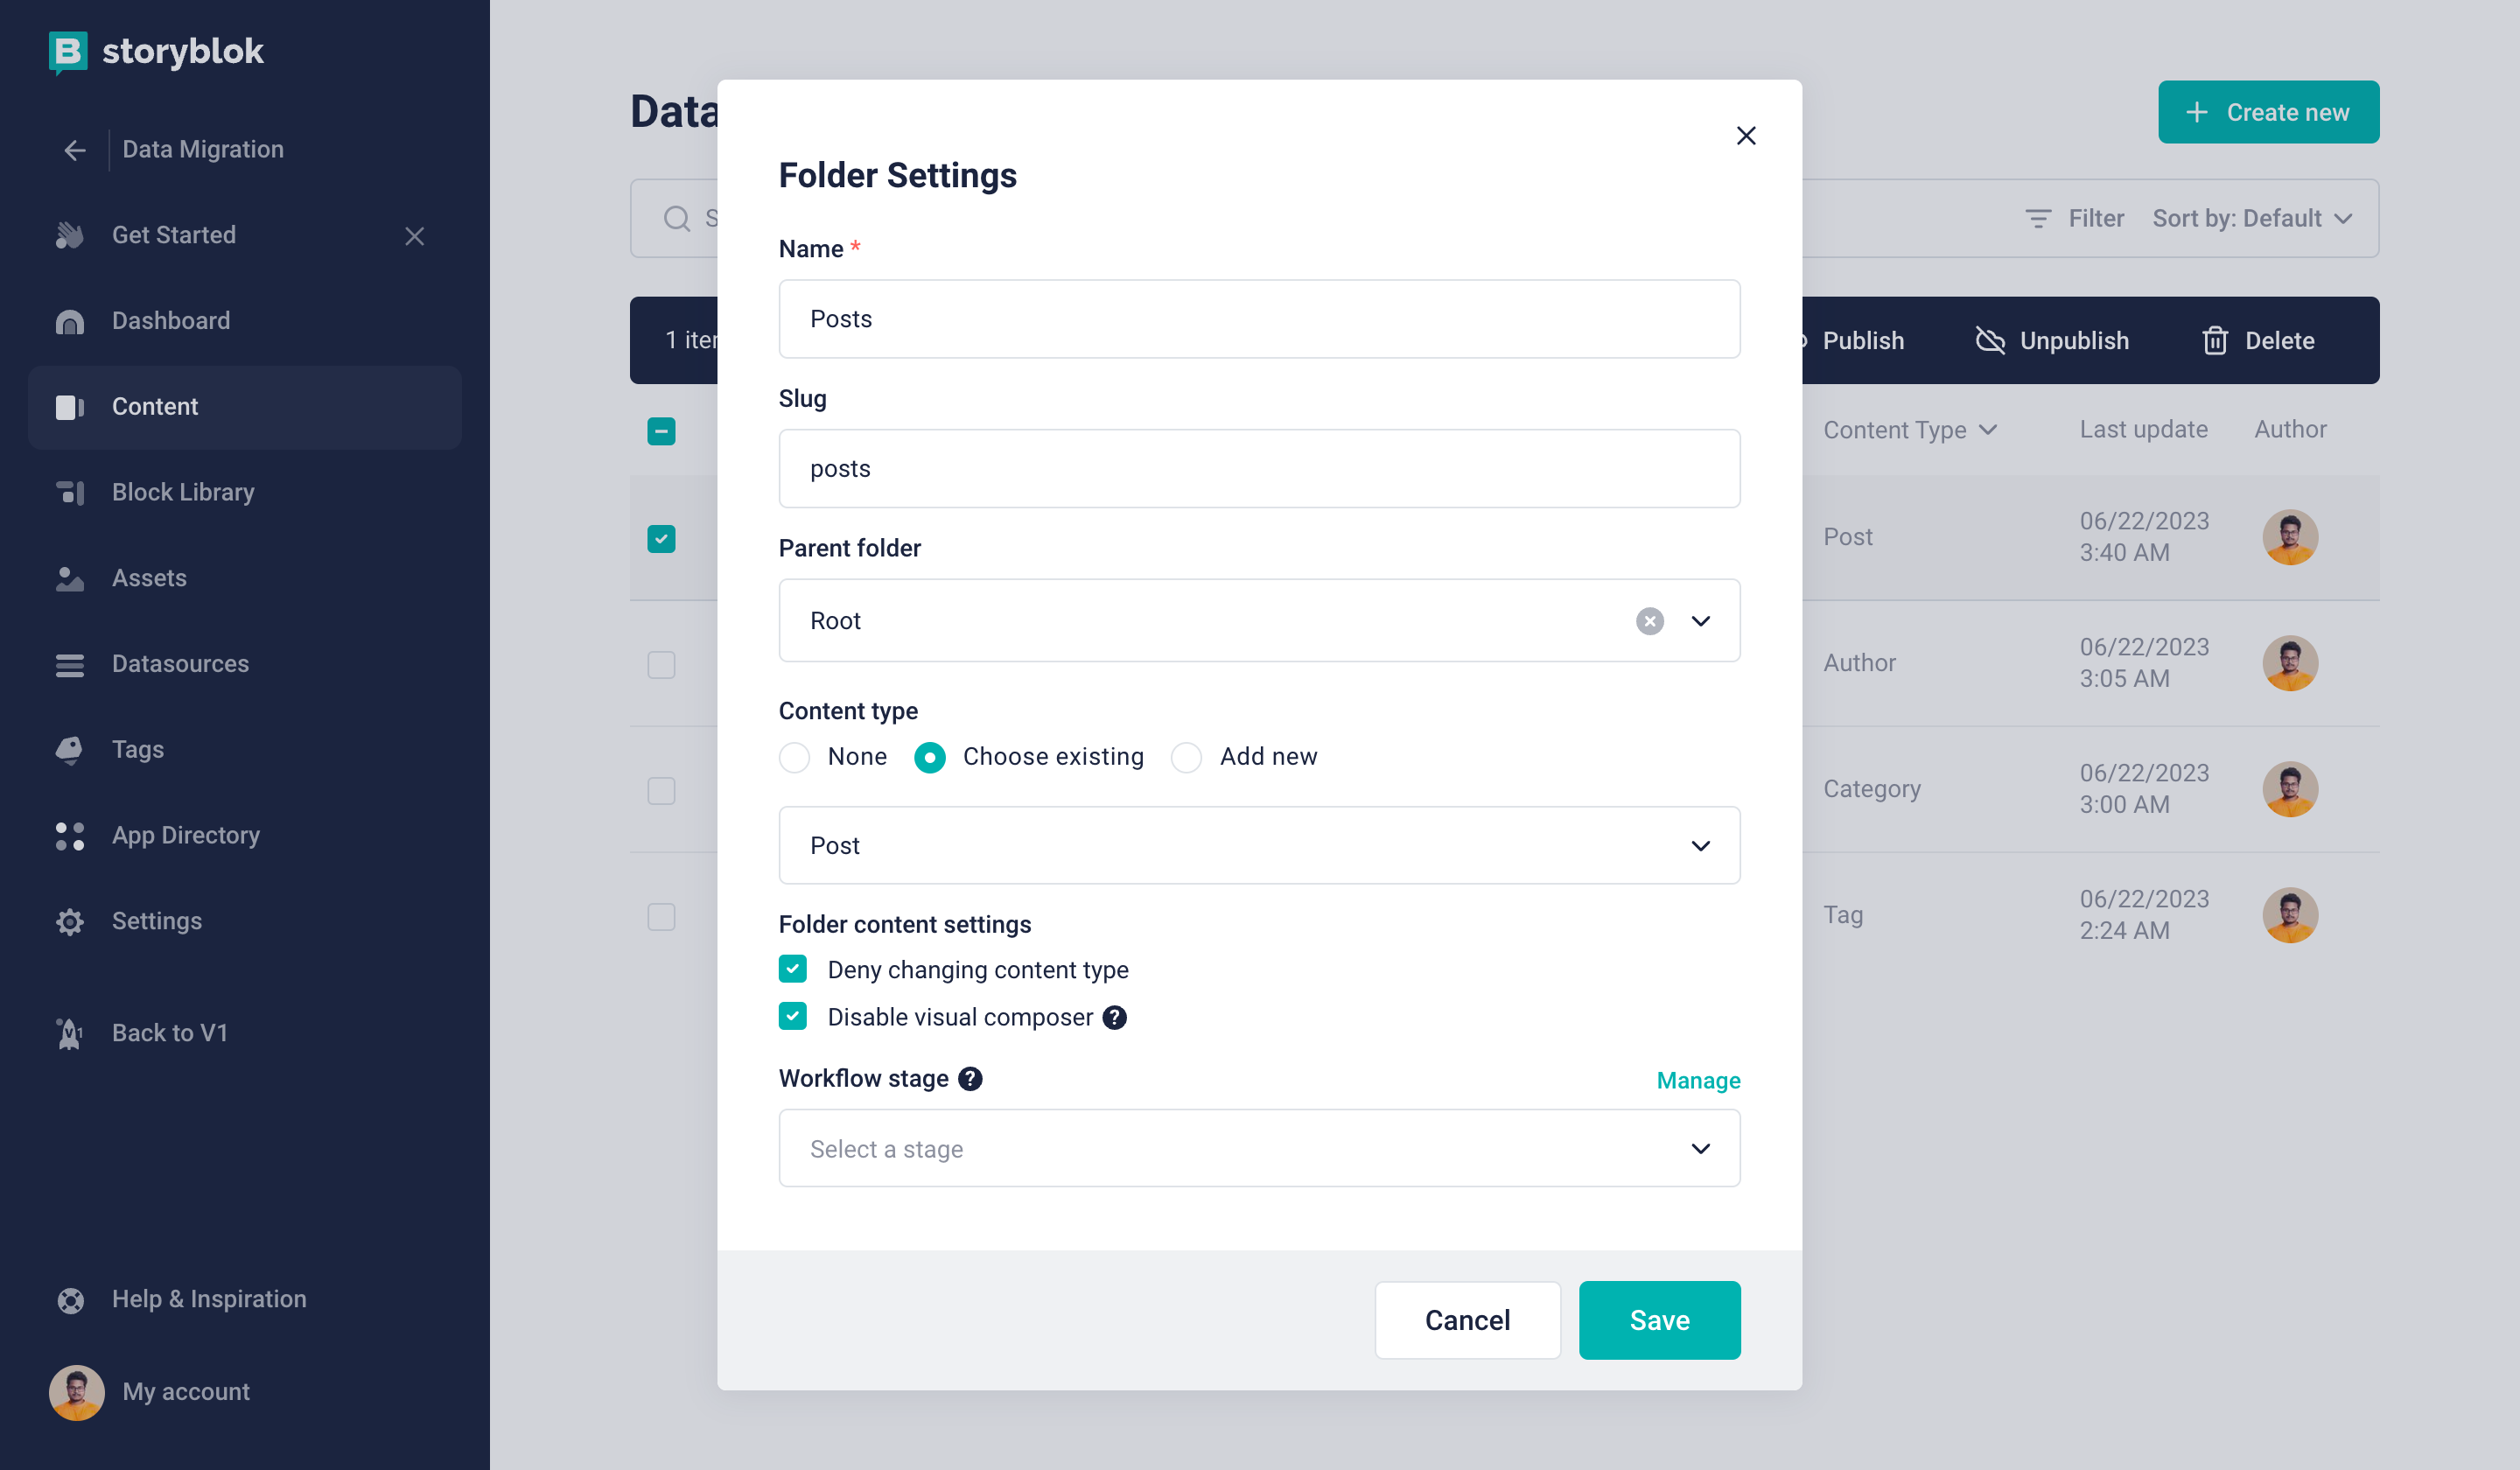
Posts folder to organize all Post Content
We will create four folders for each content type as shown in the image above.
Get relevant access tokens from Storyblok
Before we start writing our code we are going to need a few things from Storyblok, so let's collect those.
- Personal access token
- Preview access token
- Space ID
- The IDs of the four folders
In order to get a personal access token, you can go to this section in your Storyblok account and press Generate new token.

Generate Personal access token
Personal access tokens are meant to be used in a secure environment!
The preview access token and space ID can be retrieved from the Settings of your Storyblok space.
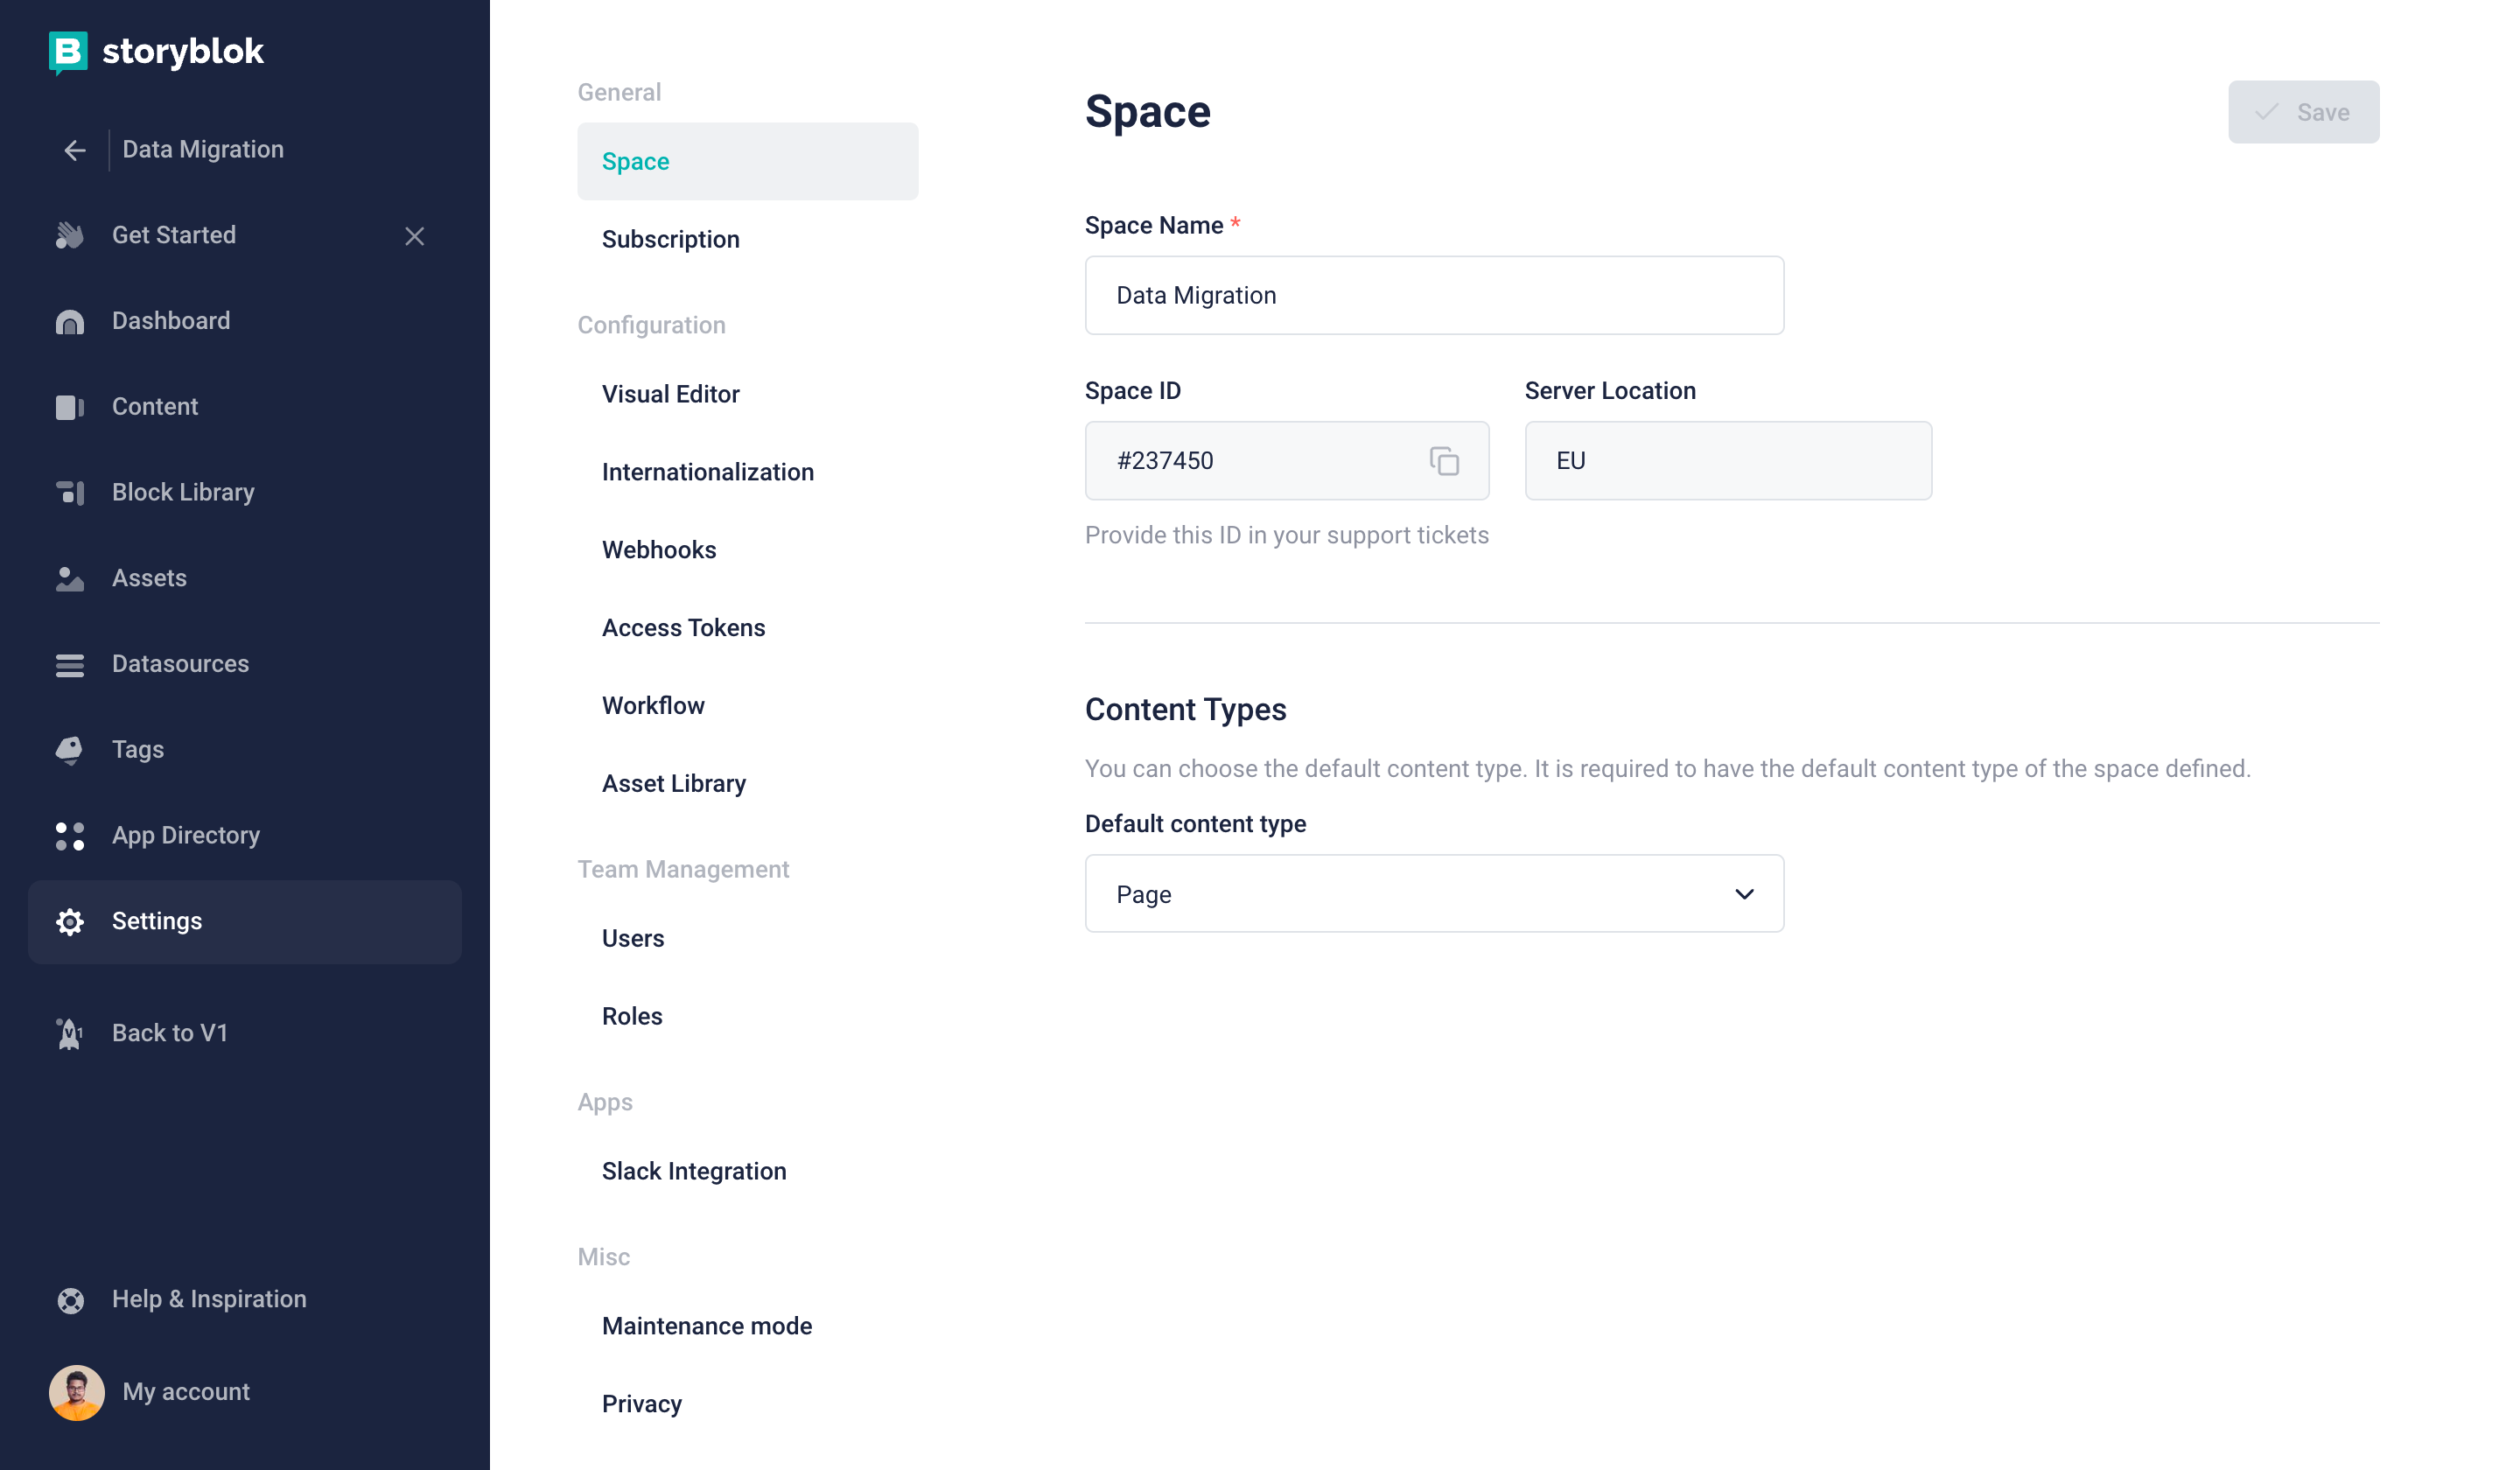
Storyblok SpaceID
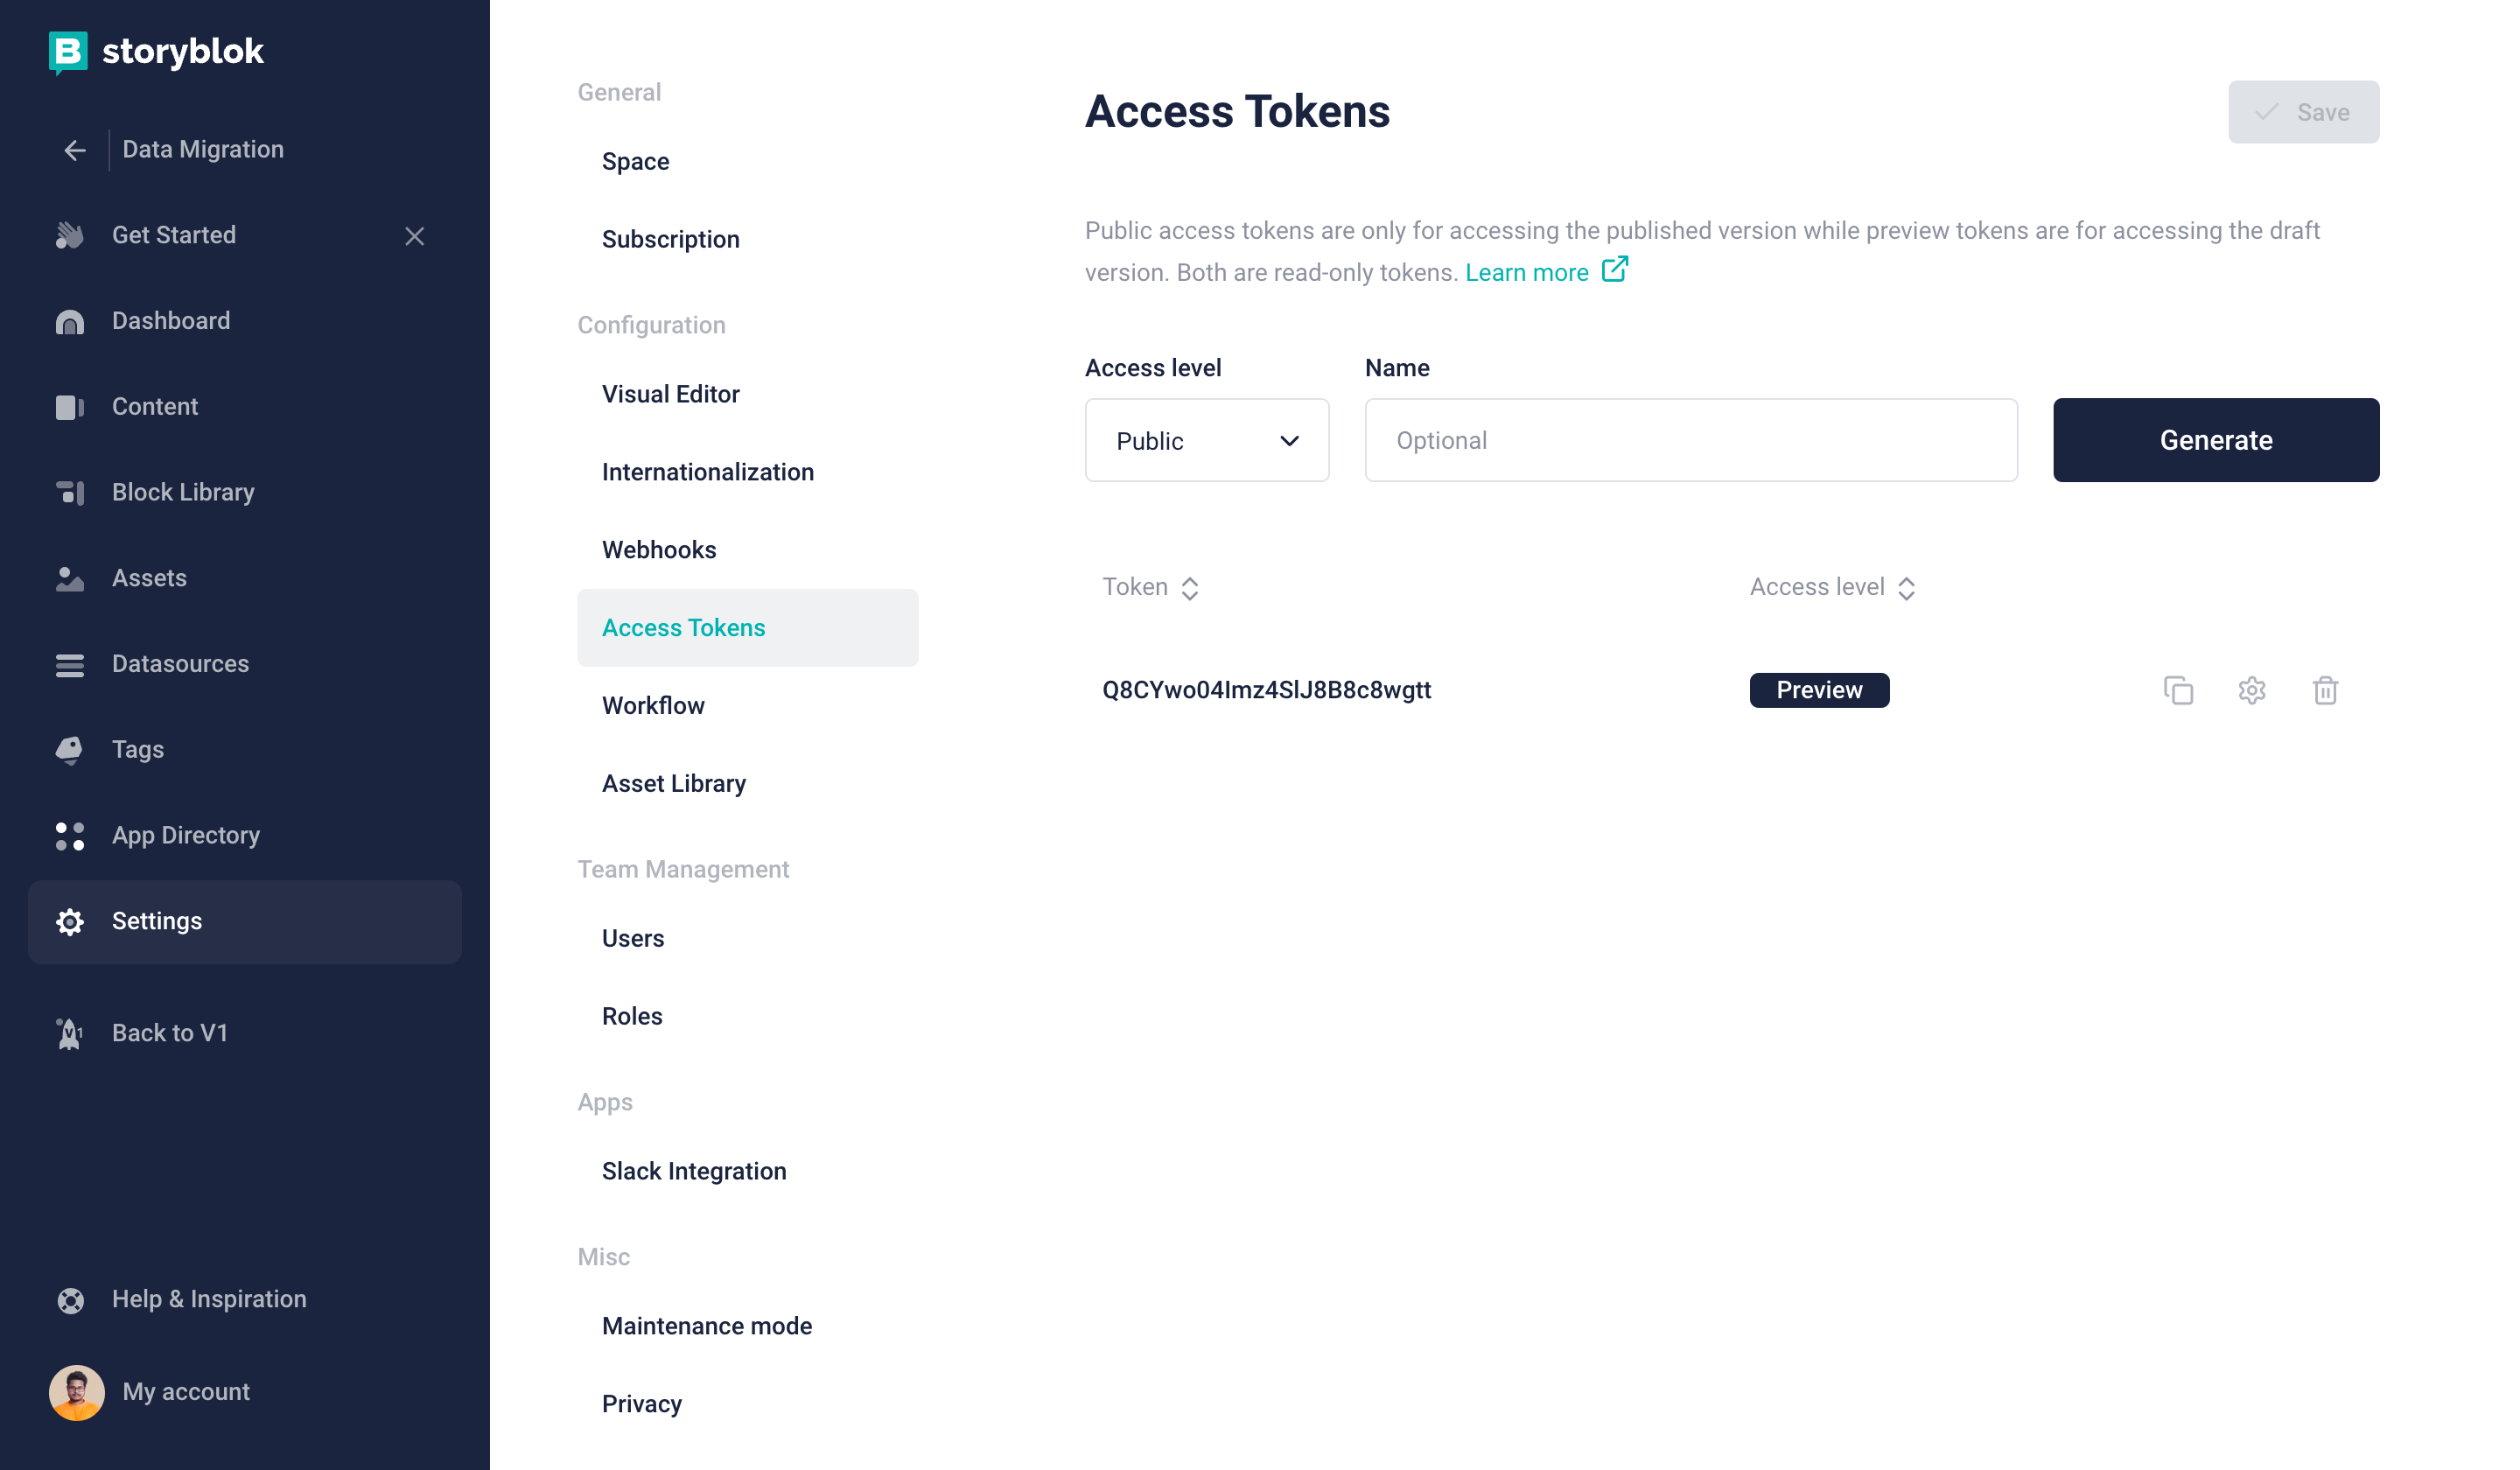
Storyblok preview access token
You can get all the folder IDs from the URL when you navigate the folder. For example, you can check the below image.
Get Storyblok folder ID
Write our migration scripts
For the coding part, I will use Next.js for this tutorial, but the code will not be Next.js specific. You can use the same code in any other framework or in plain old Node.js.
You can find the complete source code here.
Let’s first write a few helper functions that we will use throughout our project.
let spaceID = process.env.STORYBLOK_SPACE_ID
let mapiKey = process.env.STORYBLOK_MAPI_KEY
async function addToStoryblok(data) {
  try {
    await fetch(`https://mapi.storyblok.com/v1/spaces/${spaceID}/stories/`, {
      method: 'POST',
      headers: {
        'Content-Type': 'application/json',
        Authorization: mapiKey,
      },
      body: JSON.stringify(data),
    })
  } catch (error) {
    console.log(error.message)
  }
}
export { addToStoryblok }
The above function takes a story object and adds it to our space. You can look into our Management API docs on how you can create a story.
const delay = (ms) => new Promise((res) => setTimeout(res, ms))
export { delay }
Storyblok Management API has rate limits. When uploading content we have to make sure we don't cross that limit. We are going to use the above function to delay our requests.
import FormData from 'form-data'
let spaceID = process.env.STORYBLOK_SPACE_ID
let mapiKey = process.env.STORYBLOK_MAPI_KEY
async function UploadFileToStoryblok(fileUrl) {
  if (!fileUrl) {
    return
  }
  let splitFile = fileUrl?.split('/')
  let fileName = splitFile[splitFile.length - 1]
  try {
    let response = await fetch(
      `https://mapi.storyblok.com/v1/spaces/${spaceID}/assets/`,
      {
        method: 'POST',
        headers: {
          'Content-Type': 'application/json',
          Authorization: mapiKey,
        },
        body: JSON.stringify({
          filename: fileName,
          size: '400x500',
        }),
      }
    )
    let data = await response.json()
    let fetchImage = await fetch(fileUrl)
    let imgBuffer = Buffer.from(await fetchImage.arrayBuffer())
    await fileUpload(data, imgBuffer)
    let filename = `https://a.storyblok.com/${data.fields.key}`
    return {
      filename,
      id: data.id,
      alt: '',
      name: '',
      focus: '',
      title: '',
      source: '',
      copyright: '',
      fieldtype: 'asset',
      meta_data: {},
      is_external_url: false,
    }
  } catch (error) {
    console.log(error.message)
  }
}
async function fileUpload(signed_request, file) {
  const form = new FormData()
  for (let key in signed_request.fields) {
    form.append(key, signed_request.fields[key])
  }
  form.append('file', file)
  form.submit(signed_request.post_url, function (err, res) {
    if (err) throw err
  })
}
export { UploadFileToStoryblok }
Based on our current data we know we have images that need to be uploaded to our space. The above function will help us do that. It takes an image URL and then uploads it. You can read our Management API docs on how to upload an asset here.
With the following three helper functions we can start uploading our data to Storyblok. Let’s start with uploading the tags.
import { addToStoryblok } from '@/lib/addToStoryblok'
import { delay } from '@/lib/delay'
export default async function handler(req, res) {
  let response = await fetch(
    'https://raw.githubusercontent.com/dipankarmaikap/fake-json-data/main/tags.json'
  )
  let tags = await response.json()
  for (let tag of tags) {
    await addToStoryblok({
      publish: '1', //you can add false value if you want this to be draft
      story: {
        name: tag.name,
        slug: tag.slug,
        parent_id: 328808329, // This will be your tags Folder id
        content: {
          id: tag.id,
          name: tag.name,
          component: 'tag',
          description: tag.description,
        },
      },
    })
    await delay(500)
  }
  res.status(200).json({ message: 'Success!' })
}
In the above function, we are fetching the JSON data from our GitHub repo and then looping through it and passing the data in addToStoryblok helper function.
Our object contains two properties:
publish: You can set it to1if you want that story to be published right away. Alternatively, you can leave out this property or passfalseif you want your story to be in draft mode.story: This is an object with multiple properties:name: This is what you will see from the Storyblok dashboard.slug: This will be your story’s slug. It needs to be unique.parent_id: It's optional but in our case, we want to put all of our tags in a folder. Therefore, we have to provide the folder ID.content: Here we have all the properties we will see in our Visual Editor. One important property here is thecomponent. We have to give the exact Technical Name used when creating the Block.
Once we run the above function, or, in the case of Next.js, navigate to http://localhost:3000/api/upload-tags, after a few seconds we will see the success message. Now let’s check in Storyblok how it looks.
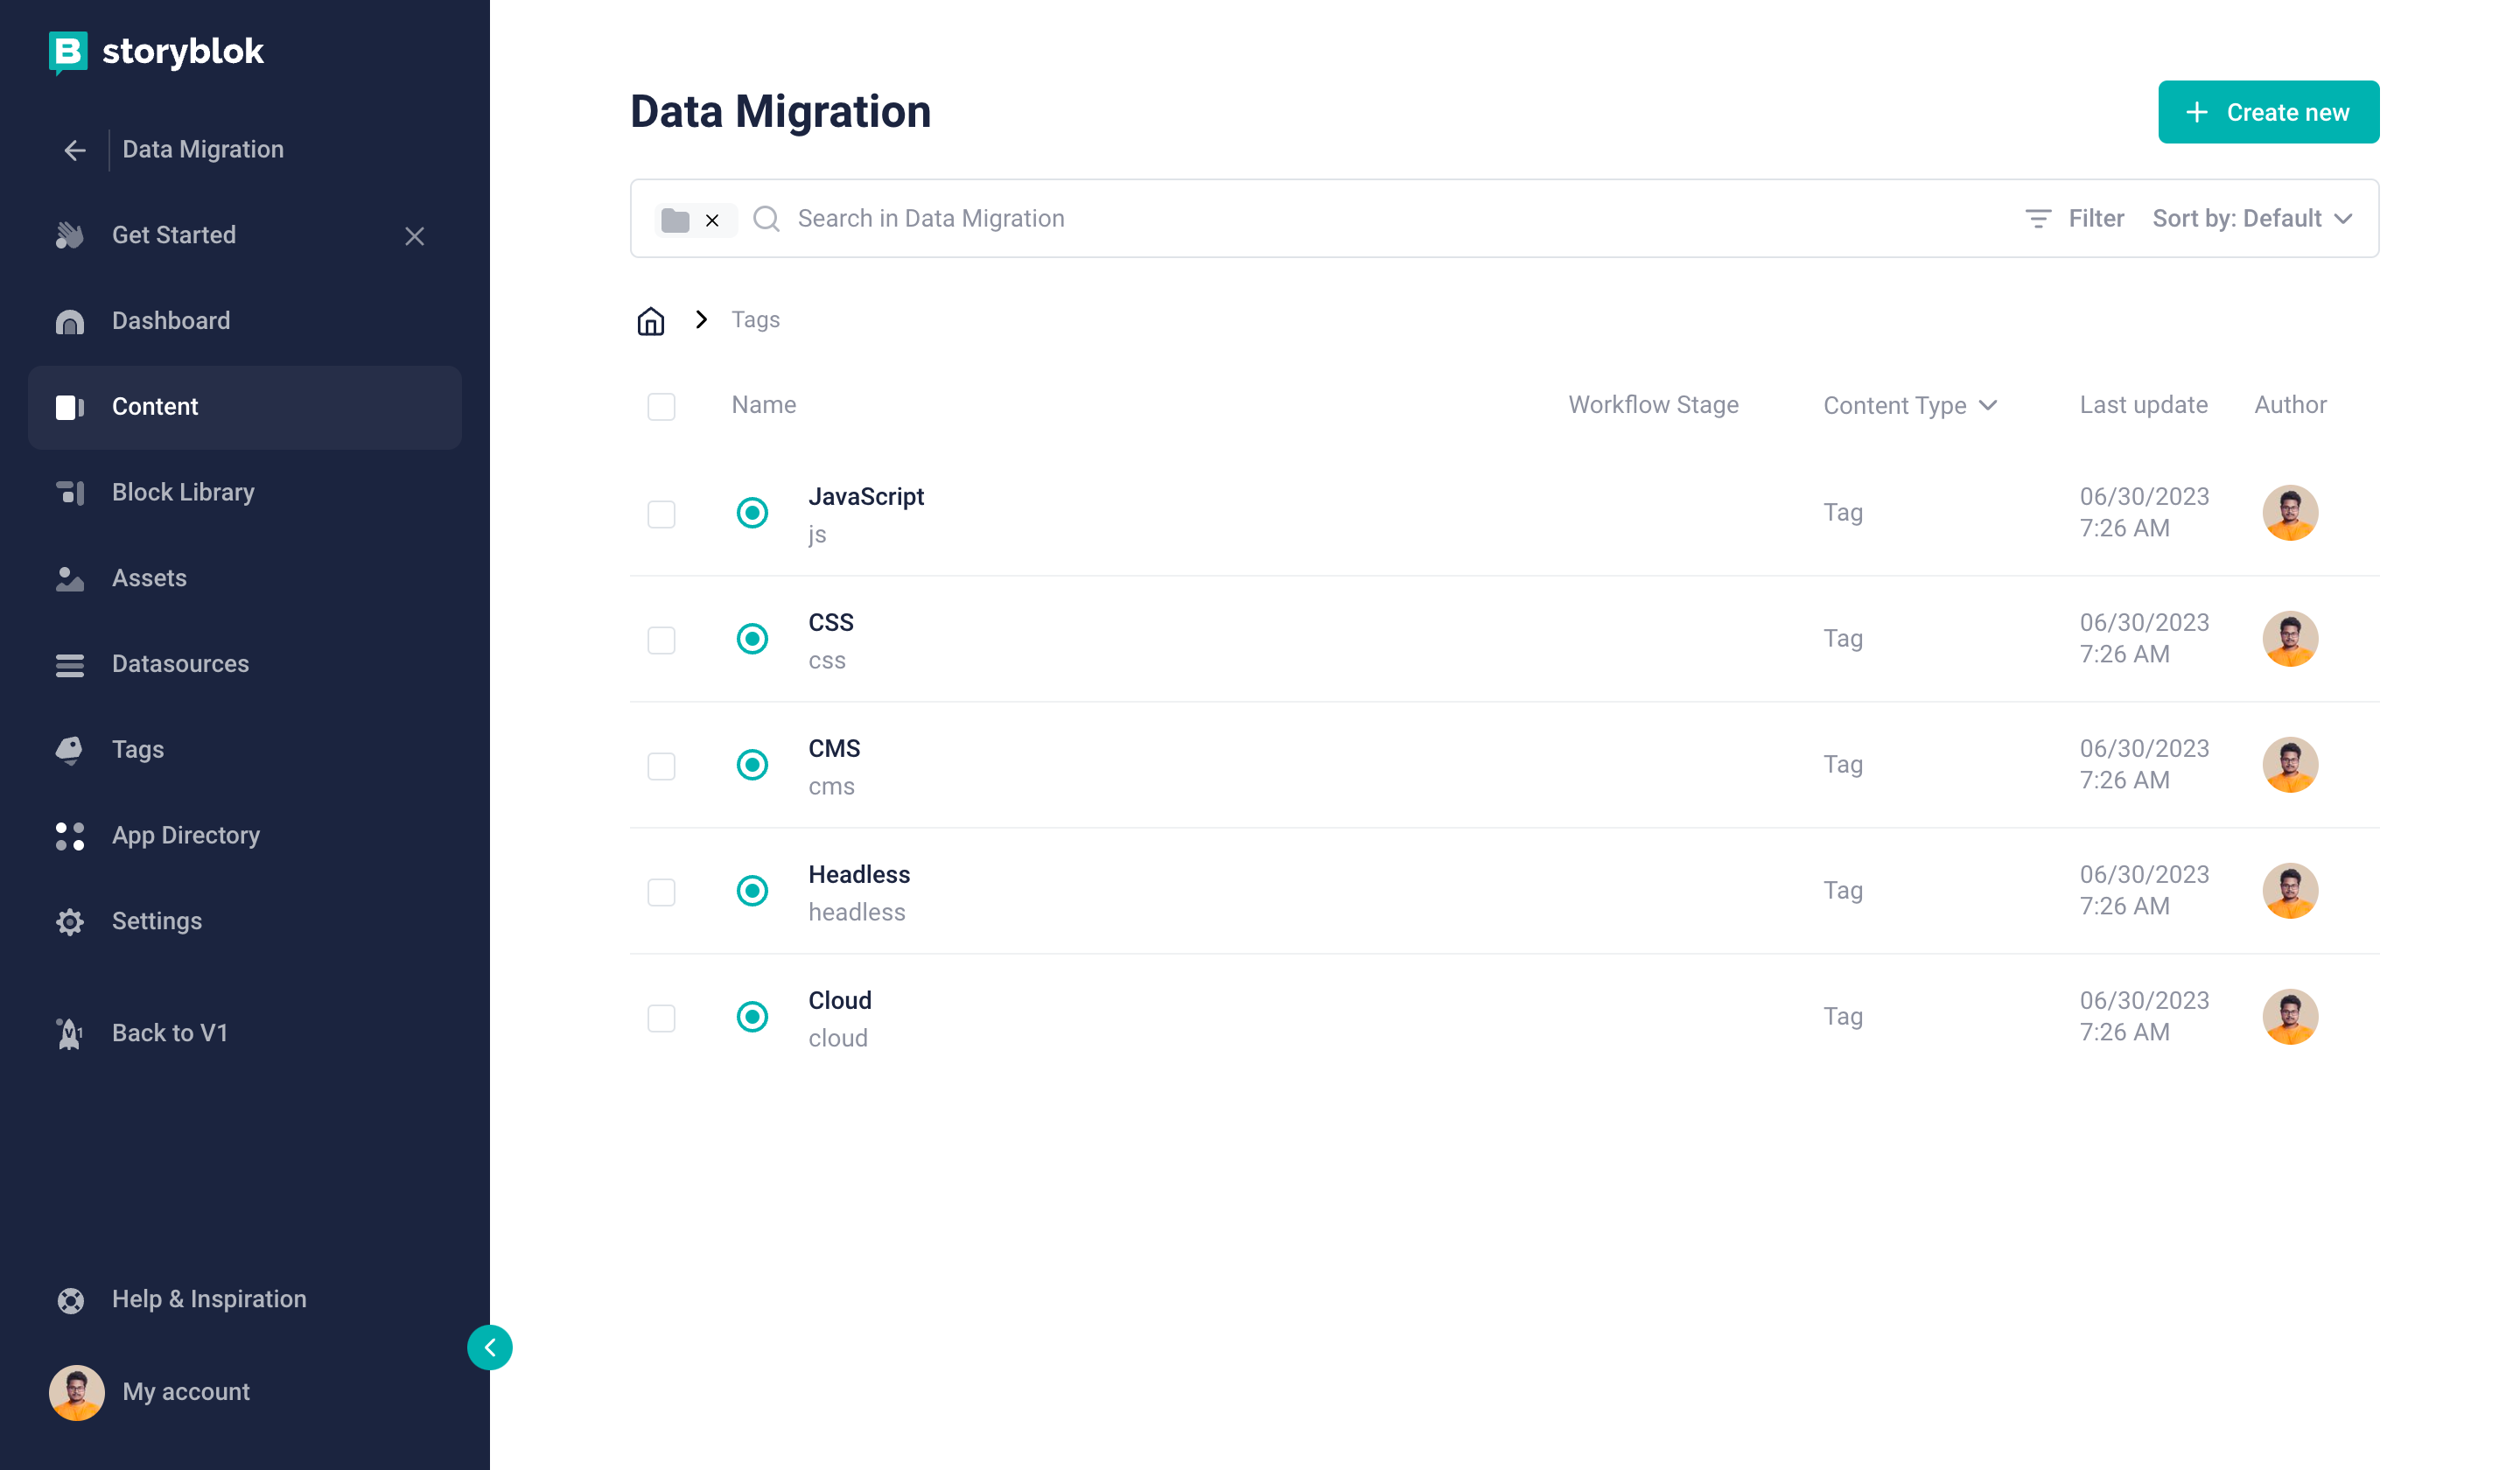
Tags folder after all tags have been migrated
Single tag story example
Perfect. We have successfully uploaded all the tags. Now, let's do the same for our categories. This will be pretty similar to the tags as they have an identical schema.
import { addToStoryblok } from '@/lib/addToStoryblok'
import { delay } from '@/lib/delay'
export default async function handler(req, res) {
  let response = await fetch(
    'https://raw.githubusercontent.com/dipankarmaikap/fake-json-data/main/categories.json'
  )
  let categories = await response.json()
  for (let category of categories) {
    await addToStoryblok({
      publish: '1', //you can add false value if you want this to be draft
      story: {
        name: category.name,
        slug: category.slug,
        parent_id: 328829827, //This will be your Category Folder id
        content: {
          id: category.id,
          name: category.name,
          component: 'category',
          description: category.description,
        },
      },
    })
    await delay(500)
  }
  res.status(200).json({ message: 'Success!' })
}
Once we run the above function it will migrate all the categories in our Storyblok space. Also, don't forget to change the folder Id to match your Storyblok space.
Next on our list is the author's data. This one is a bit different than the above two. However, let’s see the code first then we can break it down.
import { addToStoryblok } from '@/lib/addToStoryblok'
import { UploadFileToStoryblok } from '@/lib/assetUpload'
import { delay } from '@/lib/delay'
export default async function handler(req, res) {
  let response = await fetch(
    'https://raw.githubusercontent.com/dipankarmaikap/fake-json-data/main/authors.json'
  )
  let authors = await response.json()
  for (let author of authors) {
    let storyblokImgObj = await UploadFileToStoryblok(author.avatar_url)
    await addToStoryblok({
      publish: '1', //you can add false value if you want this to be draft
      story: {
        name: author.name,
        slug: author.slug,
        parent_id: 328835062, //This will be your Authors Folder id
        content: {
          id: author.id,
          name: author.name,
          component: 'author',
          description: author.description,
          avatar: {
            ...storyblokImgObj,
            alt: author.name,
          },
          links: author.links.map((link) => {
            return {
              ...link,
              component: 'link',
            }
          }),
        },
      },
    })
    await delay(500)
  }
  res.status(200).json({ message: 'Success!' })
}
For our authors, we have two different properties compared to tags and categories.
avatar: Here, we are going to use ourUploadFileToStoryblokhelper function and use that information.links: This is going to be an array, just like in the original data. However, we also have to specify thecomponentfield. We have named itlinkbecause, as you may remember, this is the Technical name we used while creating this Nestable block earlier.
After having run the function, let's take a look at what the Author data looks like in Storyblok.
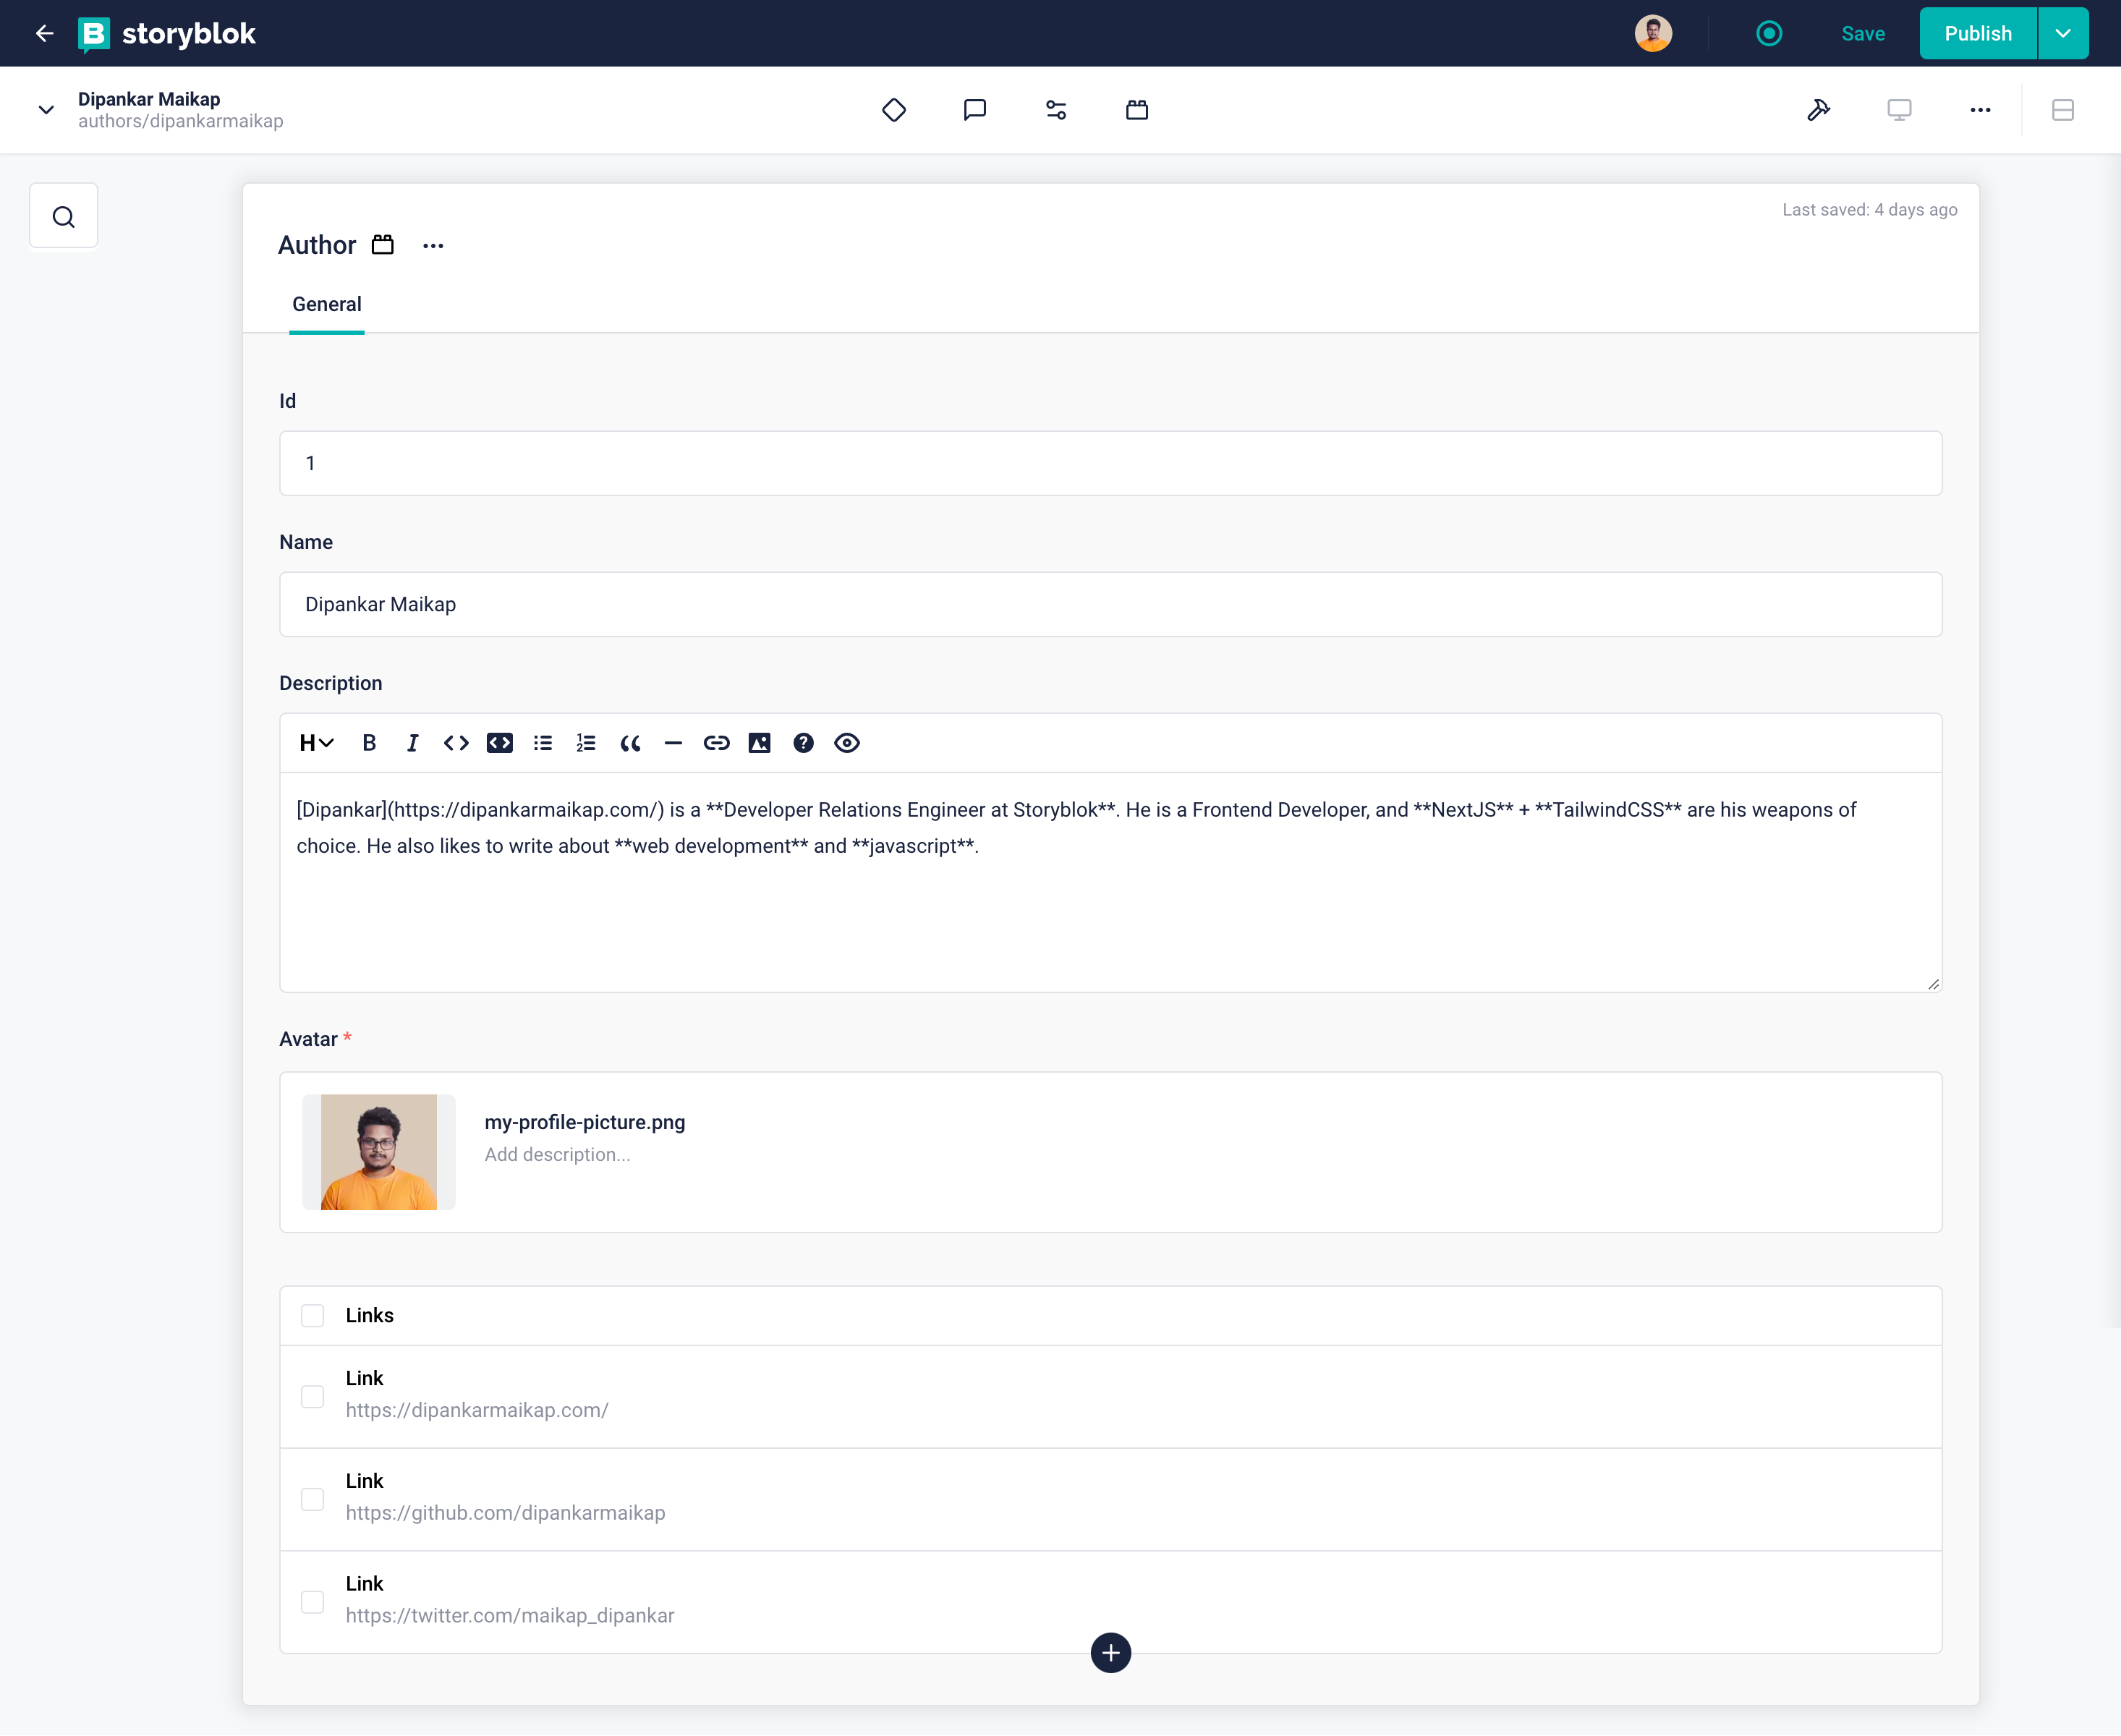
Author Story in Storyblok
In the above image, we can see what our author entry looks like. We have all the data present in their respective fields. We can also see the individual Link entry as well. In the future, if we need to add more links, we can easily do that without any modifications.
In order to confirm we have uploaded the images in Storyblok, we can check the Assets section.
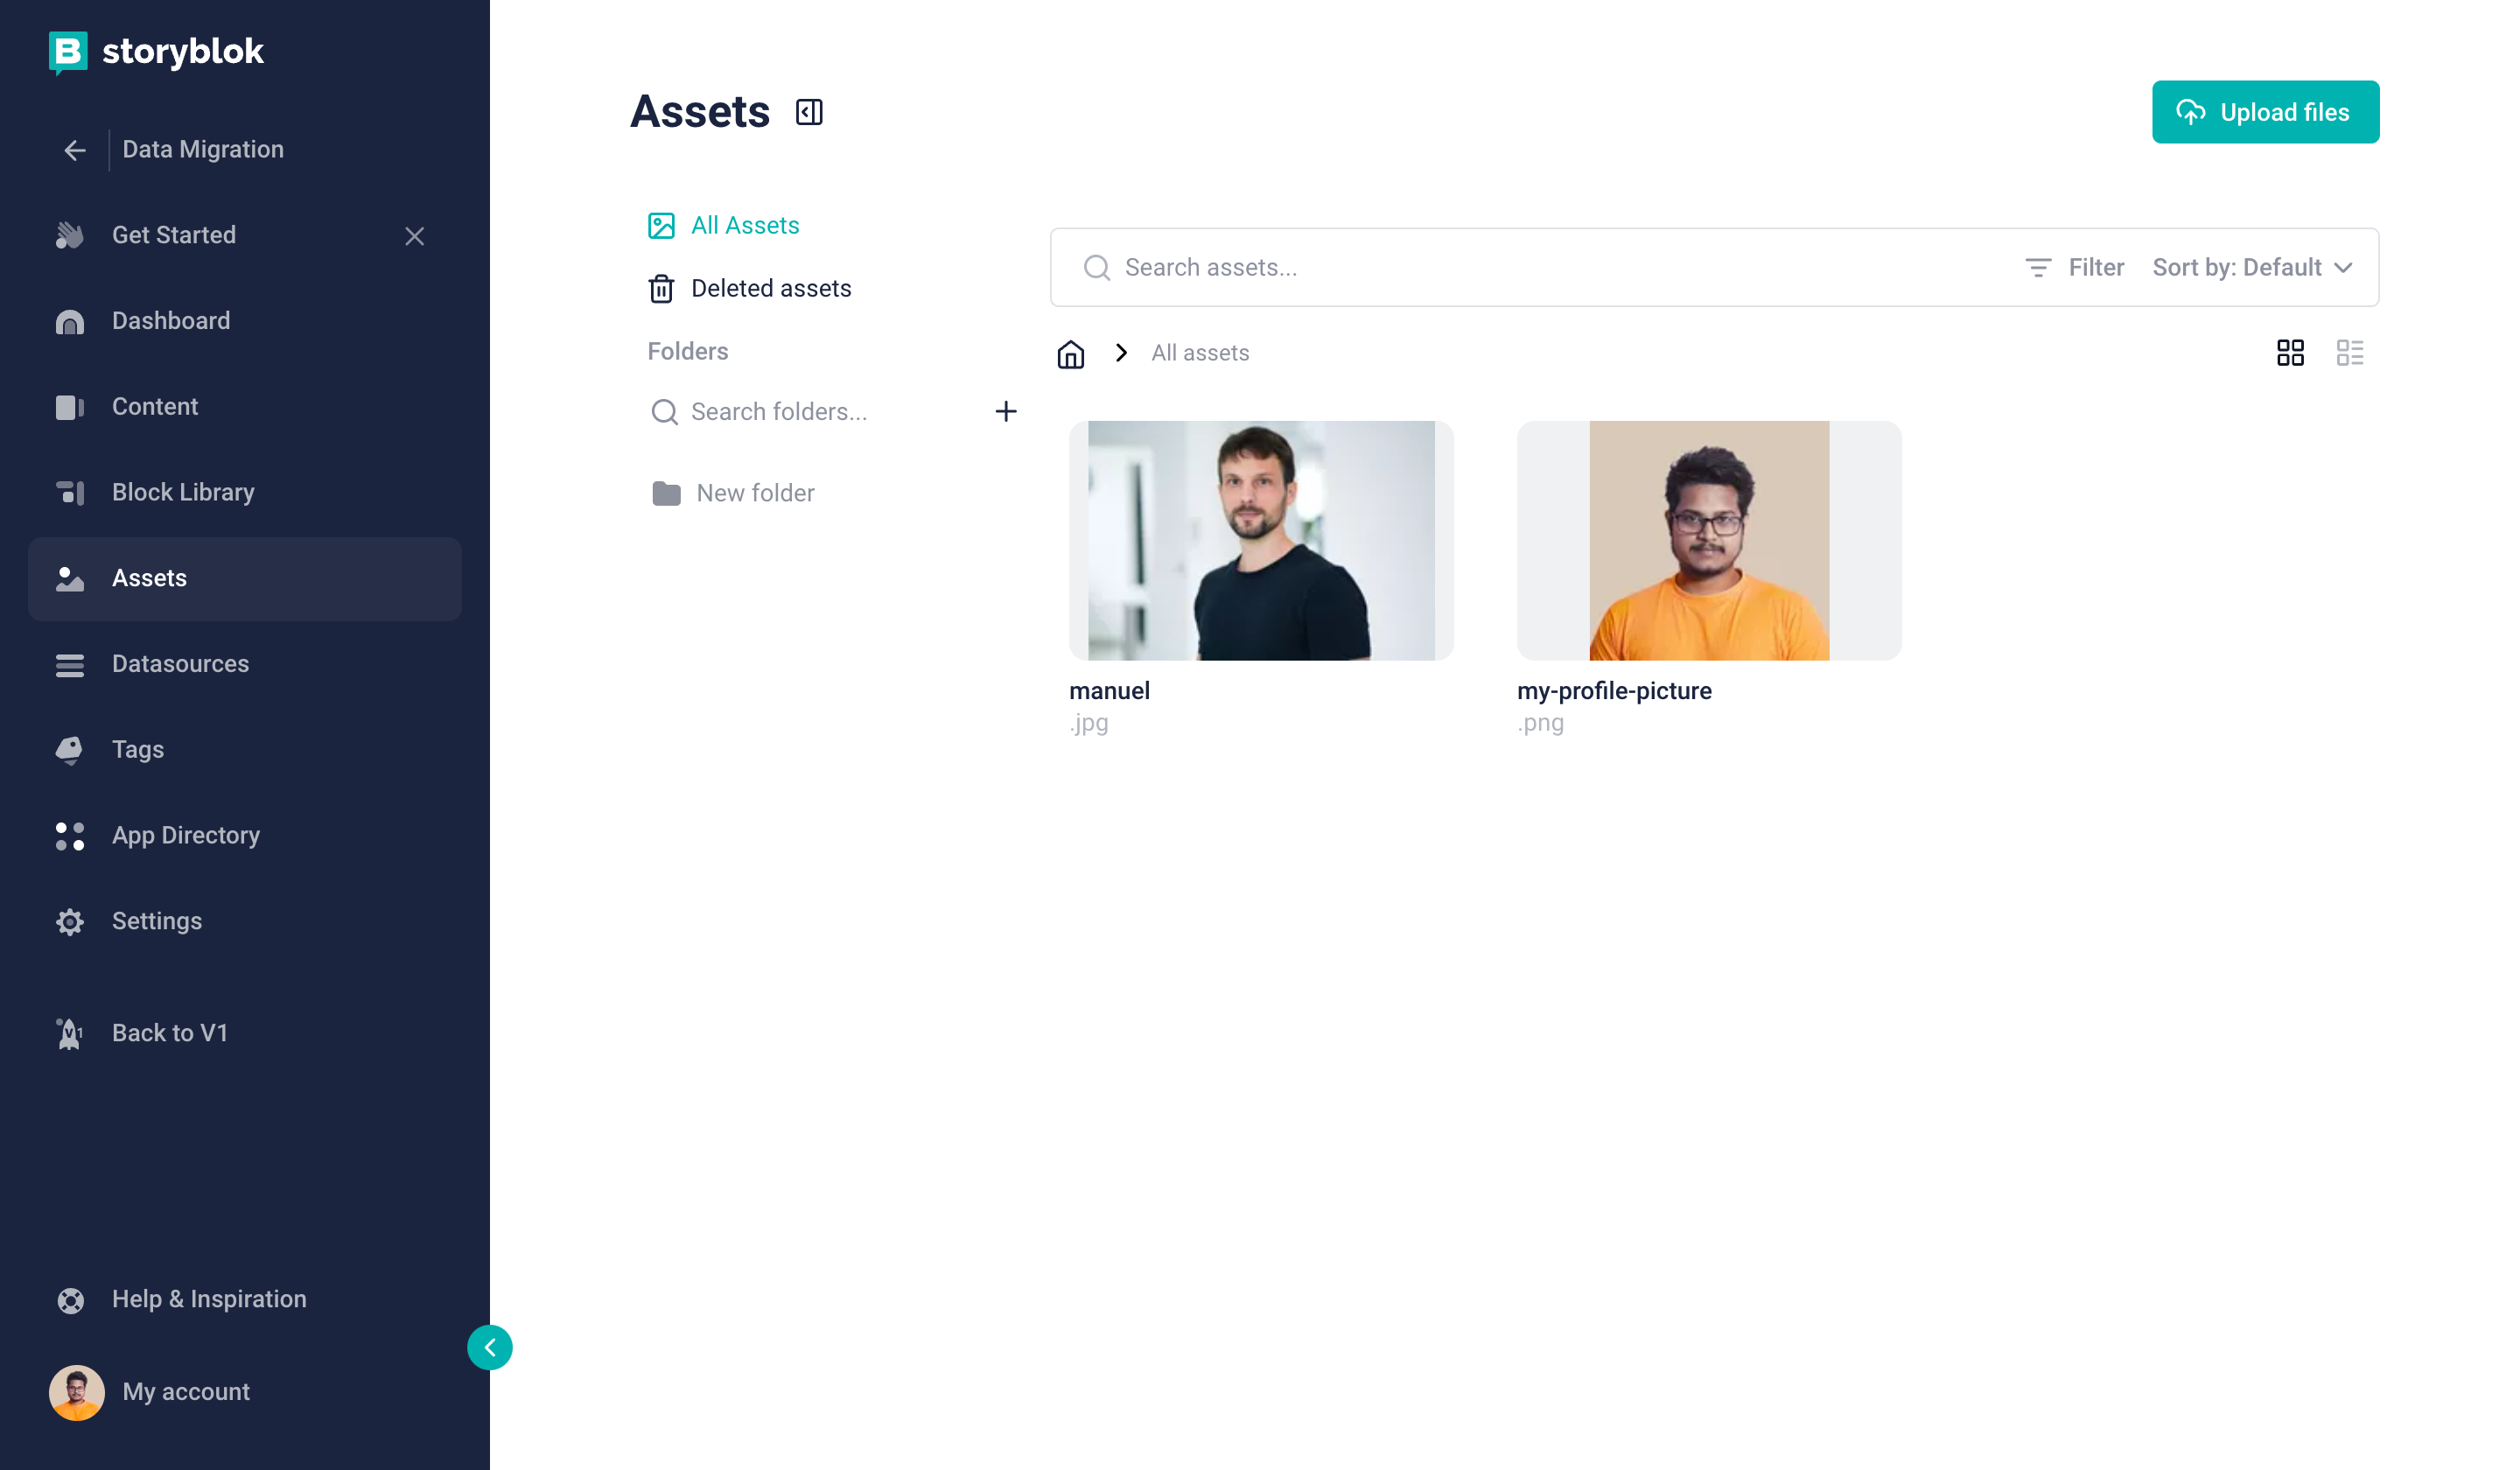
Storyblok assets tab
Finally, we have the content of the post that needs to be uploaded. This is going to be a bit more complex. First, let's create a few more helper functions that will come in handy.
import TurndownService from 'turndown'
import pkg from 'storyblok-markdown-richtext'
const { markdownToRichtext } = pkg
const turndownService = new TurndownService()
export default function convertHtmlToJson(html) {
  if (!html) return
  return markdownToRichtext(turndownService.turndown(html))
}
If we look at our post data, we can see we have two properties excerpt and content containing HTML data. In the Storyblok RichText editor, we can not add the raw HTML as it is, so we will use the above helper function to convert our HTML data to the format that the Storyblok RichText editor expects.
Here is what the above function does:
- First, HTML is converted to Markdown using the turndown package.
- Next, storyblok-markdown-richtext provided by Storyblok is used to convert the Markdown data to the desired format.
Next, if we further analyze the post content structure, you will see we have author, tags and categories that are only referenced via their IDs. However, in Storyblok, creating a story automatically creates an id and uuid.
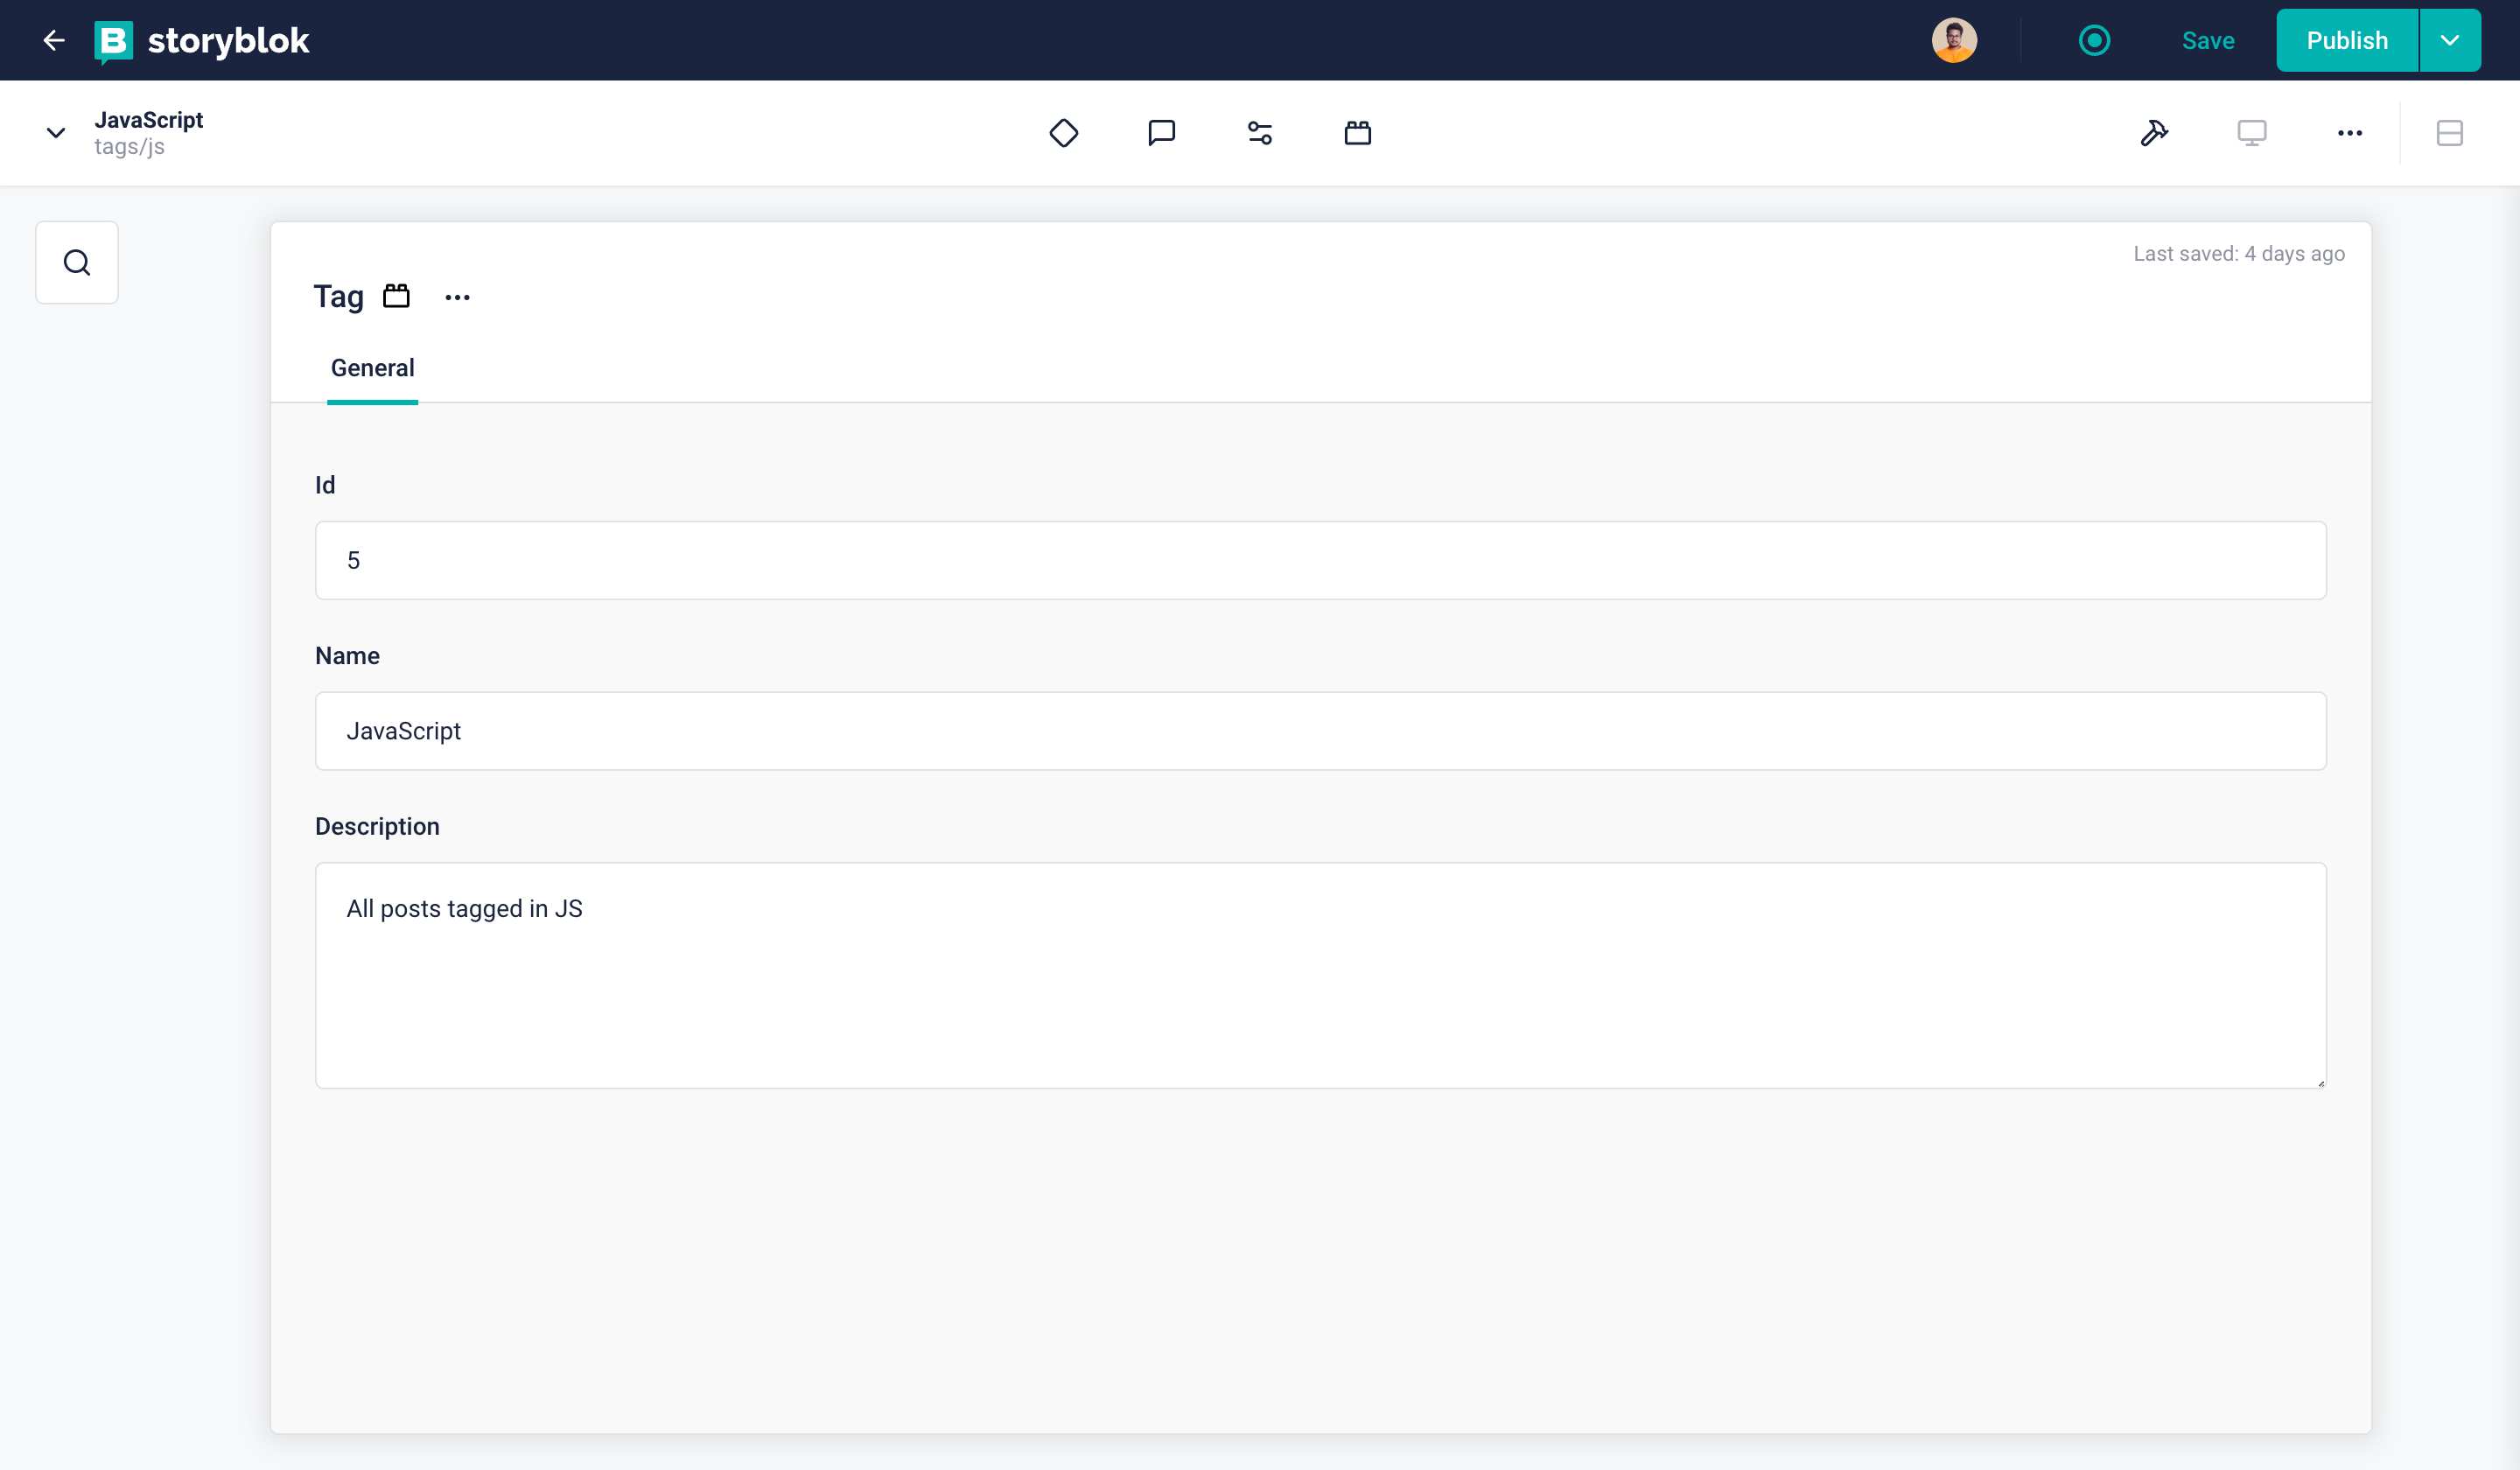
Here is an example of tag data after it’s been migrated to Storyblok:
{
  story: {
    name: 'JavaScript',
    created_at: '2023-06-30T12:56:22.152Z',
    published_at: '2023-06-30T12:56:22.253Z',
    id: 334488453,
    uuid: '8259b011-144f-443b-8018-773964cbd106',
    content: {
      id: 5,
      _uid: '2b64bb53-3ca7-4f4c-bf50-5383272f3179',
      name: 'JavaScript',
      component: 'tag',
      description: 'All posts tagged in JS',
      _editable:
        '<!--#storyblok#{"name": "Tag", "space": "237450", "uid": "2b64bb53-3ca7-4f4c-bf50-5383272f3179", "id": "334488453"}-->',
    },
    ...
  },
  ...
}
Therefore, in order to reference these, we have to find their uuids based on their old id which we can see in the content section.
Basically, if we take the above data as an example, we have to write a function that can take the old id (here it’s 5) and return the uuid (in this case it will be 8259b011-144f-443b-8018-773964cbd106).
export default async function getNewStoryIDFromOldID({ startsWith, id }) {
  let readAcessKey = process.env.STORYBLOK_PREVIEW_ACESS_KEY
  let url = `https://api.storyblok.com/v2/cdn/stories?token=${readAcessKey}&filter_query\[id\][in]=${id}&starts_with=${startsWith}/`
  let res = await fetch(url)
  let data = await res.json()
  let StoryID = data?.stories[0]?.uuid
  return StoryID
}
In the above function, we are going to use Storyblok’s Content Delivery API. This function takes two parameters:
id: the ID of the old story referencestartsWith: here we have to mention in which folder to look for an ID
Let's take a look at an example;
let uuid = await getNewStoryIDFromOldID({
  id: 5,
  startsWith: 'tags',
})
console.log(uuid)
//8259b011-144f-443b-8018-773964cbd106
Now that we have the two helper functions, let’s write our final script for uploading all the posts.
import { addToStoryblok } from '@/lib/addToStoryblok'
import { UploadFileToStoryblok } from '@/lib/assetUpload'
import convertHtmlToJson from '@/lib/convertHtmlToJson'
import { delay } from '@/lib/delay'
import getNewStoryIDFromOldID from '@/lib/getNewStoryIDFromOldID'
export default async function handler(req, res) {
  let response = await fetch(
    'https://raw.githubusercontent.com/dipankarmaikap/fake-json-data/main/posts.json'
  )
  let posts = await response.json()
  for (let post of posts) {
    let author = post.author
    let categories = post.categories
    let tags = post.tags
    let newAuthor = await getNewStoryIDFromOldID({
      id: author,
      startsWith: 'authors',
    })
    const newTags = await Promise.all(
      tags.map(async (id) => {
        return await getNewStoryIDFromOldID({
          id,
          startsWith: 'tags',
        })
      })
    )
    const newCategories = await Promise.all(
      categories.map(async (id) => {
        return await getNewStoryIDFromOldID({
          id,
          startsWith: 'categories',
        })
      })
    )
    let storyblokImgObj = await UploadFileToStoryblok(post.featuredimage.url)
    await addToStoryblok({
      publish: post.status === 'publish' ? '1' : false, //you can add false value if you want this to be draft
      story: {
        name: post.title,
        slug: post.slug,
        parent_id: 328861618, //Your Posts Folder id
        content: {
          title: post.title,
          component: 'post',
          excerpt: convertHtmlToJson(post.excerpt),
          content: convertHtmlToJson(post.content),
          author: newAuthor,
          tags: newTags,
          categories: newCategories,
          featuredimage: {
            ...storyblokImgObj,
            alt: post.featuredimage.alttext,
          },
        },
      },
    })
    await delay(500)
  }
  res.status(200).json({
    message: 'Success!',
  })
}
Once the above script has run successfully we can take a look at one of the updated posts in Storyblok.
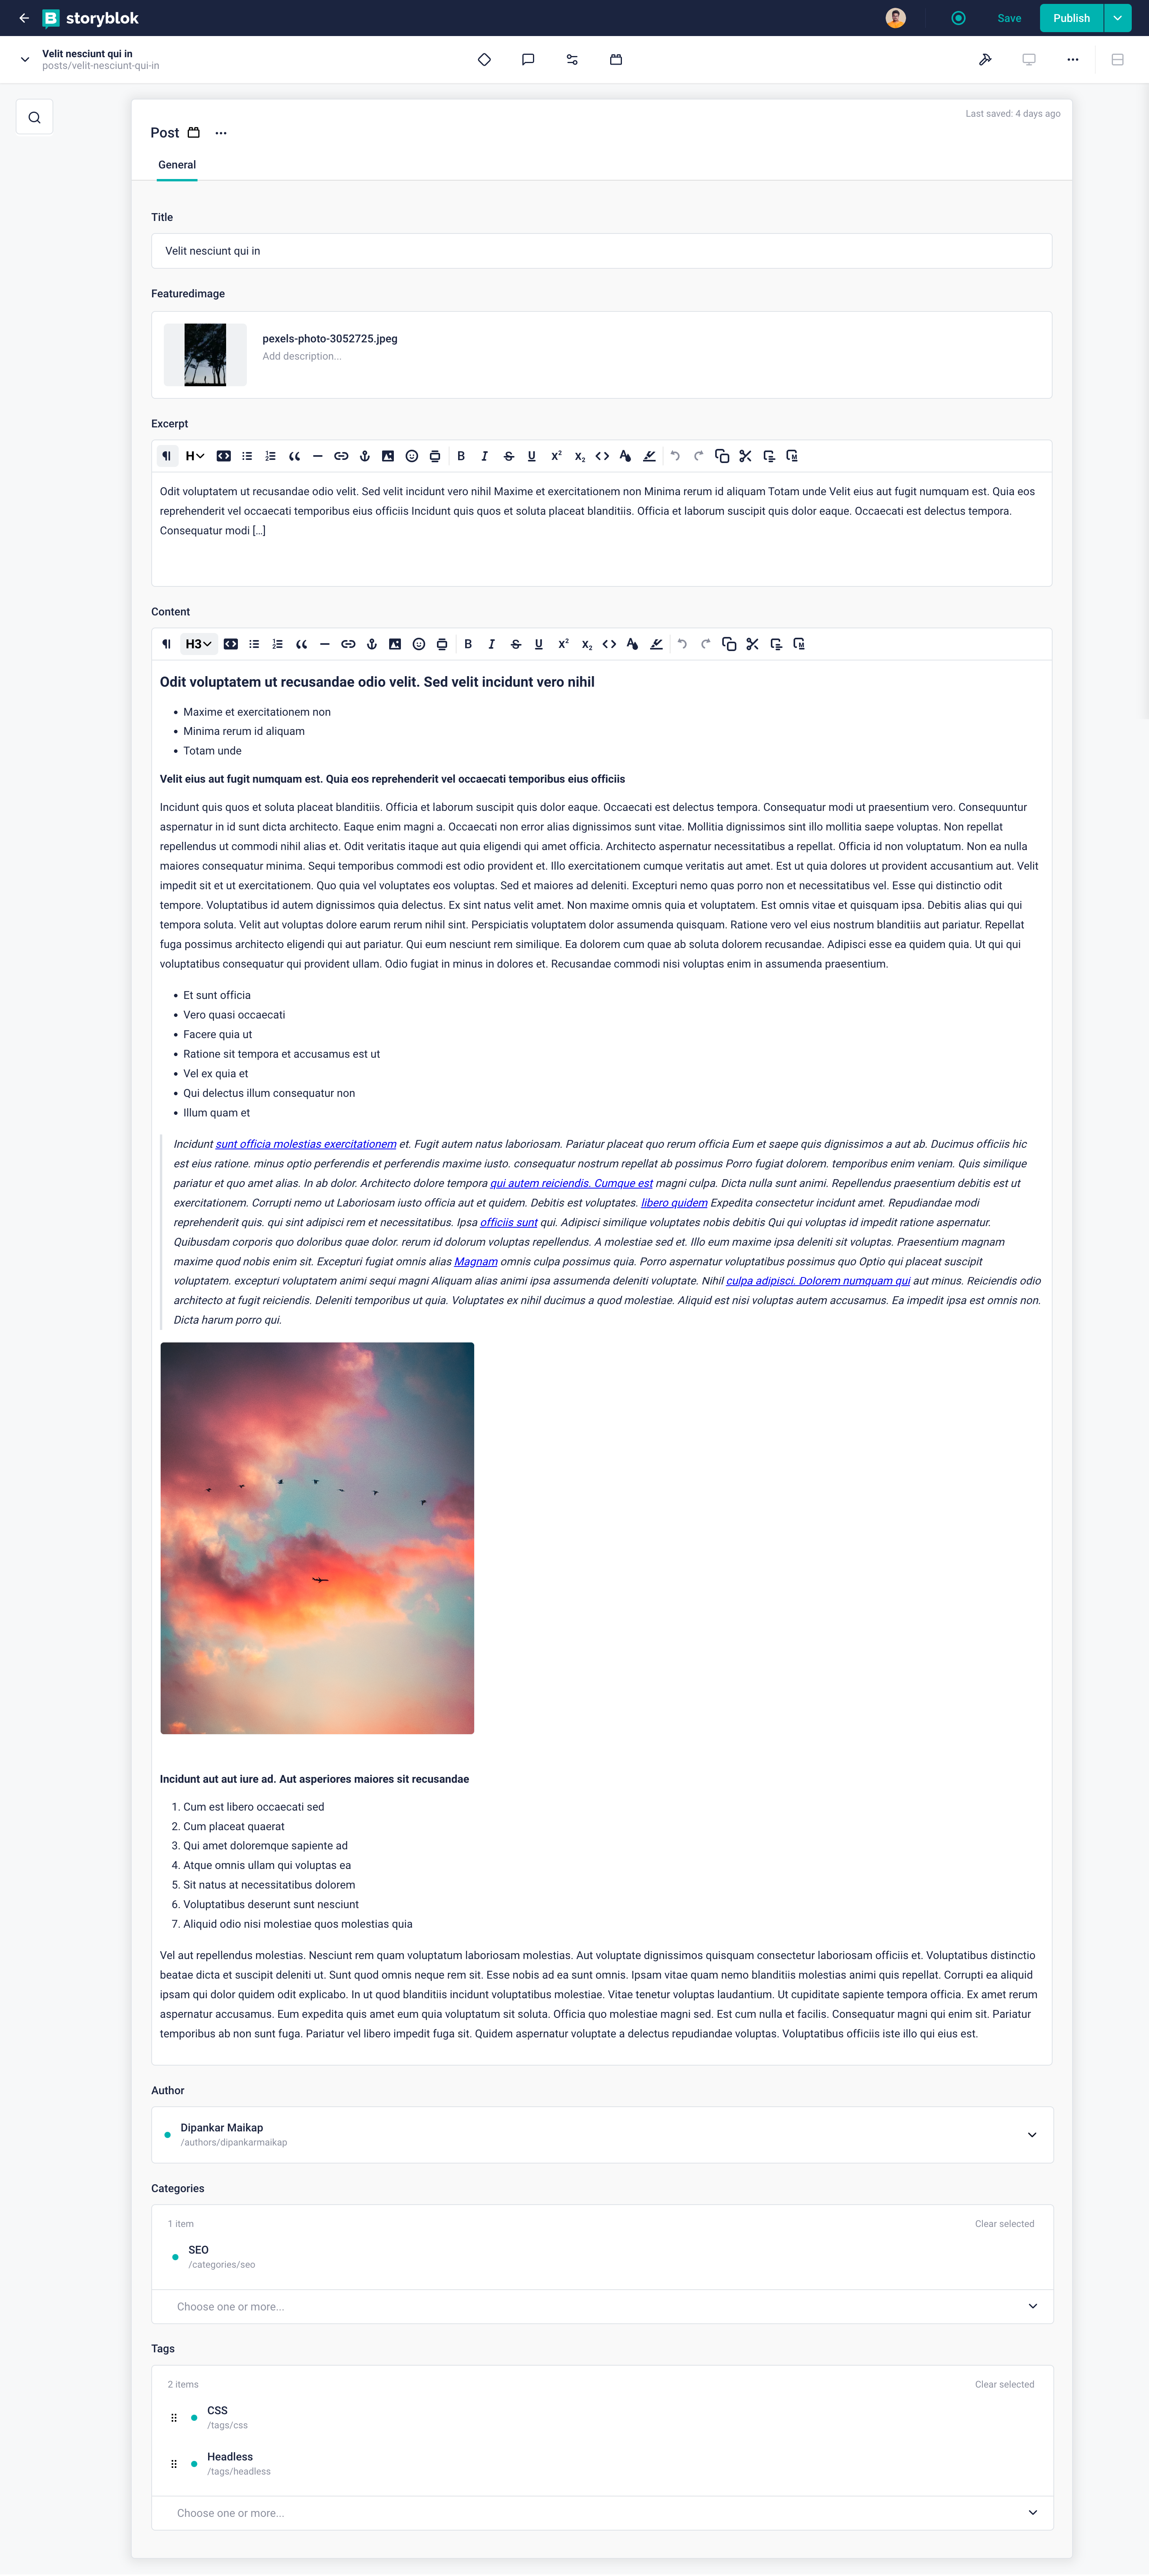
Single post entry after uploaded in Storyblok
All the data is connected perfectly in the Storyblok Visual Editor. Now we can go and delete the id fields from the Tag, Category and Author Content Type model. We no longer need them as we have successfully migrated all the data.
More Advanced Scenarios
In our post’s HTML, we also have images and links that are still pointing to the old data. In many cases, you probably want that and in those scenarios this is fine. However, what if you want to upload all the internal images to Storyblok and use those links instead of image URLs from your old CMS? Alternatively, what if you want to modify all the internal links from the old CMS? There could be many scenarios and it will be impossible to cover all these cases in one tutorial, but the following code provides a great starting point that can be modified to match your use case.
import * as cheerio from 'cheerio'
let exampleHtml = `
<p>This is a paragraph</p>
<img src="https://images.pexels.com/photos/1741206/pexels-photo-1741206.jpeg" alt="Beautiful Cat" />
<a href="https://dipankarmaikap.com/">My Website</a>
<img src="https://images.pexels.com/photos/3361739/pexels-photo-3361739.jpeg" alt="Cute puppy" />
`
export default async function handler(req, res) {
  let newHtml = await modifyHtmlImages(exampleHtml)
  res.status(200).json({ message: 'Success!', exampleHtml, newHtml })
}
async function modifyHtmlImages(html) {
  let $ = cheerio.load(html, null, false)
  let $images = $('img')
  $images.each((i, e) => {
    let attribs = e.attribs
    let imageUrl = attribs.src
    // We can now upload this image to Storyblok
    // let {filename} = await UploadFileToStoryblok(imageUrl)
    //Once we have the url we can replace the src like below
    //$(e).attr('src', filename)
    $(e).attr('src', 'https://example.com/image.jpg')
  })
  let content = $.html()
  return content
}
Here, we are using an HTML parsing package called cheerio in order to modify all the images from our exampleHtml content. You can apply the same logic to your links and all the different tags.
Conclusion
Throughout this article, we have seen how we can model an existing schema using all different types of data types provided by Storyblok. Afterwards, we explored how the existing content can be migrated to Storyblok. Finally, some more advanced migration scenarios and viable solutions have been considered.
| Name | Link |
|---|---|
| Storyblok Management API | https://www.storyblok.com/docs/api/management |
| Storyblok Content delivery API | https://www.storyblok.com/docs/api/content-delivery/v2 |
| Turndown | https://www.npmjs.com/package/turndown |
| Storyblok Markdown to Richtext converter | https://github.com/storyblok/storyblok-markdown-richtext |
| Cheerio | https://cheerio.js.org/ |
| Example data repo | https://github.com/dipankarmaikap/fake-json-data |
| Project source code | https://github.com/dipankarmaikap/data-migration |
